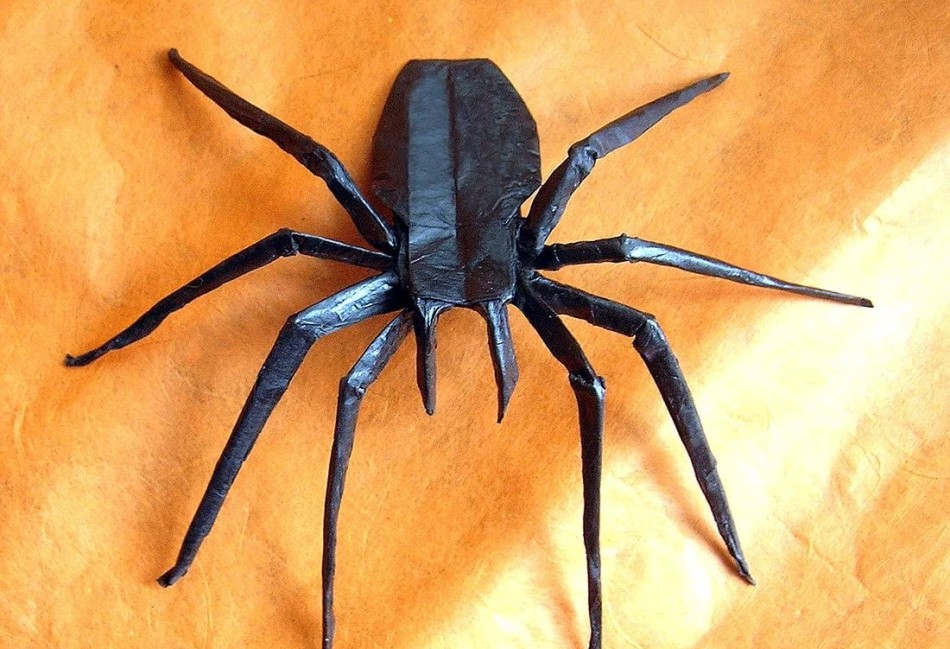
Spider made of plasticine. Master Class. How to make Spider-Man from plasticine.
Of course, all small and large children love to sculpt and draw. In this article we will talk in detail about how to mold Spider-Man from plasticine.
Spiderman mask
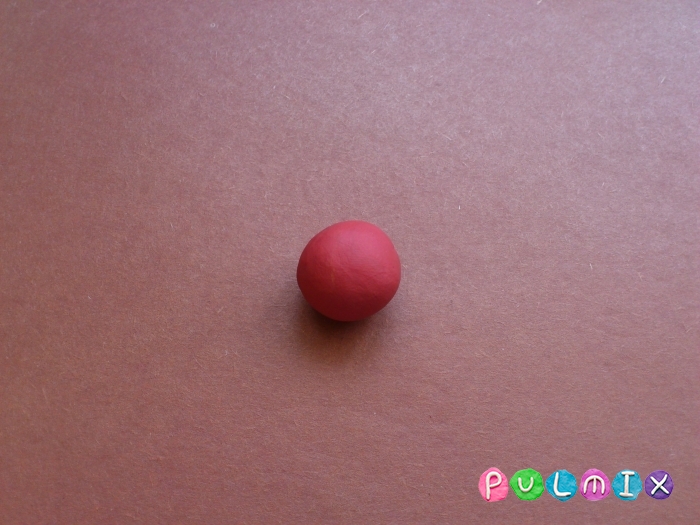
First, we will make the simplest craft, namely the mask of the main character. Before you mold Spider-Man from plasticine, wash your hands and prepare your work area. For modeling, it is better to take a small plastic board. Take red, black and white plasticine, gold glitter and stack.
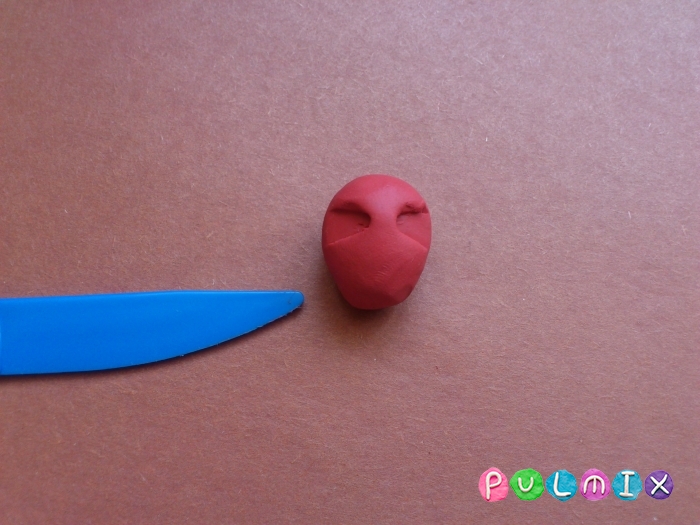
Take red plasticine and make a cake out of it about five to seven millimeters thick. Then, using a knife or a stick, carefully cut out the head of the main character. We cut out the head in the shape of a heart, but you can make it oval. It all depends on your desire. Then smooth the edges so they are sloping. Take black plasticine and roll it into many thin black sausages, which you then set aside.
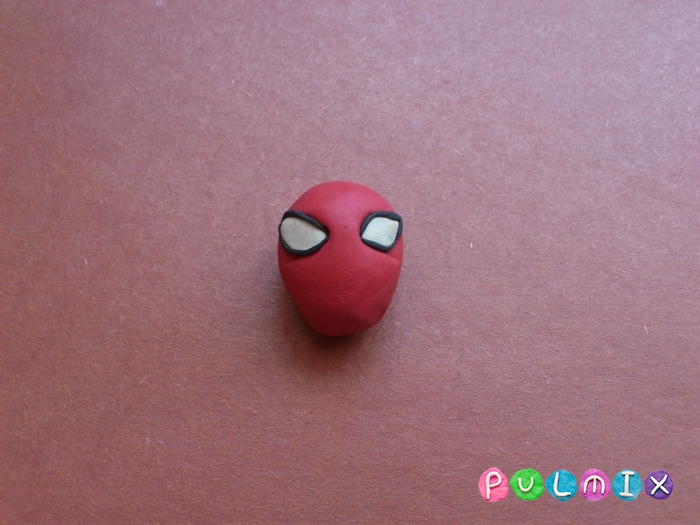
Then, from the same black plasticine, make two small oval-shaped cakes and stick them to the red layer. Then make two similar cakes, but smaller ones, from white plasticine. Stick them to black cakes. The eyes are ready. Then lay out the black sausages in a mesh pattern. Your product is ready.
in stages?
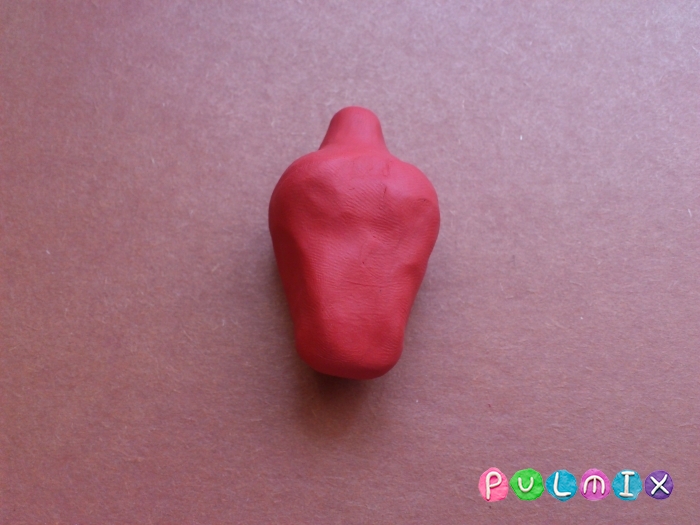
Now let's start creating a more complex model of Spider-Man. By the way, if you want to make yourself such a keychain, you can take baked polymer clay. How to make a Spider-Man from plasticine from one piece? Now you will find out. Take a piece of the red mass and knead it thoroughly in your hands. Then carefully begin to pull out the head, arms and legs from this piece. Remember that the head should be slightly larger in size than the legs and arms. If you are sculpting from plastic, bake the product and then paint it.

If you are sculpting from plasticine, then now you will need to make blue clothes, a black spider and eyes. Roll out the blue plasticine into a thin, thin layer and cut out a jacket and pants that are suitable in size and shape. Stick it all to Spider-Man. Roll a small ball from the black mass and stick figures to your chest. Use thin black sausages to make legs for the spider. Then take white plasticine and roll it into the same thin layer. Cut triangles out of it and stick it to your head. Cover your eyes with a thin black sausage. Spider-Man is ready.
How to make a full-length Spider-Man from plasticine?
But not everyone can sculpt full-length figures! This is primarily due to the fact that such figures require a wire base. Therefore, if you are thinking about how to make a full-length Spider-Man out of plasticine, you will first have to work on creating a strong frame.
First make a wire frame. If you don’t want to spend a lot of material, you can attach small pieces of foil to the frame. Then start carefully covering the frame with red and blue plasticine. Carefully work out the Spider-Man figurine. It will be great if you find an anatomical atlas and study the location of the muscles.

It is also better to make a shield with a frame, for example, from the same wire or plastic. In the same way, cover the shield with red, white and black plasticine. Blind your eyes from the white and black mass. Now you know how to make a full-length Spider-Man from plasticine. It's difficult, but quite doable.
Use your imagination!
If you are thinking about how to make a black Spider-Man from plasticine, then it is created in a similar way. You just need to change the color. Also, keep in mind that black play dough tends to stain more easily than others, and you'll have to wash your hands more often.
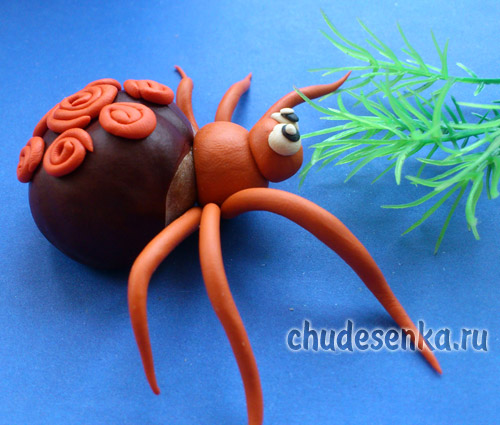
We bet that you will absolutely not be afraid of this spider if it appears on your table? And such a toy will cheer up your children. Of course, it will be so, because you can make a cute insect with your own hands, using not only ordinary plasticine, but also natural material in the form of a chestnut. Indeed, the spider looks very cute, its variegated orange color makes it bright, and its huge eyes stand out against the general background. Plasticine creativity, which involves a combination with other materials, will become a favorite for children. They will definitely dream up another equally wonderful character.
Let's take a closer look at the process of creating a craft from chestnut and plasticine - a spider. And we recommend that you definitely tell all the details of the body structure and life of these insects to your children, so that they stop being afraid of them, and simply sculpt and enjoy the process.
To create a children's craft, take:
One chestnut;
Orange (or any other bright color) plasticine;
White and black plasticine grains.
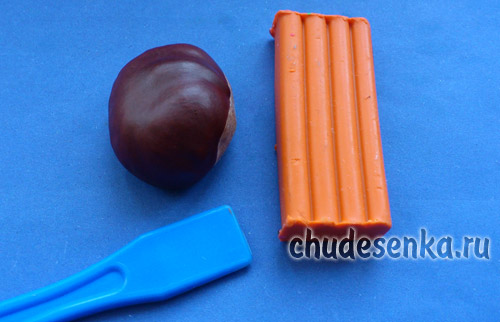
1. The chestnut has a round shape and is perfect for modeling the body of an insect. All other parts of the body will be plasticine; it is better to use a bright mass to sculpt them so that the spider turns out to be cheerful. When all materials for modeling are ready, begin the creative process.
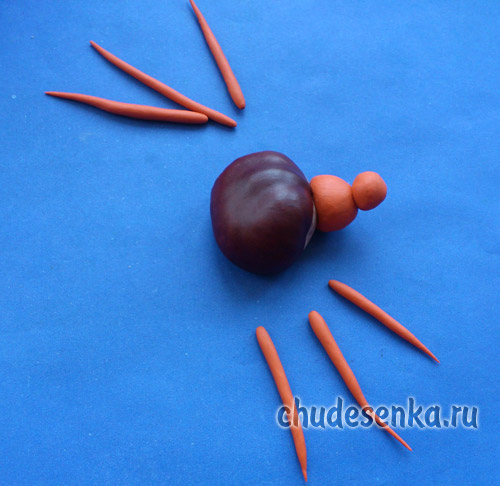
2. The spider must have 6 legs. Pinch off 6 small portions from the orange plasticine and knead them in your hands. Also make blanks for the front of the torso and head. They should also be small. Thus, a little plasticine will be needed to model the craft; the main part will be made of chestnut.
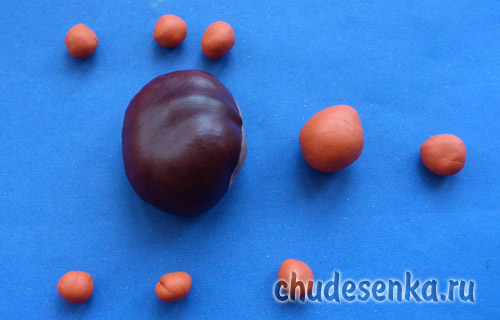
3. Attach two balls to the front of the figure, pressing them together. This will be the spider's head. Pull all 6 balls prepared to create legs into thin threads. Press each ball onto the board with your finger and roll until you get the desired piece.
4. And now you need to make your spider non-scary and even positive. It is enough to attach very large eyes to a small face, add white highlights, and that’s it, the spider turns out to be very cute.
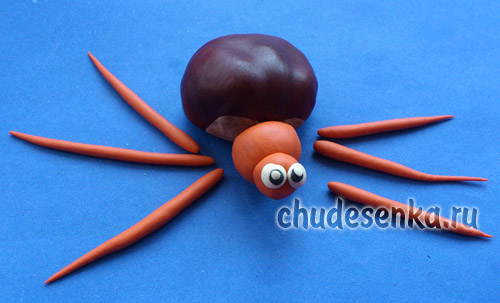
5. Attach the legs to the body, but specifically to the front part, to the orange ball. Make two pairs of legs, each with 3 pieces. Hold them together like a fan.
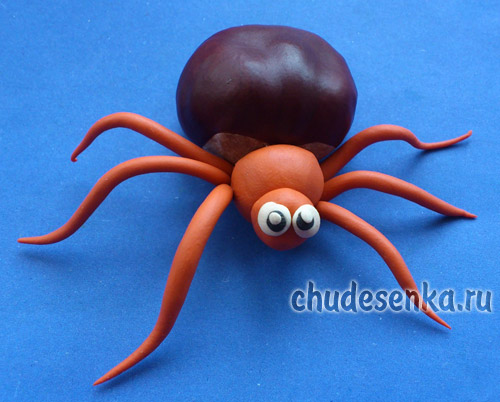
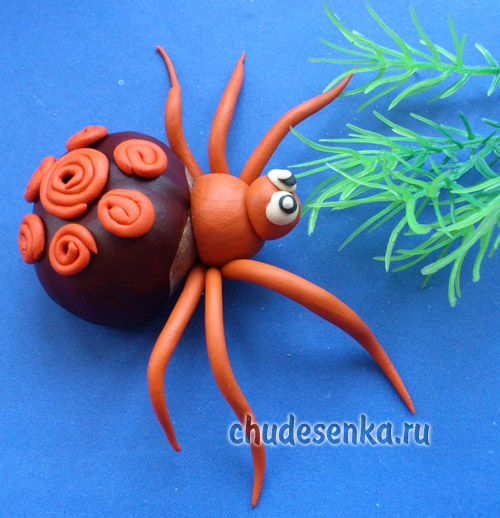
6. You can leave the back of the body a brown chestnut or decorate its surface with plasticine parts. Prepare small orange threads. Twist each into a spiral. Attach a few round pieces to the back, decorating it.
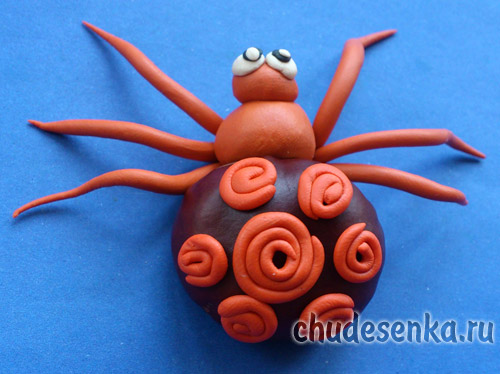
That's all. The spider insect made of plasticine and chestnut is ready. Although the craft has thin legs, nevertheless, the product lies on the table on a chestnut tree, so you don’t have to worry about reinforcing the legs with wire or matches. Plasticine sticks very well to the polished surface of the chestnut while it is still soft and warm, so you need to work with all the parts extremely quickly, and do not leave them on the table for a long time after kneading and shaping.
Elena Nikolaeva
Сhudesenka.ru
Make a spider with your own hands from cake mastic, beads, fabric, cardboard, paper or other materials. The result will be a fun and beautiful craft.
For many people, a spider is the personification of something terrible and unpleasant. But children immediately associate with the cartoon character Spider-Man. Therefore, for boys 5-8 years old, a cake with the image of this character and with black spiders around will be the best gift.
- Spiders can be made not only from mastic, but also from plasticine, paper, beads or fabric.
- This character will be a great decoration for Halloween or a birthday party if the birthday person loves spiders.
- Such a gift would be especially useful for a person who collects these insects made from different materials. But what if there is a big spider living in his house? rare species, then this gift will be remembered for a lifetime and will be kept in the most visible place.
- So let's start with the little brats. Congratulate your son and make him a cake with your own hands with fondant - it's simple and quick. Read step by step instructions In this article.
For Spider-Man himself, you can buy colored confectionery sprinkles. Make the outline with regular chocolate icing, and the costume with red and blue sprinkles. Make spiders and some other decorative elements from mastic. You can put jelly candy inside them - it will be a great surprise for the kids. How to make a spider from mastic - master class for beginners:
This is what the cake will look like in the end. But you can make spiders in your own way, with a little imagination and an original and delicious masterpiece is ready!
First draw a spider on paper. This sketch will make it easy to sculpt from mastic.
Now do the following:
- Buy black marshmallow mastic in advance at the candy store the size of an egg, as well as 4 pieces of jelly candies.
- Divide the mastic into 4 parts.
- Divide each part into 4 more parts(2 - body, 1 - head and 1 - legs). Roll one part into a flat cake, like dumplings. Place the candy in it and form a voluminous ball. From the other two parts, make two smaller balls for the head and the second part of the body.
- Connect all parts of the torso together. In order for them to stick well to each other, you need to grease them with confectionery glue - this is sugar syrup made from a tablespoon of sugar and 10 grams of water.
- Do this with the rest of the spiders.
- Then divide the remaining 4th part from each spider into 4 more parts and roll out thin sausages- these will be the spider's legs. Divide these sausages into 8 parts, form legs and glue to the body with confectionery glue.
- Do this with each spider. If you have small crumbs or pieces of mastic left, you can make jaws on the head; if not, then you can do without them. Eight legs will be enough, because we have a real spider.
Tip: If you don’t have enough black fondant or you only found brown marshmallows, then make these cookie spiders. The filling is any cream with added food coloring, and the eyes are glazed candies.
Place these spiders on a cake or serve them separately - children's delight and admiration will know no bounds.

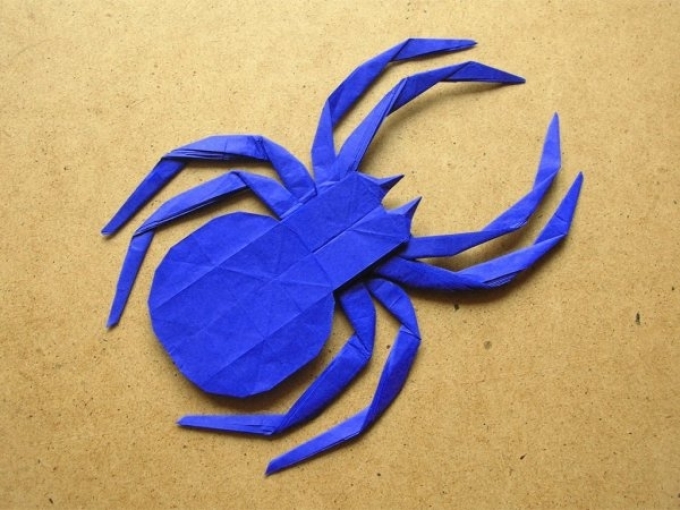
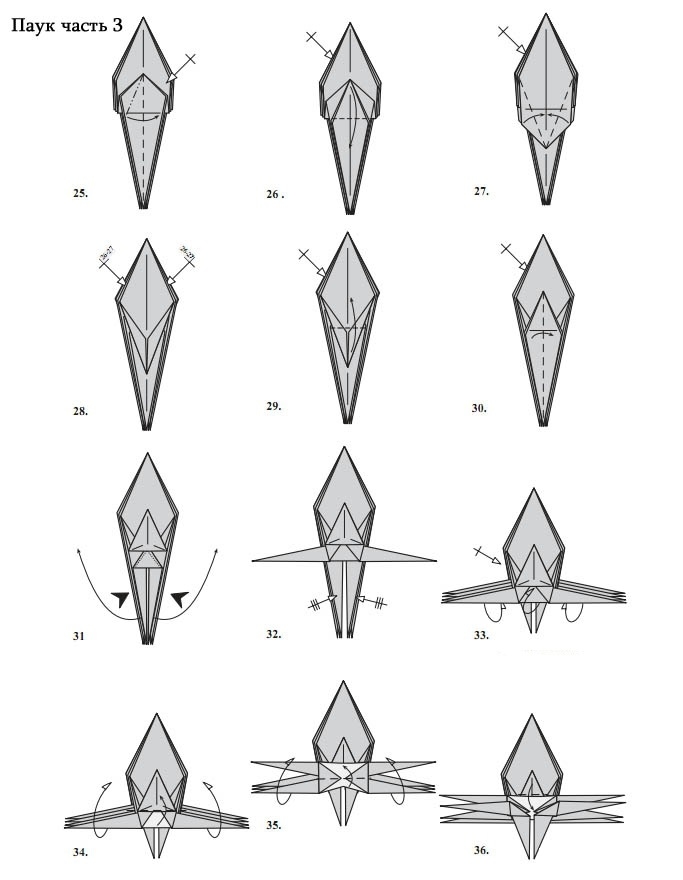
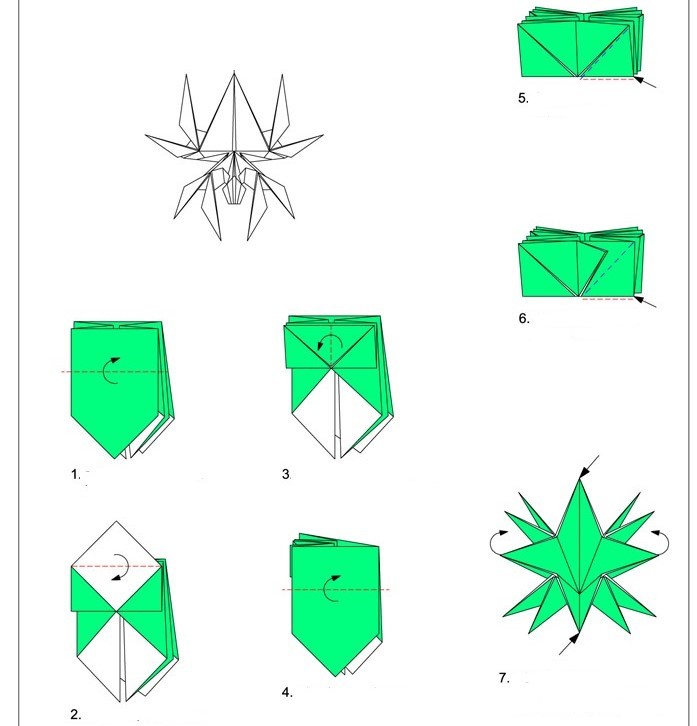
Paper crafts amaze with their beauty. Creating them requires patience, perseverance and a little skill. Our diagrams and photos will help you make a cute paper spider with your own hands. Follow all the steps and you will get a real spider, which you can give to a friend or acquaintance or simply put in a prominent place in the house. There will be no limit to the delight of the guests! Let's start from steps 1 to 12:
- Take a square sheet of paper and fold the corners towards the center - along diagonal lines.
- Then fold as shown in the diagram.
- Bend the right corner to the left, and the bottom corner up.
- Do the same with the other three parts of the workpiece.
- Pull the inner layer out.
- Fold the corner inward.
- Unfold it.
- Roll up.
- Fold the top corner and repeat the manipulations with the 9 remaining parts of the workpiece.
- Bend it as shown in Figure 10, and then straighten it.
- Bend the sides indicated by the black arrows inward. Do the same on the reverse side.
- Turn the workpiece over and repeat.
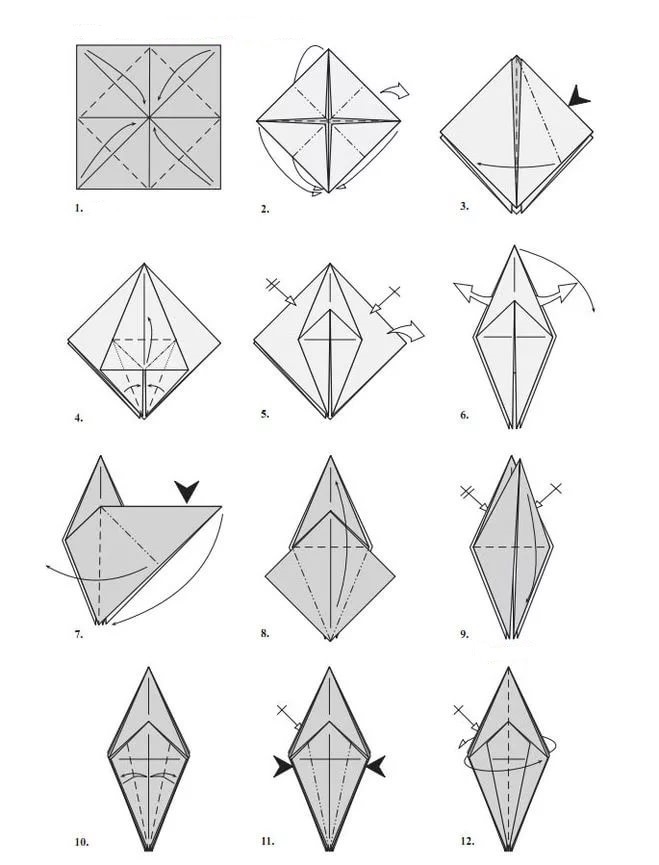 DIY paper spider: diagram part 1
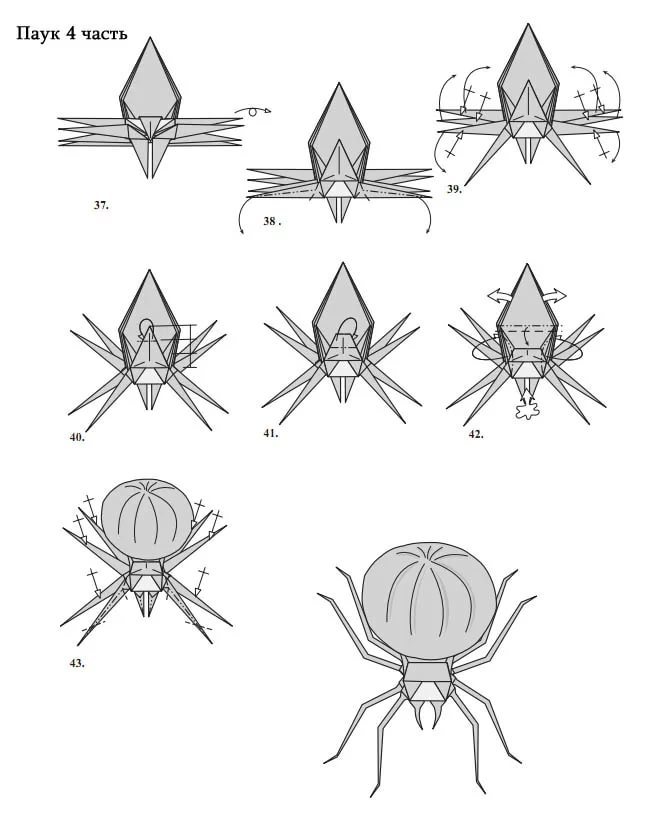
 Continue from the 13th step in the figure to the 24th:
- Fold inward on both sides.
- Bend and straighten in the direction indicated by the arrows.
- Fold to the right.
- Fold the middle towards the left side to the level shown by the first arrow before the second arrow.
- Repeat with other sides.
- Turn it over.
- Repeat on the remaining sides.
- Fold the corner to the right front and back.
- Fold the bottom corner and repeat.
- Fold the top corner to the left and do the same at the back.
- Bend the corner indicated by the arrow to the right and repeat with the corner at the back of the workpiece.
- Turn the workpiece over.
Continue with steps 25-36:
- Fold the next corner and repeat the procedure at the back.
- Fold the corner down. Do the same at the back.
- Bend part of the workpiece on both sides towards the middle.
- Repeat one more time.
- Bend the corner in the middle upward.
- The result is a figure that already looks like a spider. Bend its left corner to the right. Do the same at the back.
- Move the resulting spider legs to the sides.
- Do the same with the rest of the paws.
- Extend the layer as shown in the diagram and unfold. Do the same at the back.
- Fold the resulting elements upwards, as in the figure.
- Up again.
- If everything is done correctly, the corner will be at the bottom.
The last part of the craft:
- Turn the spider over.
- Make the jaws.
- Spread your paws to the sides.
- Bend them back.
- Bend the corner back again.
- Blow inside the spider's body so that it expands and inflates.
- Fold the paws to make them look natural.
- The spider is ready!
Watch the video to see how you can make a different spider, but also a very original and beautiful one. You can make such a craft together with your child - it will be exciting and funny.
Video: How to make a spider out of paper (Origami Spider)
Many people are interested in the origami technique - it distracts them from the hustle and bustle and helps them relax. Psychologists advise doing such crafts after work. If you do them with the whole family, it brings you much closer together. Making a spider using the origami technique is easy. Photo and diagram from stages 1 to 7:
- Prepare a square sheet of paper. Fold it like an accordion. Cut the corners as shown in the picture.
- Fold the corner up first, then down.
- Fold the corner to the left as the arrow shows.
- Fold the bottom of the workpiece towards the top.
- Fold the corner from bottom to top.
- Do this with each resulting corner of the workpiece.
- Fold all the corners towards the middle, which are shown by the arrows.
Scheme from the 8th to the 19th stage:
- Turn the top corner to the left.
- Then fold the resulting parts towards the middle, as shown by the arrows.
- Do the same on the reverse side.
- Fold the front corners up.
- Fold the top front piece down.
- Now turn it up.
- From stages 14 to 19, add all the small parts as the arrows show. The dotted line is the fold line.
Shutdown:
- Turn the workpiece 90 degrees and begin bending it in the direction of the arrow, making spider legs.
- Fold the corners up.
- Fold the corner of the future head down.
- From stage 23 to 28, make the paws. To make them thin and seem natural, roll them inward. Do this with each paw.
- The spider is ready!
 Origami spider: diagram - continuation
 The video below shows how you can make another spider using the origami technique.
Video: Origami Paper Spider
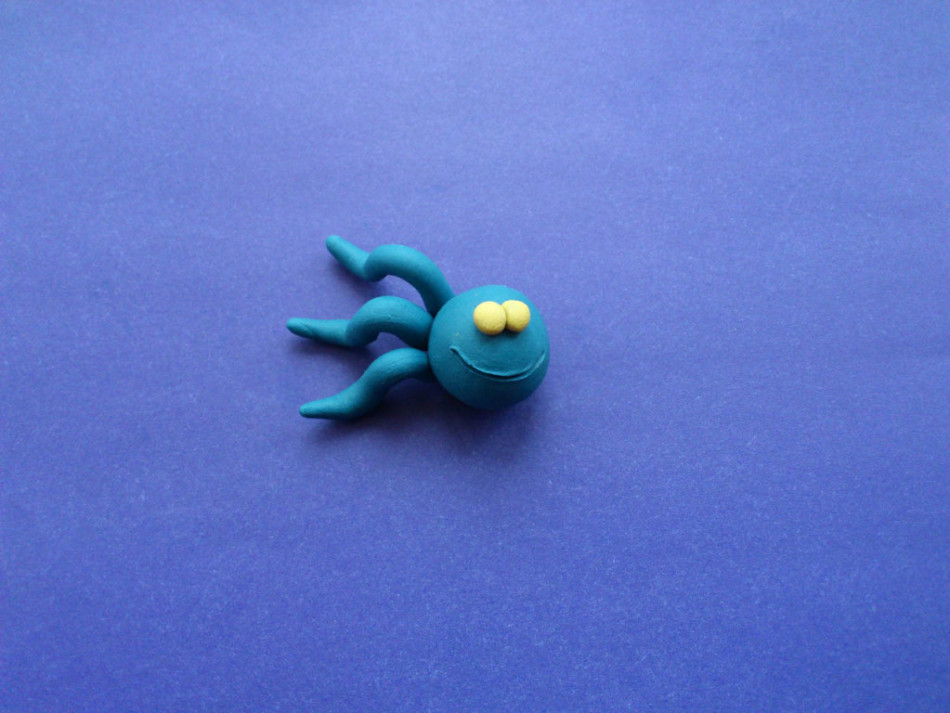
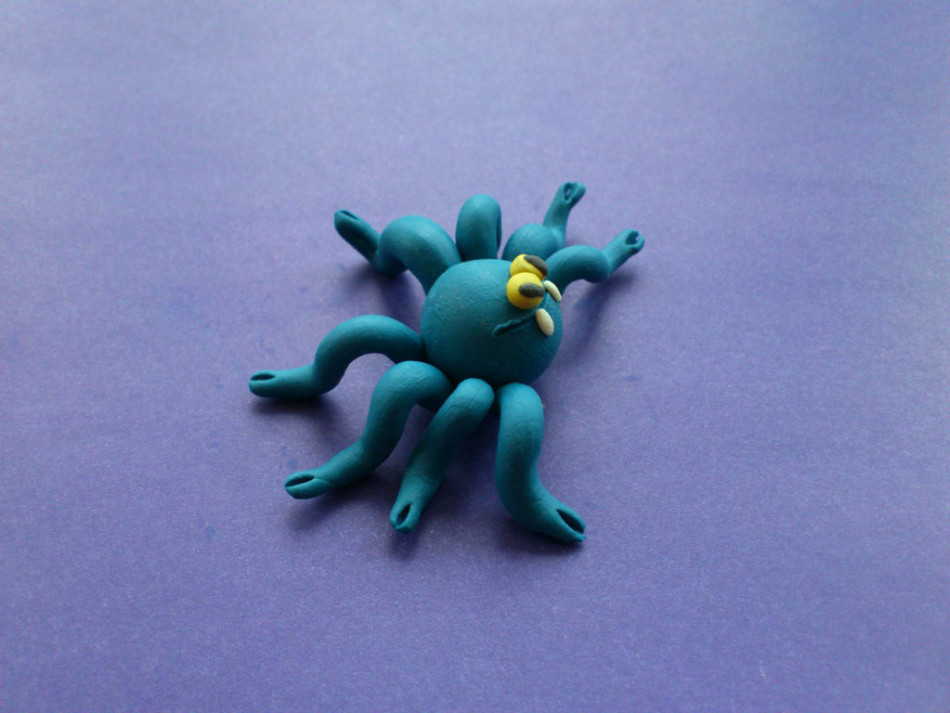
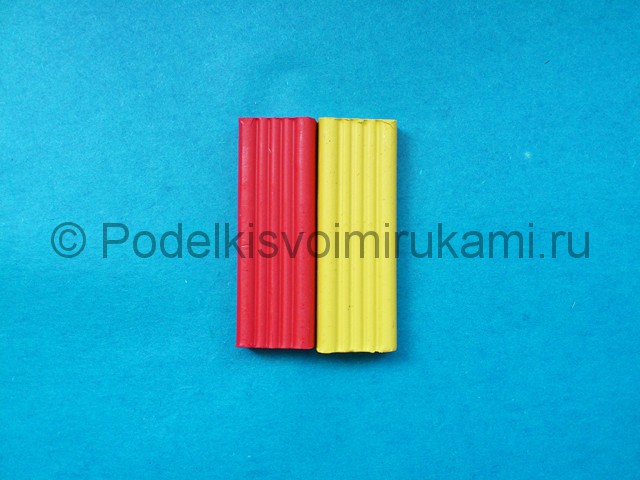
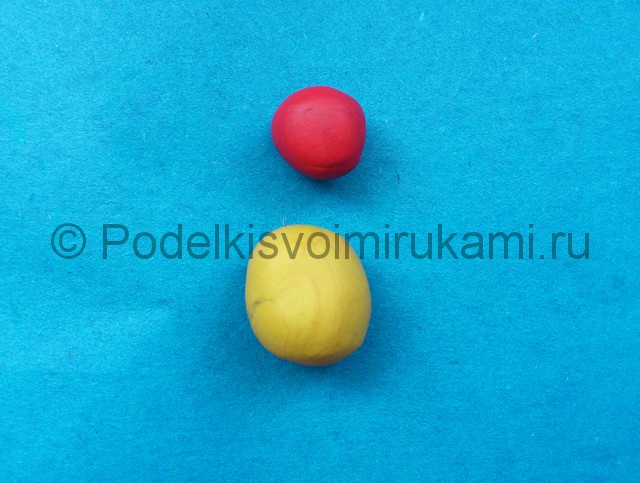
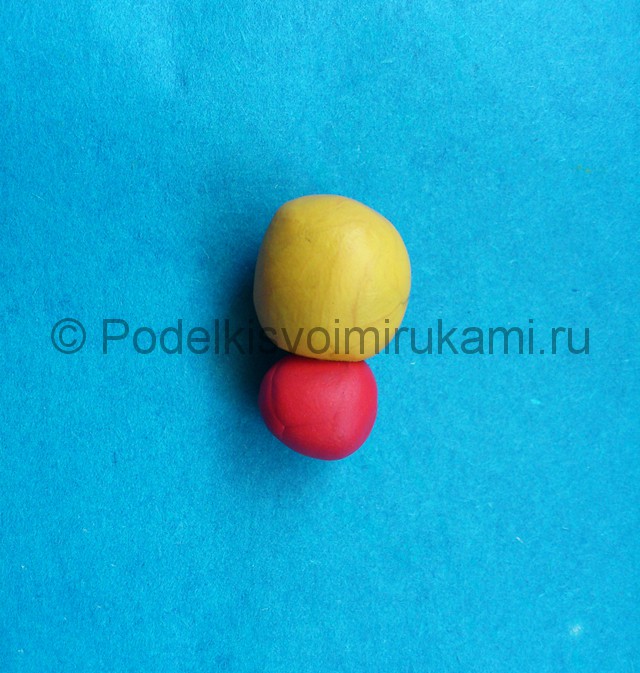
Plasticine modeling helps children develop hand motor skills. Accordingly, the baby begins to think, his creative abilities and the ability to think creatively develop. Make a spider out of plasticine together with the baby - it’s easy, simple and quick to do. Prepare clay in any color you like and a slightly different color (like yellow) for the eyes. Execution steps:
Roll out one large ball for the head and eight small ones for the legs.
 Plasticine spider - head
 Draw a smile on a large ball using a stick and attach eyes from yellow plasticine. Roll sausages out of small balls - these are the future legs.
 Plasticine spider - legs
 Bend the paws in the shape of a number 2 and stick them to the head - 4 on one side and 4 on the other.
 Spider made of plasticine - attach the legs
 Using the same stack, decorate the paws. Finish the eyes using some black plasticine and the jaws using white plasticine.
Your little one will love this spider and this modeling activity. Next time he will be able to make the spider himself.
Video: SPIDER FROM PLASTICINE. Living plasticine | Video Modeling
Since ancient times, seeing a spider in the house was considered a good omen. In the morning - to wealth, in the afternoon - good fate, in the evening - to a gift. But don’t get real spiders now. Make an original spider from beads. It will decorate your home and attract happiness.
You will need:
- two beads of any color - for the head and body;
- black beads - jumpers on the legs;
- a long red glass bead—the paws themselves;
- two blue beads for eyes;
- one bead matching the color of the body beads - for the tail;
- wire.
Instructions:
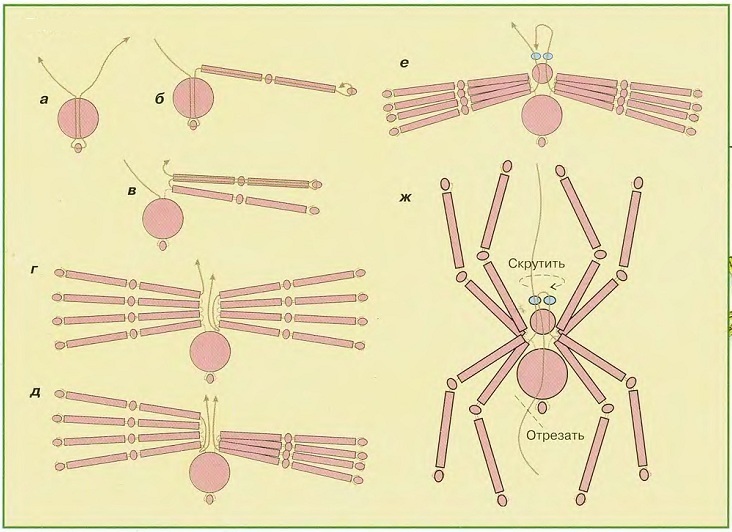
- Prepare 1 meter of thin wire. Thread one bead that matches the color of the body and place it exactly in the middle.
- Then fold the wire and put a large body bead on its two ends.
- Separate the wire and begin to put on beads and glass beads to create the legs, as shown in Figure b.
- Push the wire back into the first foot and make the second foot using the same principle.
- Continue this until you have 4 legs on one side. Do the same on the other side. As a result, there should be 4 legs on one side and 4 on the other.
- Now thread the two ends of the wire into the head bead. Separate the ends and put on blue beads to create eyes.
- Twist the wire using pliers and cut.
- The spider is ready. Straighten and bend the paws so that they look natural.
When you learn how to weave such a simple spider from beads, move on to more complex models. Detailed description in the video.
Video: Spider. Beadwork. Master Class
Few people know how difficult it is to keep a spider at home. But many children and even adults want to have this exotic pet. To prevent your baby from begging his parents for such a friend, you can sew him a spider out of fabric - cute and funny.
Making a fabric spider is easy. Prepare the following:
- a little black fur;
- dark colored knitwear;
- beads for eyes;
- decor in the form of socks.
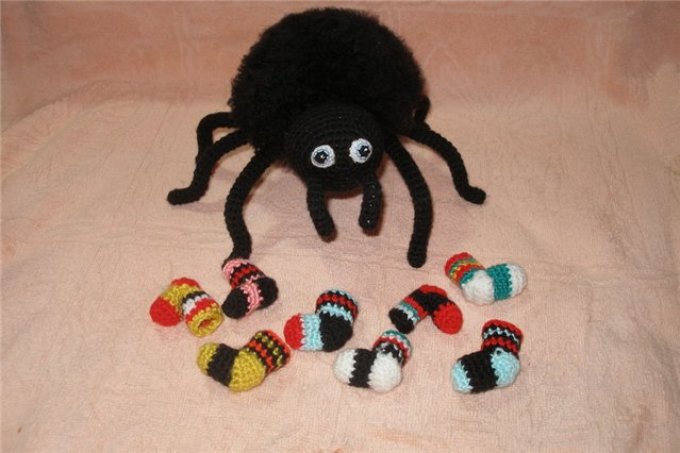
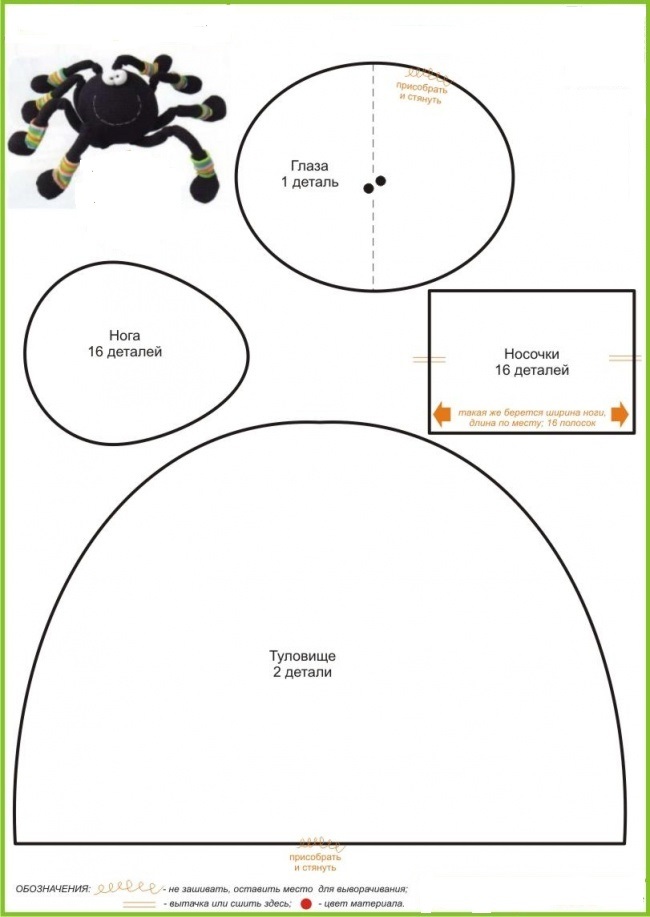
Socks can be crocheted or sewn from fabric of different colors. The result is a toy that will be your baby's favorite. To sew a spider, follow these steps:
- Cut out 2 parts of the body, sew them together, leaving a small gap so that you can fill them with padding polyester or cotton wool.
- Open the eyes from white jersey and tie them with thread along the edge. Stuff it with cotton wool and sew it to the body.
- Fold the legs in half and sew. Insert the wire inside. Sew the legs to the body and bend them for naturalness.
- For socks, you can take any bright fabric. Cut 16 pieces, sew and put on the legs.
- Using white threads, make a mouth. The spider is ready!
Sewing a fabric spider is quick and easy. You can come up with your own model of the toy. It can consist of a body and a head, only one body, jaws and various decorative elements. The legs in the amount of 8 pieces must be made flexible so that they can be bent. After all, a real spider has legs like this.
A thread spider consists of a pompom, legs with wire and two eyes. How to make a spider from threads so that it turns out funny and beautiful? Prepare the following materials:
- some black yarn;
- wire for legs;
- beads for eyes.
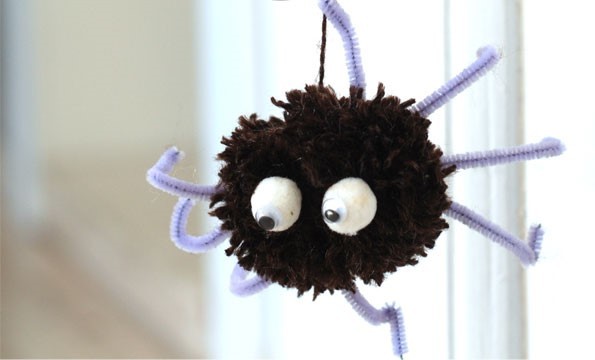
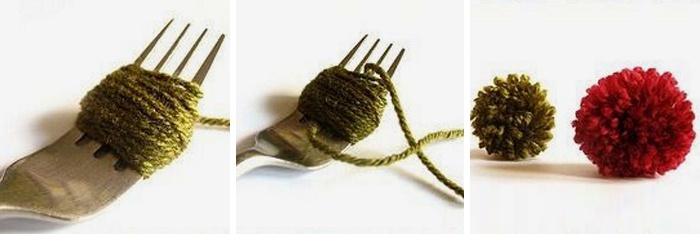
Make a pom-pom from yarn: wrap the threads around your palm or cardboard cut along the edges. You can wrap yarn around the spider using a fork. Pull the thread through and tie. Cut along the edges - you get the body of a spider.
Wrap the wire with threads of the same color from which you made the body. Attach the legs to the body. Sew two beads in place of the eyes.

The result is an interesting toy that will decorate any extravagant interior. You can give such a spider, made by yourself, to a child.
Video: Spider for Halloween decoration. Crafts from yarn.
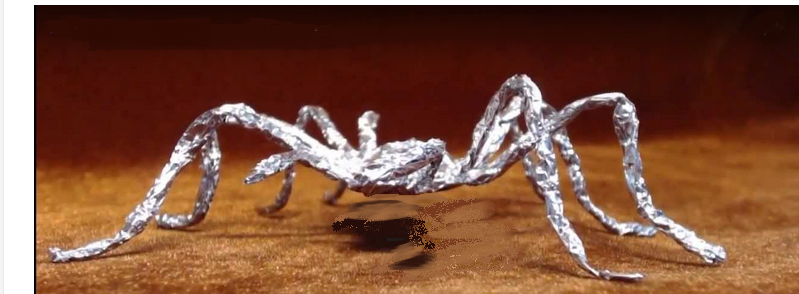
Foil is a handy material that is found in every home. It is inexpensive, and you only need 20 cm for a spider. This craft will decorate the interior of your home. It can be attached to a picture, tulle or curtain. So, how to make a spider out of foil?
- Cut 20 cm from a roll of food foil.
- Tear off or cut four 5 cm strips across the entire width of the foil. These are the future legs of the spider. The rest will be the torso.
- To make the paws, you need to roll each strip into a sausage.
- Then do this with each strip. Fold all the resulting legs onto the cut for the body so that future legs protrude along the edges.
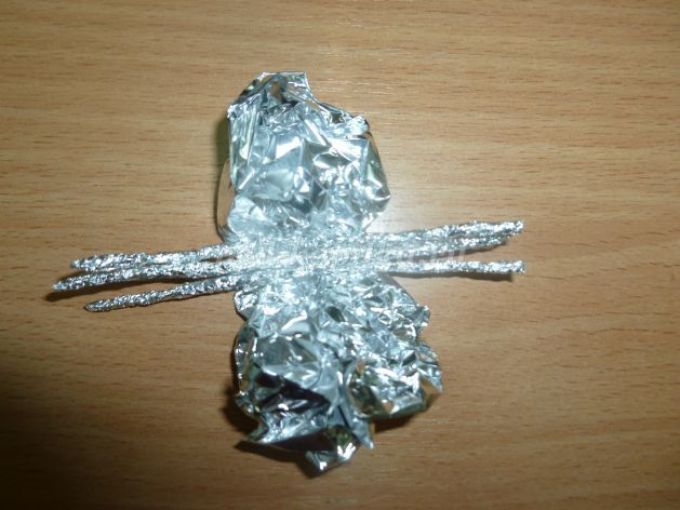
Now roll the body so that it covers the legs. Crumple the foil and form spider legs.
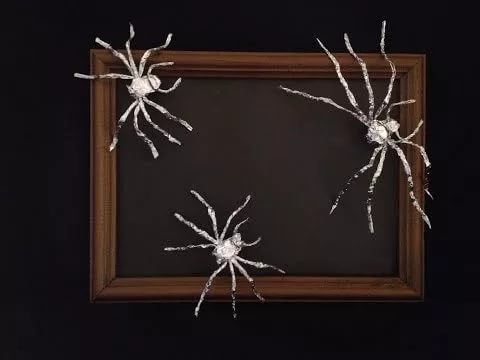
Watch the video to see how else you can make a spider out of foil. The master shows clearly how to form the body and legs.
Video: Tin foil spider
To make a spider, it is not necessary to specifically buy materials. You can make a craft from an old cardboard box. Cut a piece of cardboard and draw a blank with a felt-tip pen.

- Then thread the thread on top of the head using a needle. This is necessary so that the spider can then be hung and used to decorate the interior.
- On one side of the workpiece, apply glue over the entire surface of the cardboard.
- Glue a small layer of cotton wool onto the layer of glue, but so that the parts of the spider on the legs and body stand out.
- Do the same with the other side of the workpiece.
- Now prepare a solution with black paint. This paint can be purchased at any craft store.
- Dip the spider in the solution and hang it to dry.
When the paint dries, the craft is ready. It will be a great attribute for Halloween. Now you know how to make a spider from scrap materials, such as cardboard.
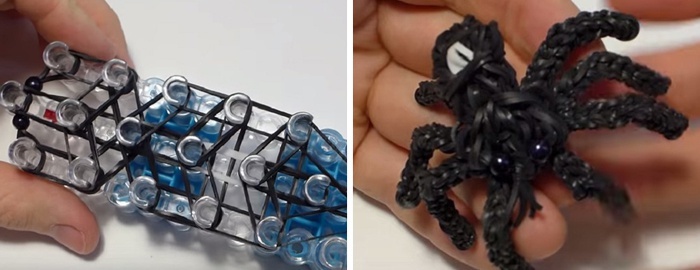
Almost every girl was fond of weaving from rubber bands. They could be used to make a bracelet, a ring, and the most resourceful ones make figurines of animals or insects. Making a spider out of rubber bands is not difficult, and the toy will look like a natural insect. You can use it to scare a friend or give him such a craft as a souvenir. Stages of making a spider on a special machine for elastic bands:
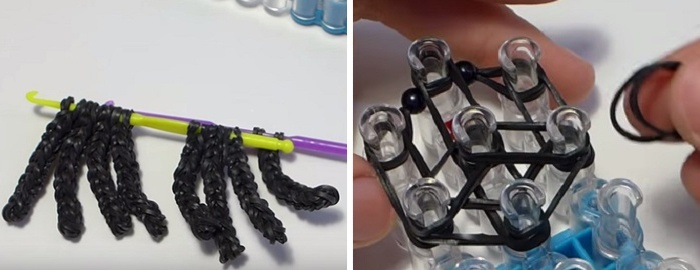
- First, weave the legs on the hook with a single crochet.
- Attach beads to two elastic bands and put them on the machine. Throw elastic bands along the contour and in the center to make the spider dense.
- For the belly, drape down from the head along the center, left and right edges.
- Then weave the figure, hooking the bottom layer with a crochet hook. Throw the elastic band forward, catching the paw blanks.
- Make a loop, tighten and remove the finished figurine.
The video shows how to make a spider from rubber bands without a machine. If you are just learning to weave, then use this method.
Video: Figurine made from rubber bands. Spider without a machine. Video tutorial No. 45 how to weave figures from rubber bands
If you want to make a craft for a child, then it is better to do it with the addition of bright material. If you need to give a spider to a friend who already has tarantulas or tarantulas at home, then it is better to make a black spider. It will definitely turn out like a real one - menacing, terrifying in appearance, but completely harmless.
This craft can be made from rubber bands, beads, paper, cotton wool, which can then be painted, or even plasticine. Choose the material that you like and create a real masterpiece of your craft.
Is your child afraid of all kinds of spider bugs? It is imperative to rid him of this phobia. And it’s advisable to start with interesting modeling classes. Together with your child, mold a bright spider, place it on a homemade web and admire your product.
Today you will learn how to make a spider from plasticine with your own hands. This lesson is suitable for the youngest children, because making a cute insect is very easy. We propose to create a kind of three-dimensional painting using not only plasticine, but also colored paper. The craft can also be supplemented with beautiful beads and wire. The use of unusual materials will arouse additional interest in the young sculptor. Of course, parents need to remember that children under three years of age should not be left unattended near small parts.
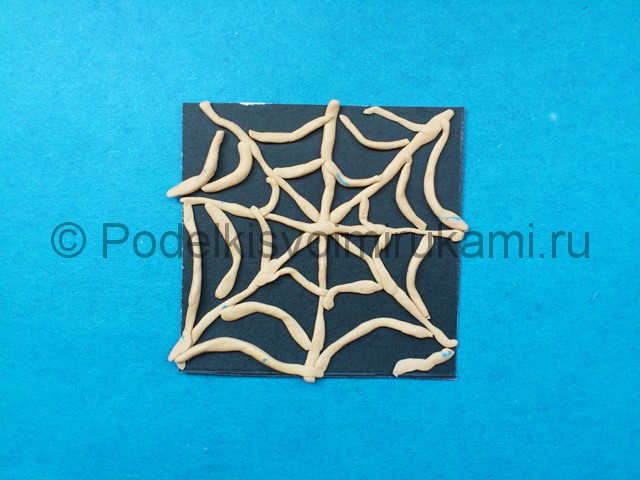
1. Choose any colored background for your future 3D painting. Black paper will look impressive. Cut out a small square from cardboard.
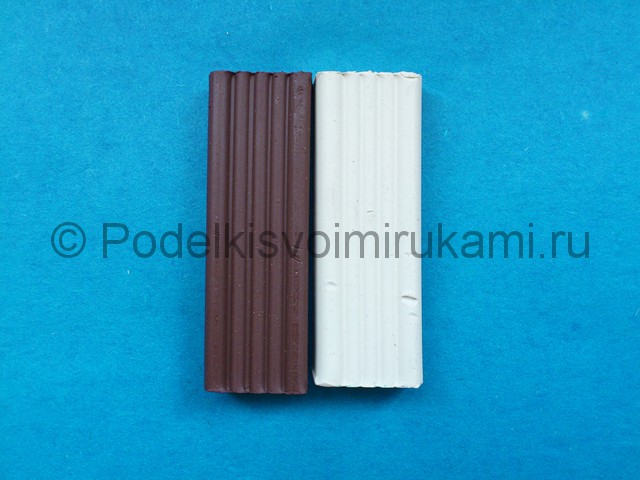
2. To create a web on a black background, use white or beige plasticine; it can be made by mixing white and a drop of brown material.
3. Roll thin threads from the prepared plasticine.
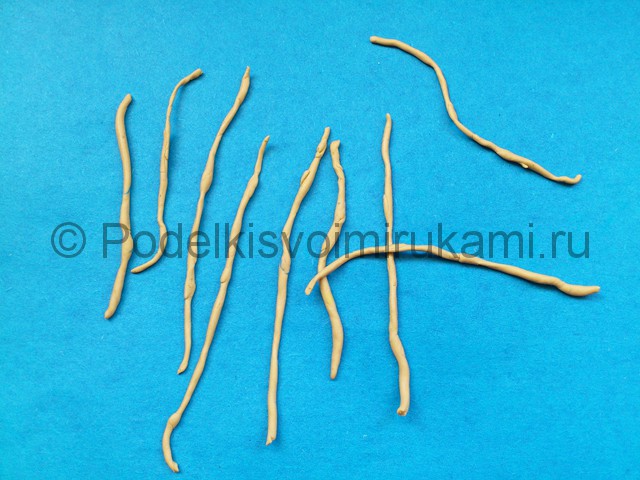
4. Divide the threads into pieces of arbitrary length and create a web on a black background. Plasticine sticks well to paper if you lightly press it with your fingers.
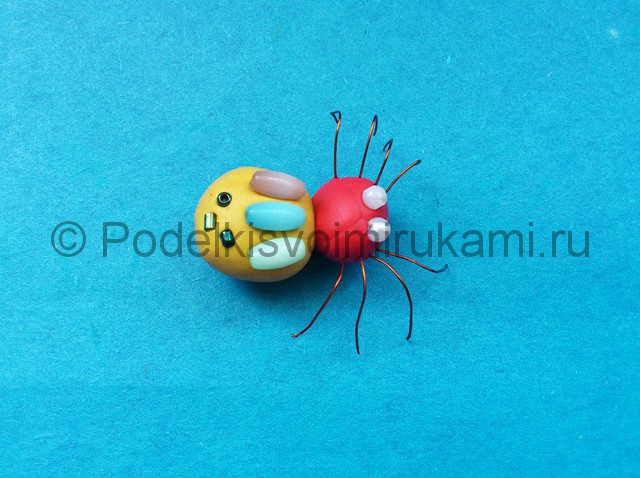
5. It is better to make the inhabitant of the web itself bright, for example, use yellow and red plasticine for this.
6. Roll two balls of different colors: a larger one and a smaller one.
7. Use half a match to hold the spider parts together.
8. The insect must have six or eight legs. They can be made either from brown plasticine or from small bent pieces of wire. In our case, we will use ordinary copper wire, which can be found in any dad's tool box.
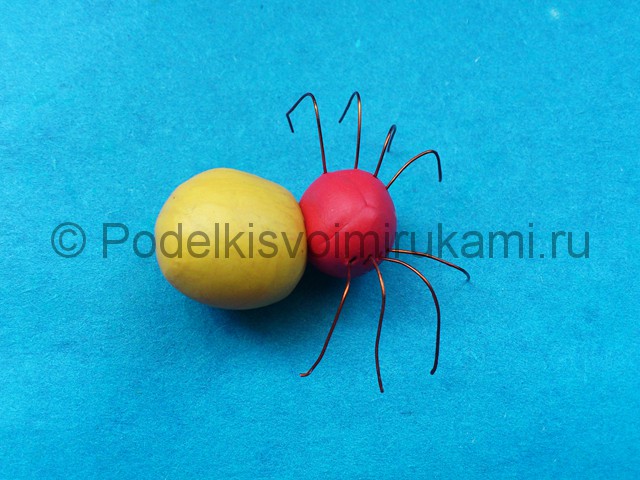
9. To decorate the back of the spider, and also instead of eyes, use all kinds of beads.
10. The resident of the web is ready to go to his house.
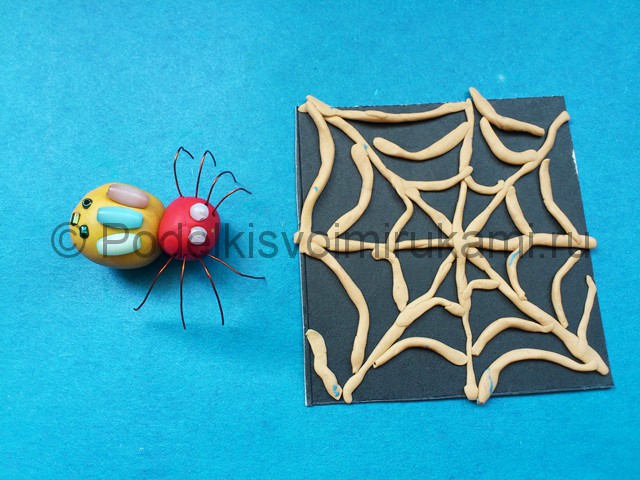
11. Attach the spider to the web. The colorful craft is ready.
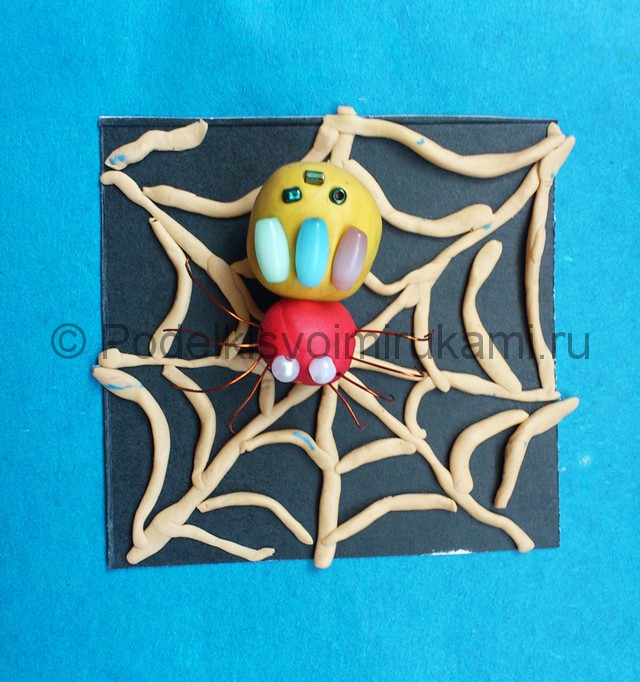
The final look of the craft.
After such a lesson, the child is unlikely to be afraid of spiders, because these are ordinary insects that also benefit people. If you liked sculpting with us, then we bring to your attention other plasticine master classes, which are available in large quantities on this site.
Print Thanks, great lesson +16
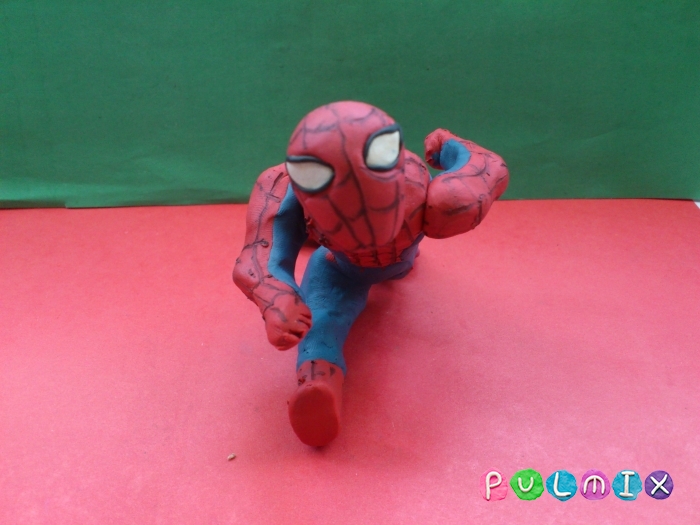
A thriller film about Spider-Man has been released a long time ago, and adventure comics cannot be called new either. But, nevertheless, modern boys, after watching this masterpiece or computer game, want to be like the main character. The image of Spider-Man is popular and in demand. His costume is worn by children at the carnival, toys in the form of this character are quickly sold out, and the red and blue muscular man also appears in coloring books and on the packaging of all kinds of children's products.
Children often ask their parents how to make a Spider-Man from plasticine, but they most likely cannot give them an intelligible answer and show them the modeling process, because they consider this craft to be quite complicated. But in this lesson we will prove the opposite to you. Feel free to invite your children to the lesson, together you will cope with sculpting this figure.
Other lessons on the topic Marvel:Step-by-step photo lesson:
Start by choosing shades of plasticine. You need to make a red and blue costume of a fantasy character, which will be covered with cobwebs. You will also need two drops of white plasticine to sculpt the eyes on the mask.
Prepare a regular small ball.
Draw out the ball, turning it into an oval head. Use the flat side of a spatula to make holes for the eyes.
Stick huge white eyes into the holes and frame them with black plasticine. For now, the mask head can be put aside.
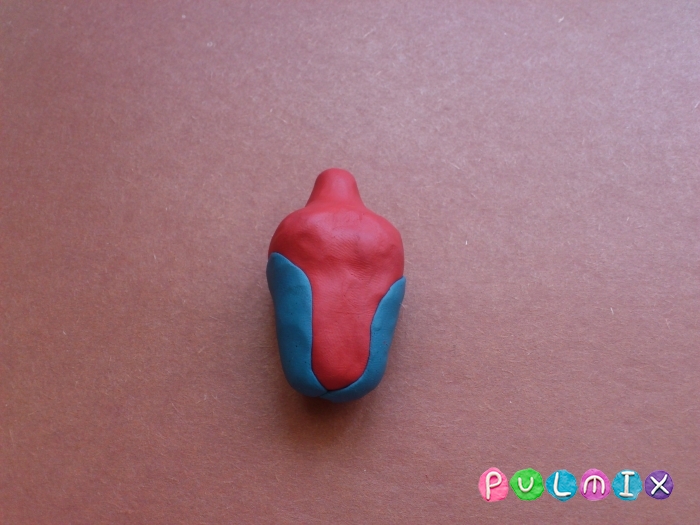
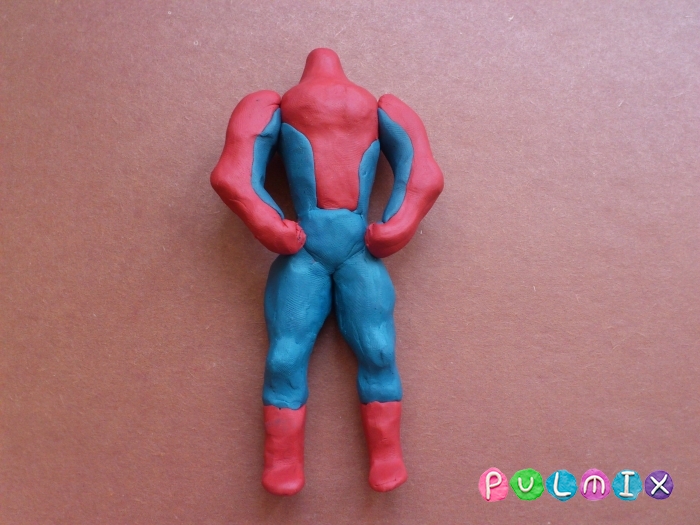
Make a block from red plasticine that resembles a matchbox in size. Then start pressing the plasticine with your fingers on one side, highlighting the belt. Pull the opposite side up, forming a neck.
Duplicate the side parts with blue cakes, perfectly joining the plasticine.
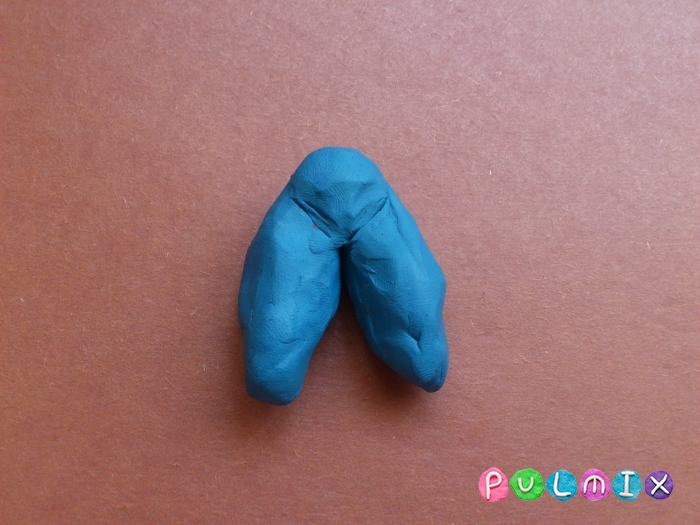
To make the thighs, roll the blue sausage, then fold it in half, but do not close the two parts together. Gradually give the plastic mass a relief reminiscent of the upper part of the legs.
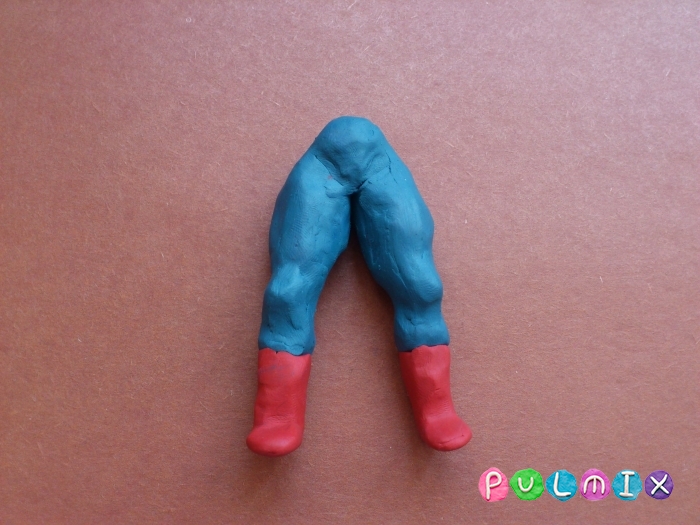
Add bumpy knees, calves, and high red boots.
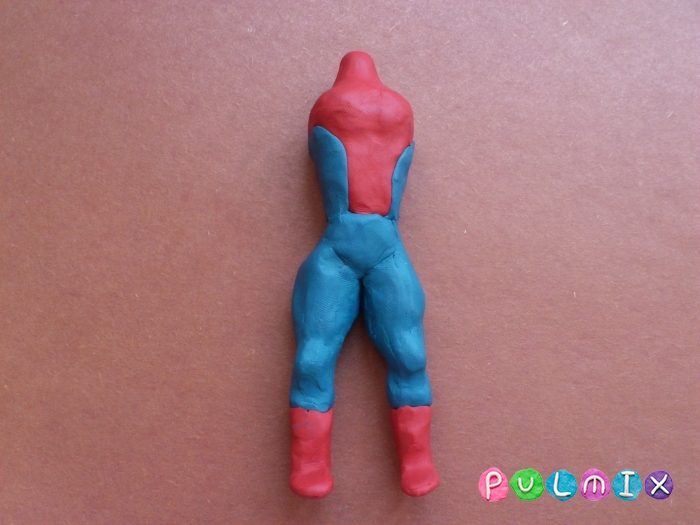
Connect both parts of the Spider-Man suit.
Also combine hands from blue and red plasticine. Try to make the superhero's powerful biceps clearly visible.
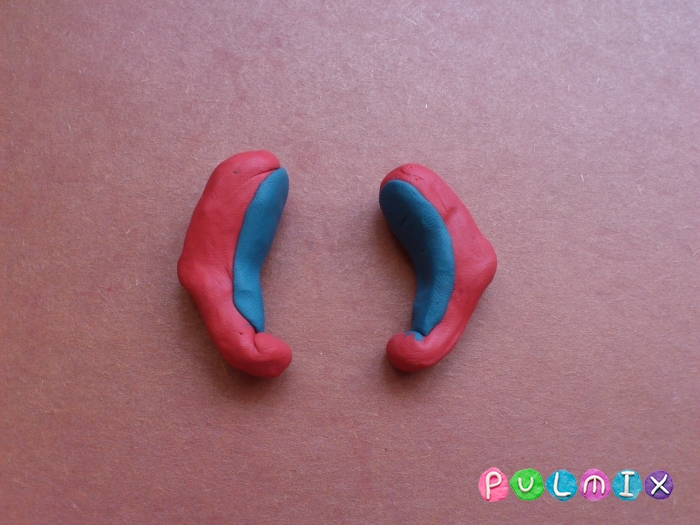
Attach your arms to your shoulders.
To make a web and have a neat result, it is better not to sculpt thin strips on top, but to draw the pattern in stacks. Having caught a drop of plasticine with the tip of a plastic spatula, begin to draw stripes on the red background. Gradually add black mass until you have drawn the entire costume.
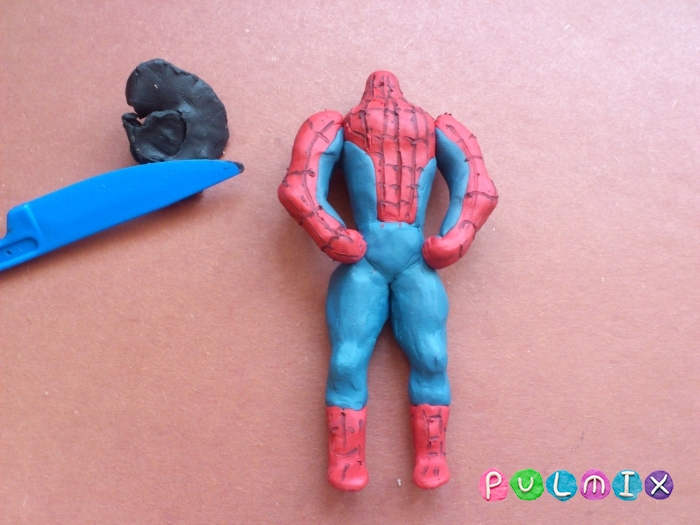
Do the same with your head.
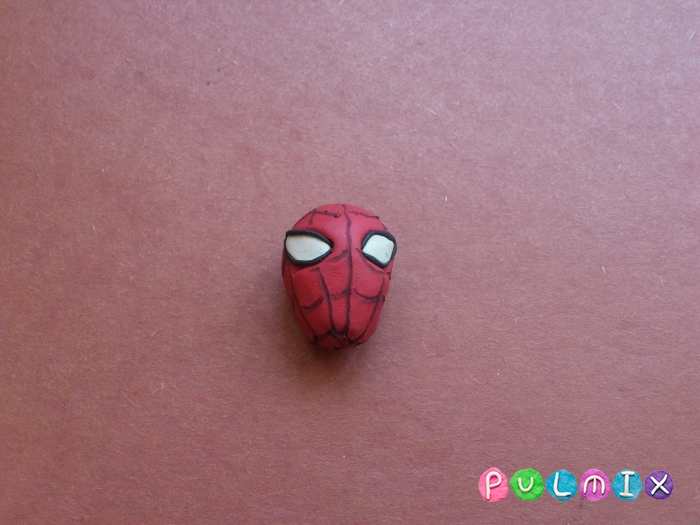
Connect the head to the neck with a match.

Spider-Man made of plasticine is great option, which will be interesting even to teenage boys. Be sure to practice these activities with your children to have a fun and useful time.