Plasticine crafts for children: the best ideas with photos. Broccoli made from plasticine.
Modeling from plasticine brings pleasure. It also helps children develop fine motor skills, which in turn affects the functioning of the speech apparatus and speech development.
DIY plasticine crafts: features
The fact that from The development of fine motor skills of the hands directly depends on the child’s speech, has long been proven. Therefore, it depends on you whether the child learns to speak correctly. Develop finger skills, stock up on colorful plasticine and invite your baby to participate. You need to start playing with plasticine with a child at the age of 2 years or from the time when he has definitely stopped putting foreign objects into his mouth.
It will be interesting for your child to sculpt if you also take part in the process. The question arises, what kind of plasticine craft can you make with your own hands? To a small child It will be interesting to make those objects that surround him in everyday life, namely: a car, animals, characters from his favorite cartoons. You can offer to make a dinosaur or a kangaroo to a child who already has a rough idea of these creatures.
DIY plasticine crafts: materials and methods
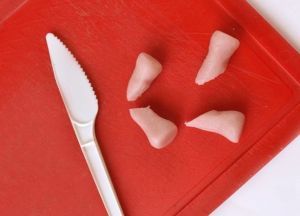
To start modeling, you will need colored plasticine, a plastic knife for cutting plasticine, an orange stick (manicure stick) and a table on which you will make crafts. An orange stick will be useful for making indentations in plasticine because it has a sharp and flat edge.
It’s good if you have not just one set of plasticine, but a whole palette of different colors. The child needs to be given time to fantasize. Support him, praise him, give him advice, but under no circumstances put pressure on him, scold him or criticize him. Modeling should be fun.
Cartoon characters made from plasticine
Favorite fairy-tale characters delight children. They associate themselves with the characters and want to imitate them. It is for this reason that your child will be especially interested in participating in the sculpting process with you.
Select the character you want to make. Choose the appropriate shade of plasticine for it and start creating. To make a character from the cartoon “Smeshariki” you will need a ball of plasticine, a pair of legs and arms, ears, a nose or beak, eyes and a hairstyle.
Give your child the opportunity to help you. Ask him to make the legs and arms for the hero while you work on the body.
Fashion all the necessary pieces and stick them to the body, thus collecting the entire character figure. Using the tool, draw the mouth, nostrils and hooves or hands.
Country yard made of plasticine
When a child already knows what pets look like, he will be interested in trying to recreate familiar characters from plasticine.
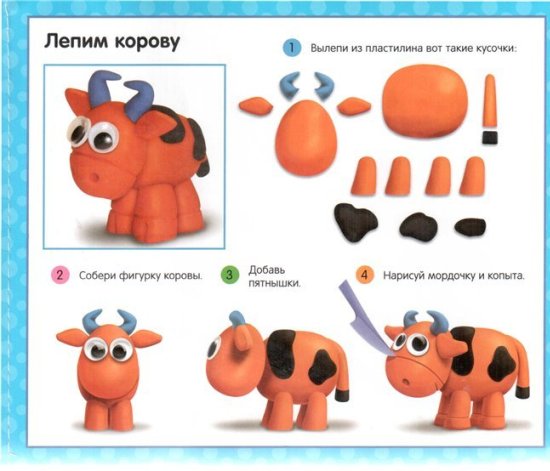
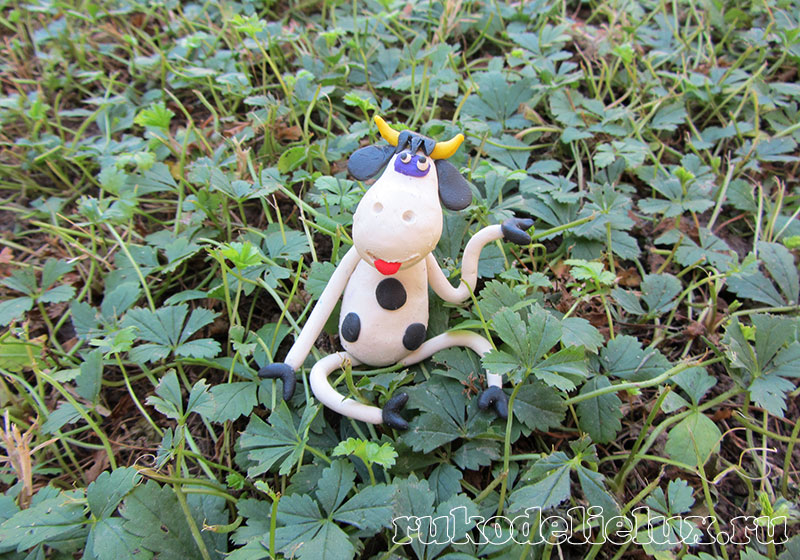
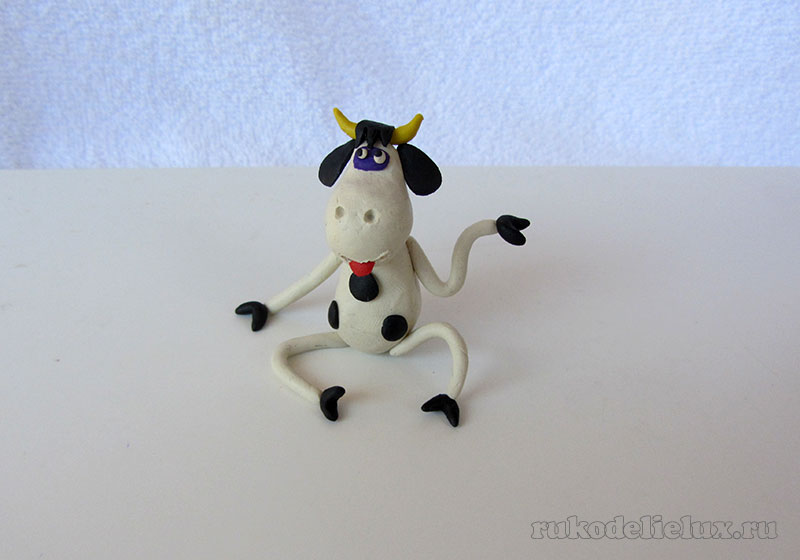
Try making a cow. For it you will need to sculpt the following details: head, eyes, body, four legs, tail, ears, horns and spots to imitate color. The head and body are oval shaped. Gather all the parts together, draw a nose and stick spots on the body, slightly smearing or stretching them. You have a purebred spotted cow.
Use plasticine to make a backyard bird, such as a chicken or duck. To do this, you will need to make the bird's body, tail, wings, legs, crest, beak and eyes. For the body, roll the plasticine into a ball and shape it into an egg. The narrow part will become the head, and the wide part will become the belly. Mold all the prepared parts into place. Use an orange stick to make indentations in the beak or draw a mouth.
To make a horse, prepare parts in the shape of the head, neck, torso, legs, ears, eyes, mane and tail. The body and head are in the form of an oval, the neck and legs are a cylinder figure. Connect all the parts to the body and draw the nose and hooves with the sharp end of an orange stick. You can also draw curls in the tail by running the sharp end of the stick along the tail. Smudge the joints between the parts with your finger so that the seam is not visible.
A village yard cannot be without barns, stables, mangers and other feeding grounds. Make simple houses in the form of walls, roof and gates. If you want something special, you can build a more complex structure. If the house made of plasticine is expected to be high, then to prevent the crossbars from sagging, you can add wooden sticks or toothpicks to the structure. To do this, measure the length of the vertical beam, roll it out into a sausage and hide a stick of the same length inside the plasticine. It should run along and should not be visible.
Make four such posts and install them at the corners of the building. Now make the walls, roll out the plasticine for them in the form of a sheet and lean it against the pillars. There should be three such walls. The fourth wall will be the entrance to the barn, so you can make a gate in that place.
Use wooden sticks to prevent the roof from sagging by placing them on the walls in rows across the building. Place a sheet of plasticine on them so that the sticks are not visible.
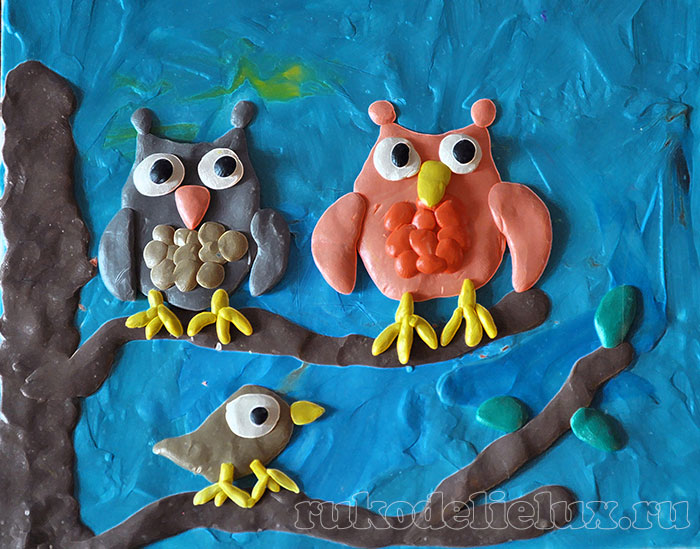
Volumetric picture made of plasticine
It will also be interesting to create a three-dimensional picture from plasticine. Come up with an event that you want to highlight and accompanying characters.
You will need for work: a base for the picture, colored plasticine and a pencil. The base should be a dense, hard surface, such as a piece of board or cardboard, cut to size.
Draw on the base the outline of the image you want to transfer to the picture. Next, choose the background color and smear it onto the canvas with your fingers in a thin layer to paint the surface. When applying the background, go 1 cm beyond the contour line, as if placing plasticine under the image that will appear in the place where the contour is now. This is done for reliability, so that random gaps do not appear and cardboard does not appear through the cracks.
Now you have a choice of how the images in the painting will look. They can be slightly voluminous and protrude above the surface or be completely flat, flush with the surface.
If you want to see the picture flat, then apply plasticine smearing it on pre-designed places in the following sequence: first the background, then the character’s figure, then small details: eyes, beak, pocket on clothes, button, and so on.
If you want to make the characters’ figures protruding in volume, then you don’t need to smear them over the surface. Make the desired character in your hands, and then stick it to the picture and press lightly, you will get a flattened figure. Do the same manipulations with the remaining parts of the character. Proceed in the same sequence: first the background, then the character, then the small details. This is what it looks like.
When choosing a color, do not require your child to use only the color that matches the animal. Don't limit your child's imagination. A pink horse will please him no less than a gray one.
If the plasticine is too hard, knead or warm it in your hand. Do not place it on a hot battery, otherwise it may leak, staining the battery and the floor.
Try to work with plasticine only on a prepared surface. If the plasticine falls and rips into the carpet, you can remove it, but you will have to work hard.
From early childhood, parents try to instill in their children a love of creativity, as this contributes to the development of fine motor skills, perseverance, imagination, and imagination. For work, a variety of tools and elements can be used, for example, natural materials, colored paper. Crafts made from plasticine are especially popular, because with its help various figures, accessories, and other products can be created. Below are step-by-step instructions for making interesting crafts with your own hands.
What crafts can you make from plasticine with your own hands?
By using imagination and imagination, using plasticine it is easy to create different products and thematic works. In some cases of the creative process can be used Additional materials- chestnuts, acorns, leaves, flowers, etc., this will help create an original craft, for example. The following products are especially popular among children:
- Animals are favorite figurines, very easy to make. Among children, the following animals created with plasticine are held in special esteem: squirrel, frog, snake, lambs, bunny, giraffe, caterpillar, spider, horse, octopus, turtle, shark. Creation schemes may differ depending on the available material, the child’s vision, his imagination, and creative abilities.
- Flowers. Using plasticine, charming compositions, crafts, and decorations can be created. Depending on age, the complexity of flowers created using plasticine may increase. So, for example, preschool children can make a daisy or tulip, but schoolchildren can create a rose, pansy, and other exquisite crafts.
- Toys. Children are doubly happy when they can create something to play with with their own hands. For girls it can be a doll, a baby doll, an angel, a butterfly, a mermaid, but boys will prefer different types of transport - a car, a tank, a plane, a train or transformers.
- Vegetables and fruits are easy crafts that beginner plasticine craftsmen can do. Children will enjoy an apple, a watermelon or its slice, grapes, berries - strawberries, raspberries. In addition to vegetables and fruits, other food can be created, for example, cookies, cake, candy.
- Fairy-tale or cartoon characters. Children are partial to fairy tales and cartoons, so they will be especially enthusiastic about creating their favorite characters. Children especially hold in high esteem: figurines of Fixies, Smeshariki, Masha and the Bear, Cheburashka, Ninja Turtles, Angry Birds, Cars cars, Minecraft heroes, etc.
Step-by-step instructions for making children's crafts from plasticine
Plasticine crafts can be created using certain patterns, master classes, or without specific instructions, relying on your fantasy and imagination. Some products, despite their apparent simplicity, are extremely difficult to make without a detailed description. Below are detailed descriptions creating a variety of crafts with photos, thanks to which children of different ages will find a master class according to their abilities.
Plasticine craft chicken for kids 2-3 years old
For young children, making a chicken using plasticine will be a simple and interesting activity. In the creative process, you will need the help of parents so that the DIY craft turns out perfect and pleases the child. The material can be classic or fine-grained plasticine, which will allow you to create an original product.
To work you will need:
- plasticine of three colors;
- cardboard for the base of the work;
- beads for eyes;
- stack for plasticine.
How to make chicken step by step:
- Using yellow material, make the head (a small circle) and the body (an oblong element that needs to be given the necessary shape) of the bird.
- Connect the two main parts.
- Make green wings and attach them to the body.
- Decorate the chicken's head: make a comb, a beak using plasticine, and use beads as eyes.
- Make a stand on which to sit the bird - and it is ready for presentation to parents or at an exhibition in the garden.
Aquarium fish for children 3-4 years old
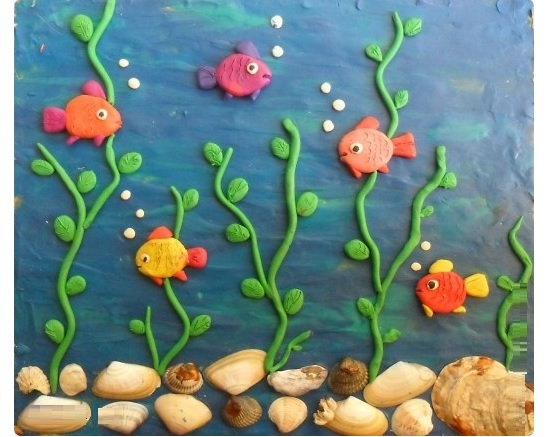
Many children are partial to the beautiful, bright fish that live in the aquarium. Using plasticine, it is possible to create not only figures, but also a composition, using colored blue cardboard to imitate water, green material for algae. The brighter and more diverse the fish are, the more interesting the DIY craft will look. Shells or other natural materials can be used for additional decoration.
To make fish you will need:
- plasticine;
- modeling board;
- additional accessories for decoration (sequins, beads).
Scheme of step-by-step creation of a fish:
- Roll up a plasticine ball and press it down, creating the contours of the figure.
- Make a tail and fins. Connect the parts to the body.
- Stick on the eye using beads, beads or black base material.
- Decorate the figurine with multi-colored plasticine, sequins (creating scales) or other elements.
- The aquarium fish is ready and can be used to create a composition in the form of an aquarium.
Tiger cub made of plasticine mass for children 5-6 years old
Using plasticine, preschool children will be able to create a cute tiger that majestically strolls through the desert or lies on the stage at the circus. It’s easy to sculpt an animal figurine, the main thing is desire, perseverance and the availability of the necessary material and tools. To create a tiger you will need:
- plasticine of three colors (orange, white, black);
- stationery knife;
- beads or sequins for eyes.
Step-by-step creation of a tiger:
- Make an oval using orange material and give it the shape of an animal's body.
- Sculpt the paws (to make them more realistic, you need to make notches with a special stack), a tail, and attach them to the body.
- Roll up the head, complete it with the necessary details: eyes (beads, seed beads or plasticine can be used), ears, mouth. To give originality to the figurine, you need to take white decorative elements.
- Roll out small “sausages” from black plasticine and use them to create dark stripes on the tiger’s body and tail. In addition, with the help of such elements you can create mustaches and eyebrows.
- Using the white mass, make a shirt front for the tiger and glue it to the animal’s body.
- The figurine is ready and can become an element of the composition or a self-sufficient product for an exhibition or competition.
Baby elephant made of plasticine for children 6-7 years old
To create an animal figurine, schoolchildren can use plasticine, and additional decorative elements will add realism and originality to the craft. The creative process will captivate the child and help him spend his time interestingly and usefully, and the resulting elephant will be suitable for participation in an exhibition at school. To create a work (a baby elephant in a zoo, for example), you will need the following materials:
- plasticine;
- stacks for work;
- a pair of decorative eyes (beads, rhinestones);
- PVA glue.
Step-by-step creation of an elephant:
- Using gray plasticine, roll into balls of different sizes: one large for the body and four medium-sized ones to form the legs. Sculpt all the parts and connect them together. On the forefoot, make small cuts using a stack.
- Decorate your legs with small white circles and blue spirals.
- Make an elephant's head with a trunk. Using a stack, make small notches to mark the folds of the nose.
- To create the ears you will need a pink and gray mass: connect two pieces of multi-colored plasticine and roll out thinly, making the edges wavy. Attach the parts to the head, which needs to be connected to the body.
- Roll up the tusks, thin flagella for the bangs, tail - attach all the elements to the body to complete the figurine.
We sculpt space for schoolchildren in grades 1-4 from plasticine on cardboard
Unexplored space is interesting to children, and they often create applications and creative works on this topic: starry sky, flying saucers, alien people, planets solar system and not only. Such works always look unusual and very interesting, because in them the guys reflect their vision and idea of the universe.
To create a craft you will need:
- plasticine mass;
- stacks;
- cardboard (it will become the basis for the craft);
- additional elements for work (matches, toothpicks, straws, etc.).
How to make step-by-step crafts on a space theme with a flying saucer and planets:
- Roll out the material, mold a plasticine ball, flatten it into a disk shape.
- Make a hemisphere of a bright shade and attach it to the center of the circle on top.
- Make four or six legs of an alien ship (the number depends on the size of the craft) and connect them to the main part. The flying saucer is ready.
- To create a planet, you need to twist balls using different colors of plasticine: yellow for the sun, green and blue for Earth, brown for Saturn, burgundy for Mars.
- Glue all the elements onto cardboard, creating one composition. Additionally, a variety of available materials, including natural ones, can be used.
Easy picture: a hedgehog made of plasticine and seeds for kindergarten
Beautiful and original creative work does not have to be difficult to create. Making a cute hedgehog using plasticine and seeds is very simple, and even small children can cope with such work. To work, first of all, you need to prepare cardboard and a printed sheet with the contours of the animal - this will serve as the basis for the future application.
Materials for work:
- PVA glue;
- plasticine mass;
- sunflower seeds;
- cardboard, sketch of a hedgehog (drawn or printed).
Step-by-step creation of a hedgehog:
- Print out a black and white picture of a hedgehog (template), which will become the basis of the work.
- Coat the area of the spines generously with glue and glue black seeds. It is important to ensure that all elements are directed in one direction, this will help make the work more neat and beautiful.
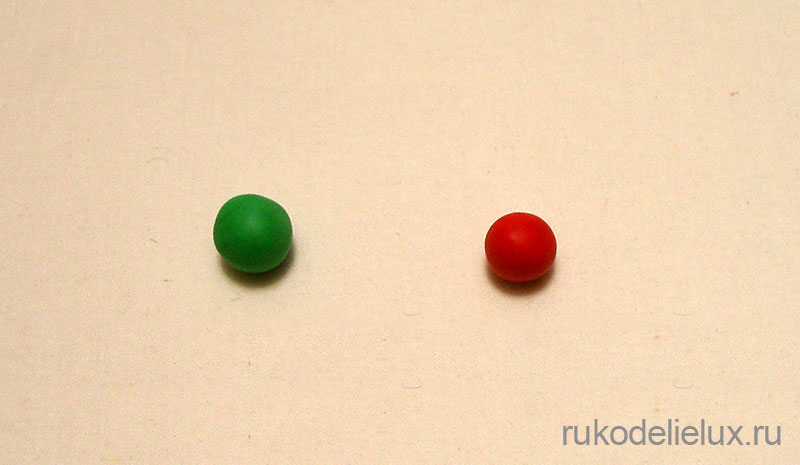
- Using various plasticine, make small fruits, mushrooms, leaves and other elements that need to be glued onto the hedgehog’s back to make the craft three-dimensional and more realistic.
Master class on making a Christmas tree from plasticine
In anticipation New Year's holidays Many people have a natural desire to create room decoration with their own hands. Many kindergartens and schools host exhibitions of handicrafts by children and their parents, which allows them to demonstrate their creative abilities. A simple, but original and beautiful product with a New Year theme is a Christmas tree created using plasticine. To work, you will need a minimum of materials: green mass (plasticine or salt dough), scissors and decorative elements for decoration.
Step-by-step creation of crafts:
- Roll the plasticine mass into a ball, then make a cone blank.
- Insert a pencil or branch into the bottom of the product, which will imitate the leg of a tree.
- Using scissors, make small cuts to form Christmas tree needles.
- Decorate the finished craft with beads or beads to give it a festive look. This way the Christmas tree will become a real decoration for your interior or exhibition.
Plasticine rose for middle and high school children
Children aged 8 years and older can make more complex crafts from plasticine, for example, flowers, a forest-themed composition, or an original birthday card. To create a beautiful rose, you will need plasticine in two shades (green and red or pink) and cardboard if it is a composition on paper. Step-by-step flower creation:
- The red plasticine mass should be rolled into a ball, then into a long rope, which must be made flat by pressing it between your fingers.
- Twist the finished ribbon to form a loose rosebud. Bend the edges of the flower slightly to form petals.
- Using green mass, sculpt sepals, leaves, and stems.
- Connect all the details - and the beautiful craft is ready, and if desired, thorns can be added and impressions made to make the product more realistic. This rose can become a decorative element for a postcard or composition in a vase.
Crafts on the theme of autumn from plasticine and natural materials
Easy crafts from plasticine chestnut cones and acorns
How to make a hedgehog from ball plasticine with children
Children's applique made from seed grains and plasticine
We sculpt autumn leaves from plasticine on a disk
How to make a rowan branch with children
In this article you will find many ideas for modeling from plasticine with step-by-step instructions and photos, as well as what crafts you can do with a child at different ages.
Working with plasticine has a beneficial effect on a child's development. These activities improve memory, attention, have a good effect on thinking, develop fine motor skills of the hands, which in turn contributes to the development of speech, form the imagination, open up creative abilities, and force one to exercise imagination. You will learn more about the benefits of practicing with plasticine and other materials in the article
Is plasticine necessary for children under one year old?
It is recommended that children engage in modeling from the age of 1; until the child is one year old, the child will most likely show no other interest in plasticine other than trying it out. But children are all different, so you can try modeling with your child earlier. Show your baby plasticine of one color, tear off a piece of it, roll the ball, let him hold it in his hands. If the child is not interested, put it aside and try again after a while.
Modeling from plasticine for children 2 and 3 years old
At the age of 2 to 3 years, a child still cannot cope with ordinary plasticine, so it is worth choosing special soft plasticine for small children.
Children are still learning to control their hands and it is difficult for them to practice modeling. Select tasks that are not difficult for your child so that he can cope with them; this will inspire him, give him self-confidence and he will want to continue to engage in this useful type of creativity.
By the age of three, a child will already be able to:
- tear off pieces from plasticine
- make balls out of them
- flatten them
- stick plasticine to paper and smear it
- crush the balls with your palms
- make sausages
- twist them into rings
- combine all the components into one craft.
The parents' task is to teach their child this. 
Show your child
- how to cut a sausage and get rings
- how to cut out figures from flat cake
- how to cut dough into squares, triangles and other shapes
- how to stick various objects onto plasticine smeared on cardboard, for example, seeds, beads, cereals, pasta
The duration of a modeling lesson at the age of 1-3 years is 5-15 minutes and depends on the child’s mood and desire to work with plasticine. 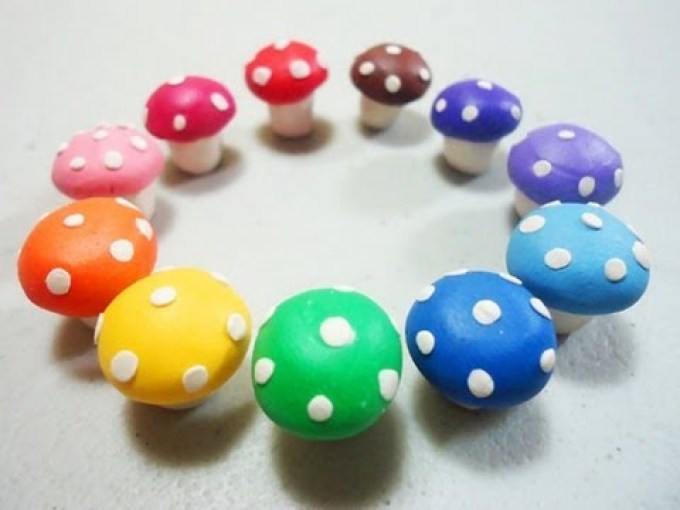
For this age, it is recommended to use plasticine only in primary colors, so as not to overload the child with a large variety and not distract from the modeling activity itself. In addition, if desired, colors can be mixed and new shades can be obtained.
Modeling from plasticine for children 4 and 5 years old
At the age of 4-5 years, a child already skillfully handles a modeling knife, his hands are already stronger and he can work with ordinary plasticine.
Children of this age know how to roll balls and sausages, and now it will be more interesting for them to make more complex and interesting crafts themselves. 
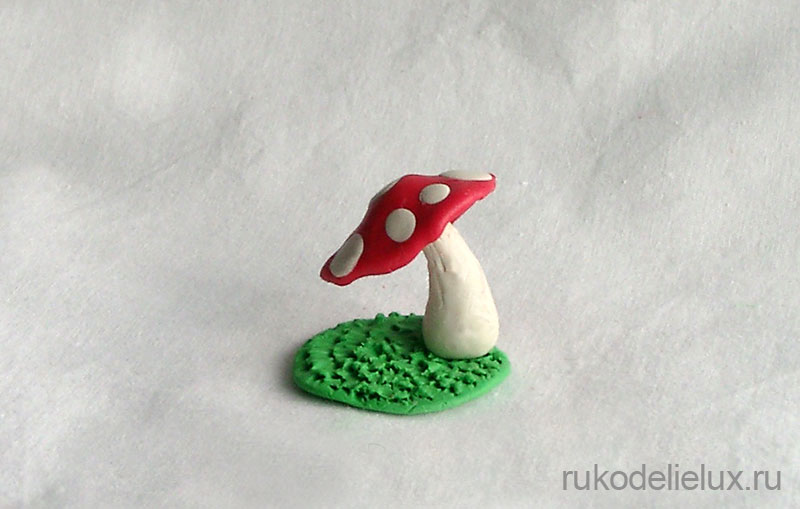
Invite your child to make a mushroom meadow or forest lawn with bushes and trees around. Maybe the child will want to make something of his own, don’t interfere with this. On the contrary, this is good and fosters independence.
Also, the mother can sculpt one part of the composition, and the child another, then combine everything into one craft. This way the child will feel responsible for his part of the work.
A child at this age can sculpt simple figures of animals, plants, birds, and food for dolls.
You can begin to master the technique of plasticine printing with your child and make simple plasticine paintings and panels. Invite your child to add natural and waste materials to such paintings. 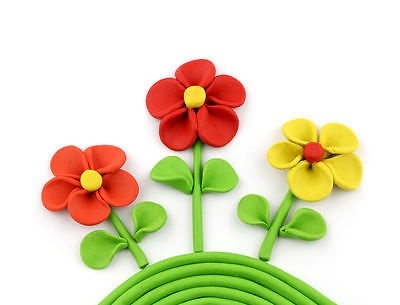
The time of working with plasticine is 10-20 minutes; if the child is very enthusiastic, it can be extended a little, depending on the child’s perseverance.
Modeling from plasticine for children 6 and 7 years old
You can use regular plasticine or buy different sets, for example, for modeling confectionery products from Play Doh. There are also kits with mass for modeling; they harden well in air and are preserved in the future.
At primary school age, children already know how to independently fantasize and bring their ideas to life. They sculpt more complex figures following step-by-step instructions.
Help your child make a picture from plasticine; he can already make more intricate drawings with a lot of small details, transitions of colors and different textures. 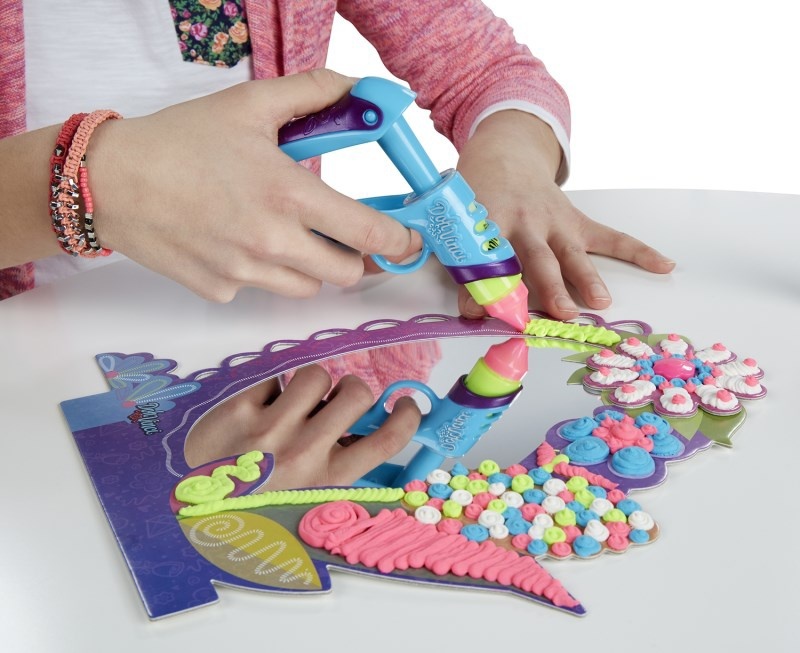
There is no need to limit the time for modeling at this age; let the child do as much as he wants and as much imagination and perseverance as he has.
How to make food for dolls from plasticine?
Soft plasticine is good for creating toy food. It will be boring for the baby to just make balls, but if they are used as decoration for a toy cake, it will be more interesting. You can make various cakes, pasta, sandwiches, pastries and much more with your child, as long as your imagination is enough. You don’t have to throw away the candy boxes, but make your own toy candies for them. Be sure to fit your doll food to the container they will eat it from. 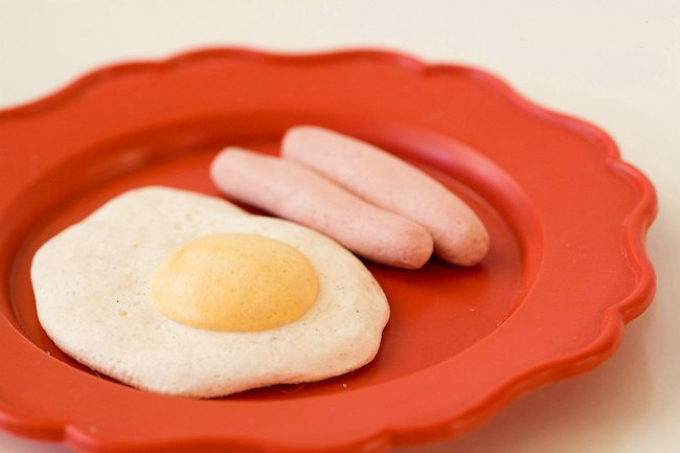
For older children, you can combine the lesson with mathematics, divide the cake into equal parts and study fractions, feed guests and count how many cakes you need to prepare for them.
Below we give you a few step-by-step instructions how to make some food for dolls from plasticine.
Broccoli made from plasticine
Take plasticine in three different shades of green. From the lightest one, make a sausage leg for cabbage, divide it in a stack into several small branches. Take three pieces of plasticine of different shades and press them through a kitchen strainer, and you have broccoli florets. Connect these parts together. 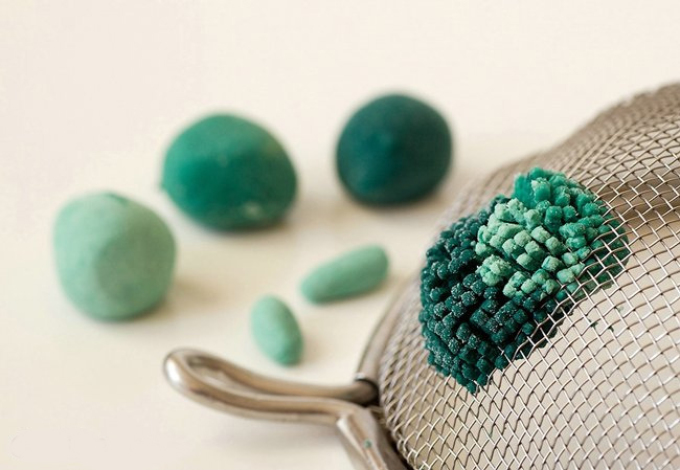
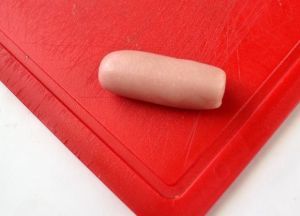
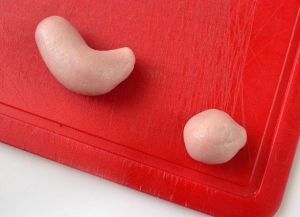
Modeling sausages from plasticine
Prepare sausage-colored plasticine. Make a flat cake out of it, put white stripes on top. Roll the cake, roll it like a sausage between your palms and put it in the refrigerator for a while. You need to cut the sausage using sawing movements, not pushing. 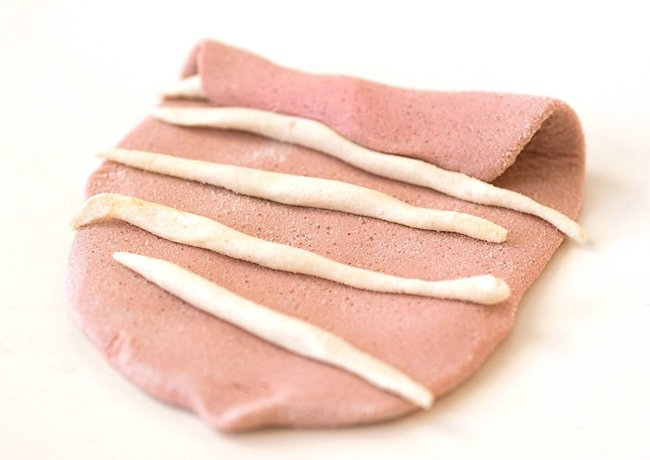
Making ice cream from plasticine
Take a piece of sand-colored plasticine and stamp cells on it, like on waffles. Now make a cone and one or three balls, the same color as you want to make ice cream, you can take different colors. We stick the balls onto the cone to its base, and wrap it with our wafer cake. You can add jam on top by smearing two or three sausages crosswise on the balls, stick small multi-colored pieces and sprinkle with crumbs. 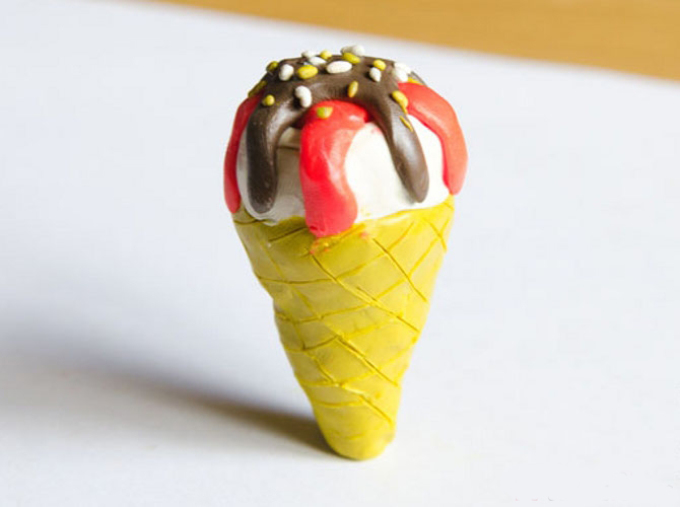
Modeling cheese from plasticine
The cheese is made from yellow plasticine with a small addition of orange. Make a cake, cut out a triangle and press holes in it, it is convenient to make large holes with the back of the pen, and small ones with a writing tip or pencil. 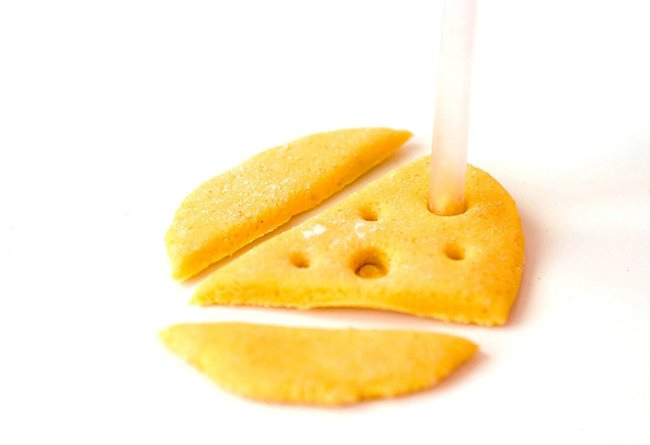
Making a cake from plasticine
Make several plasticine balls of different colors, it is better to take two brown ones for the chocolate layers of the sponge cake, two different berry colors and one of whatever color you want for the icing. 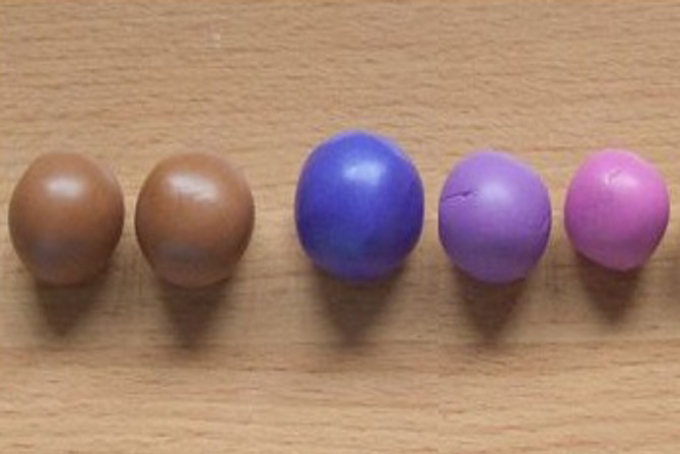
We make chocolate and berry cakes very simply, flatten the ball a little and roll it out into barrels to even them out. 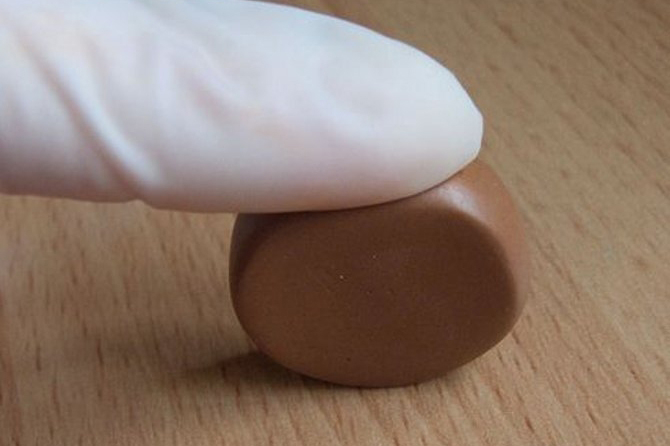
We combine all the cakes into one cake and roll it sideways again to even out all the layers. 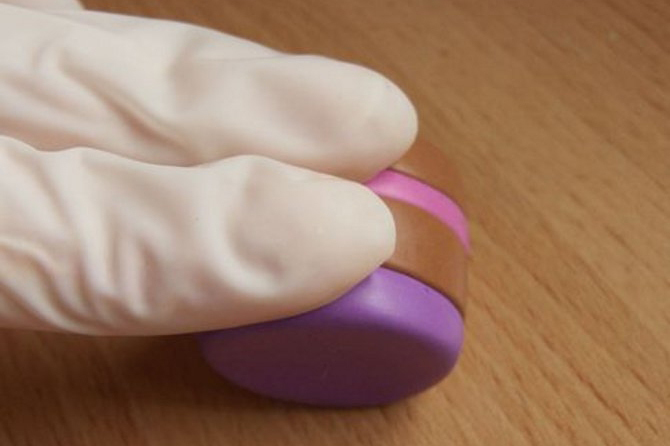
We take our icing ball and roll it out as thin as possible, wrap our entire cake in it, cut off the excess edges and smooth it out. 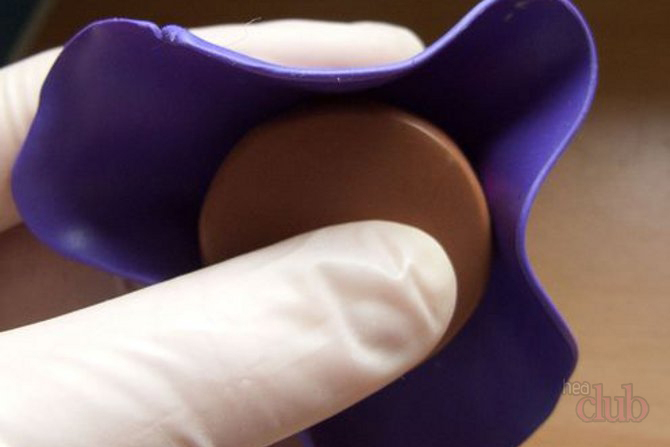
Now we make the cream: roll out the plasticine into a thin and long sausage, fold it in half and twist it. We spread it around the perimeter of our cake. ![]()
We cut the cake into pieces and use a toothpick or toothbrush to add porosity to our chocolate layers of the sponge cake. Each piece can also be decorated with fruit beads and topped with glaze. 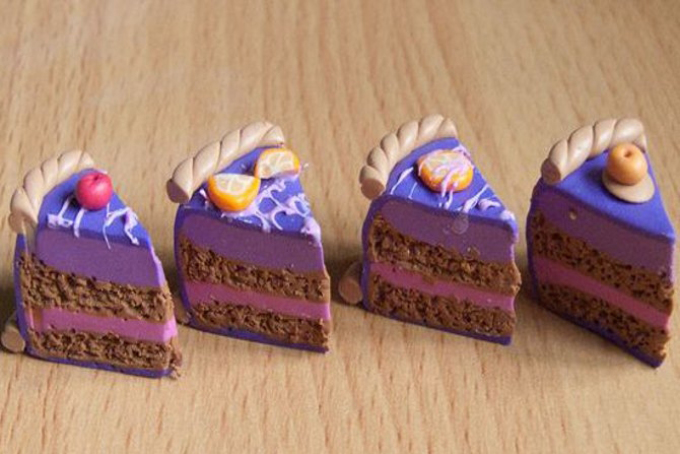
Bread can be sculpted using sand-colored plasticine. To make a loaf, add toothpick prints to it diagonally. 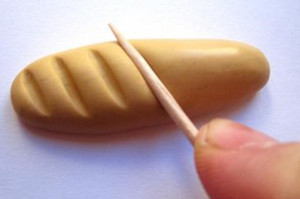
How to make a watermelon from plasticine?
We take black plasticine and roll several thin sausages. We roll out the red plasticine into a not very thin oval-shaped cake. Place one sausage in the middle and fold the flatbread in half. 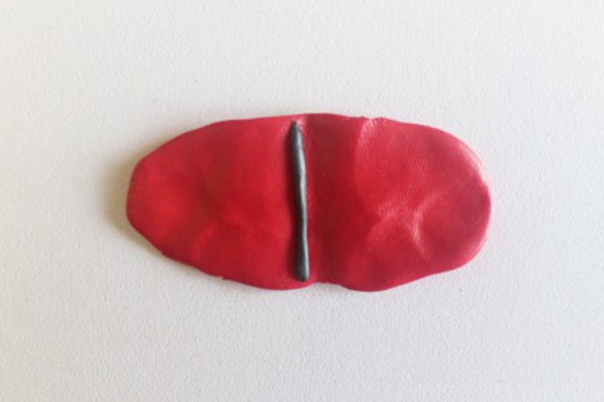 Add a couple more sausages and fold them again and repeat this several times. Finally, give it a round shape.
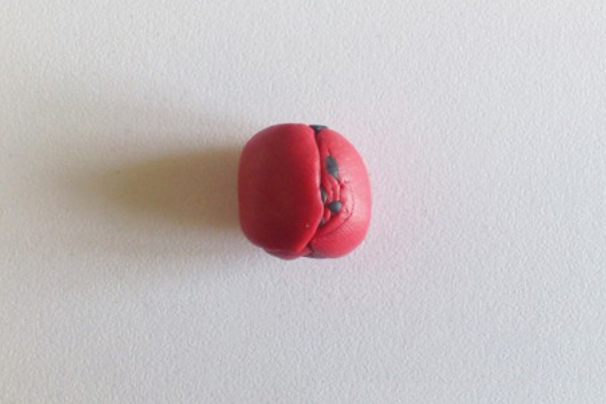
We wrap our watermelon in a white cake, and then in a green one, thus making a peel. 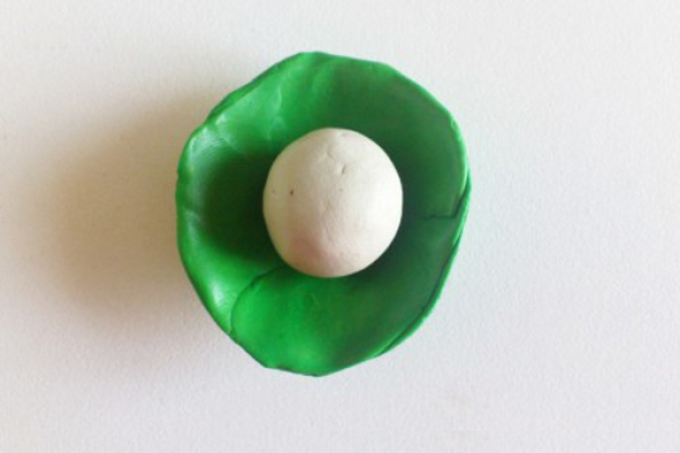
Add lighter colored green stripes. 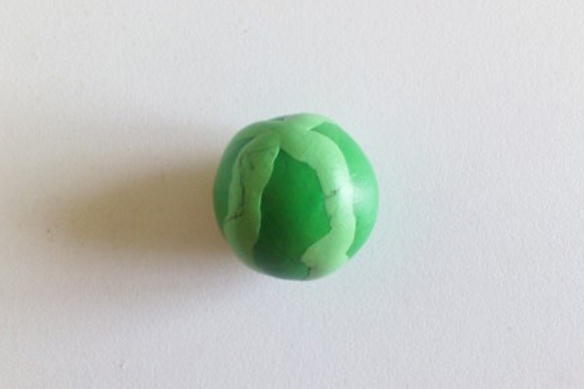
And cut it. Look how ripe our watermelon turned out! 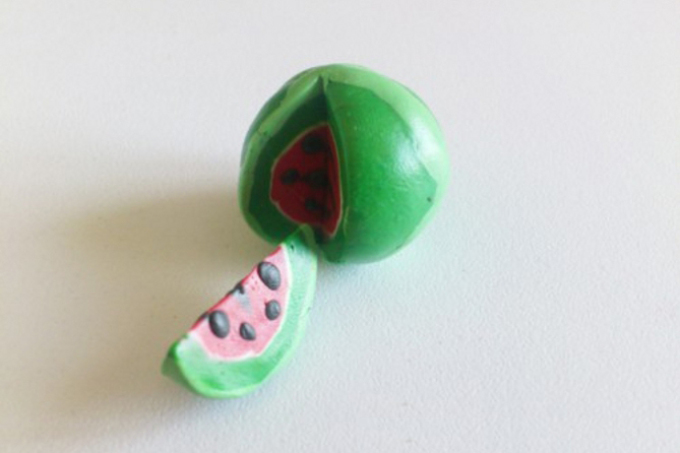
VIDEO: Modeling from plasticine. How to make a hot dog?
We sculpt animals from plasticine
Having step-by-step instructions, it is very easy to sculpt animals and insects from plasticine.
Making a giraffe from plasticine
- For the giraffe figurine, take yellow, black, orange, white plasticine and a toothpick
- You need to make a voluminous oval from yellow plasticine, this will be the body of a giraffe
- Add 4 cones to it, which will be its legs.
- Roll a long sausage, this will be the neck of a giraffe, but so that it holds its shape well, pierce it in the middle along with a toothpick
- Make the head and ears
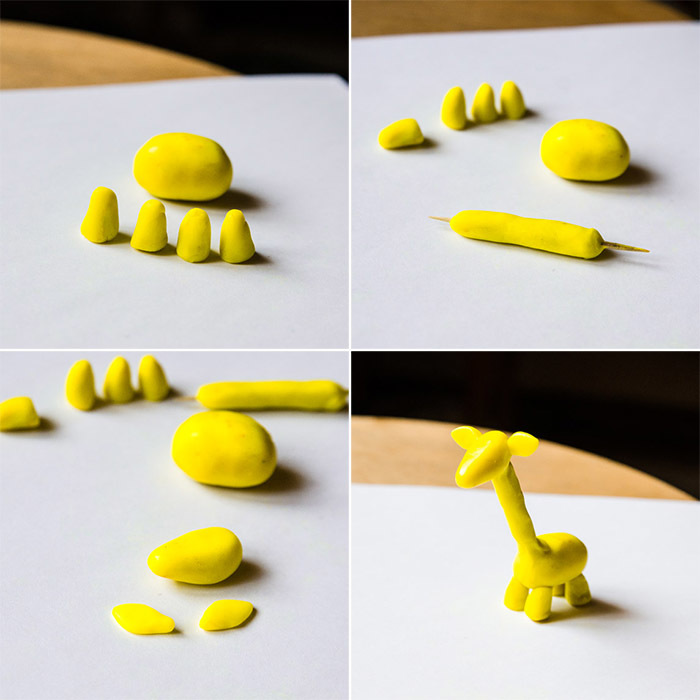
- Connect everything into one figure, smooth out the joints.
- Add a tail to the giraffe, also made of yellow plasticine, and make an orange tassel at the tip.
- Make orange spots for the giraffe using small balls of plasticine.
- Add eyes, orange horns and pierce the nostrils with a toothpick.
The giraffe is ready! 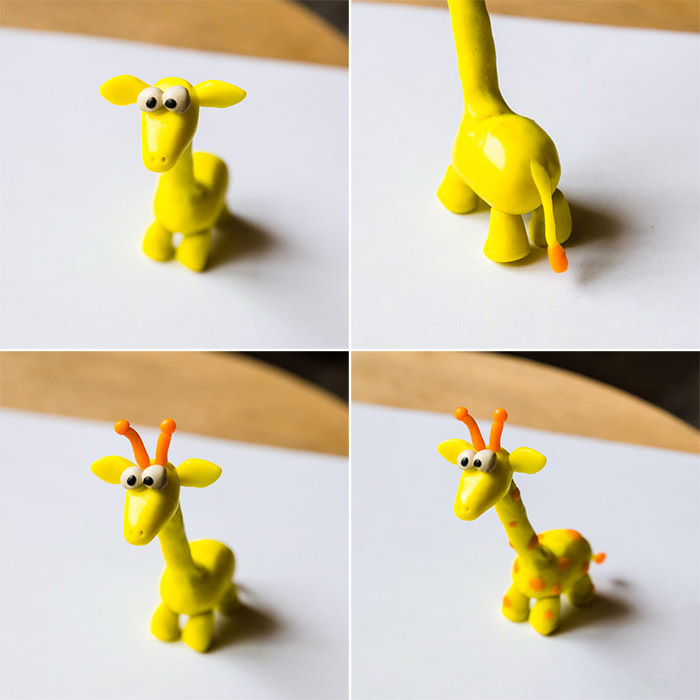
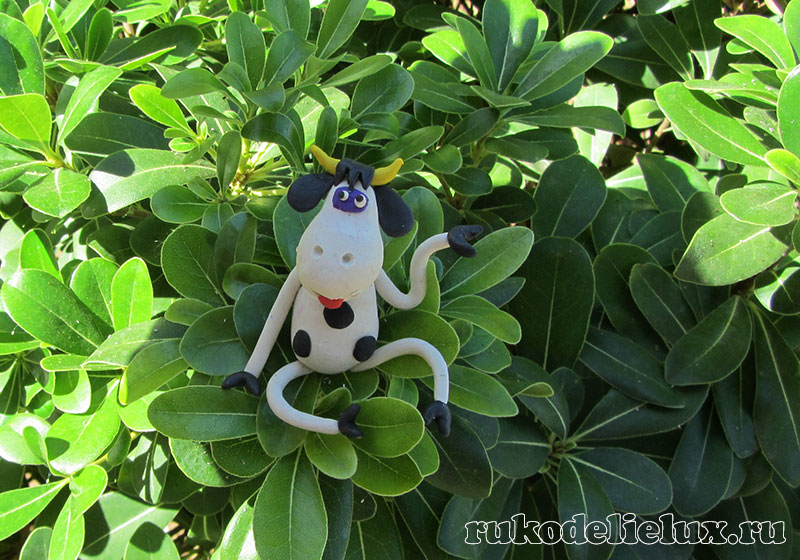
You can make such a cheerful cow from plasticine.
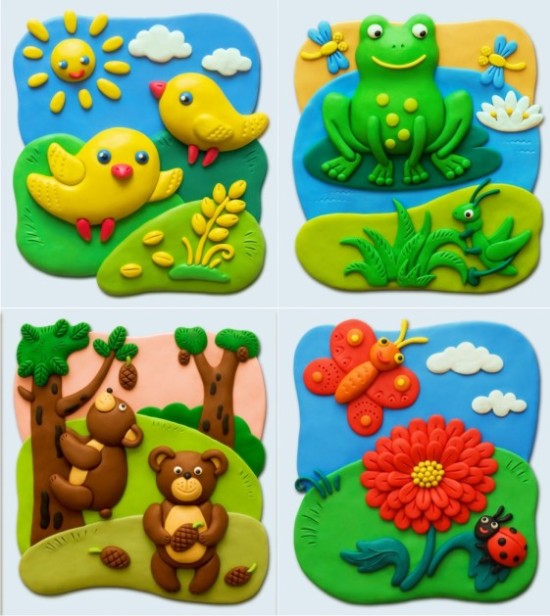
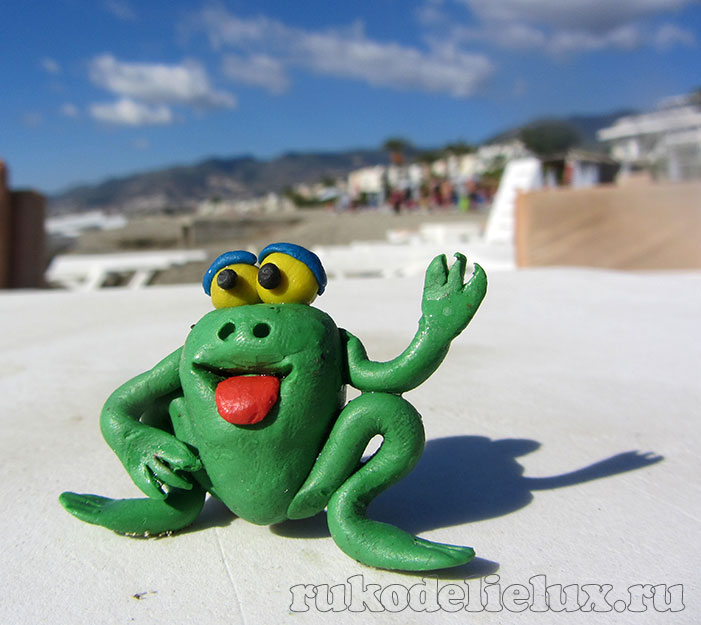
A simple idea on how to make a frog from plasticine. 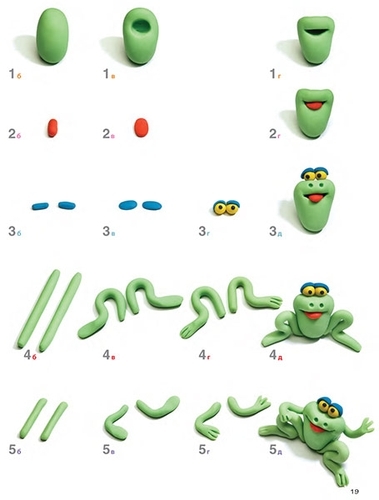
Here's an interesting dog made of plasticine with step-by-step photos. 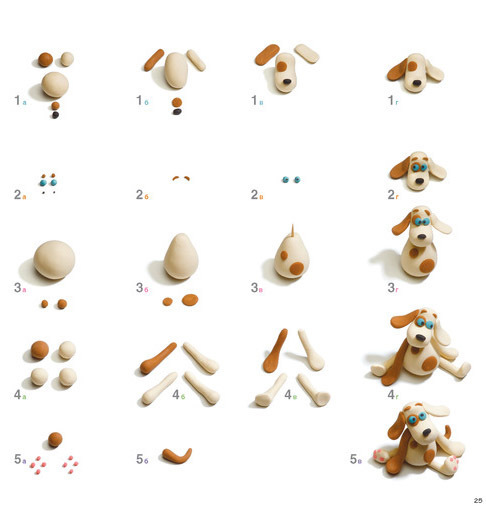
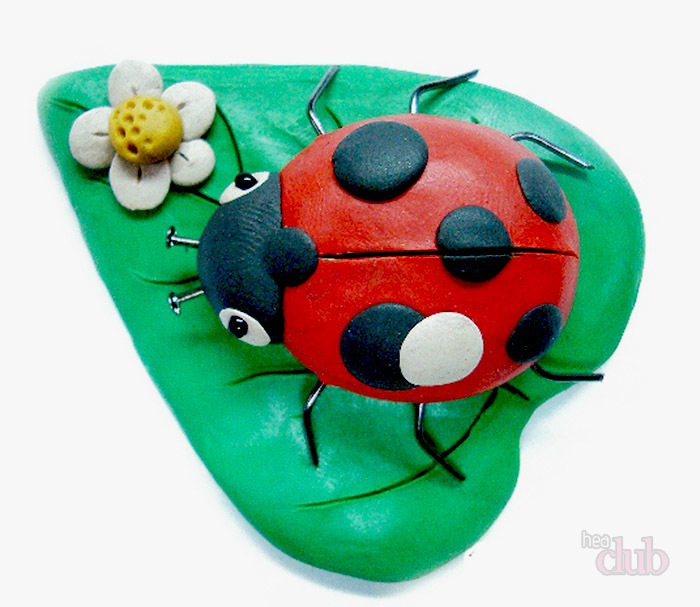
Making a ladybug from plasticine
- Prepare plasticine in red, black and white colors, you will also need thin wire, black beads and a toothpick
- If you want to plant ladybug on a leaf, make it from green plasticine, press the veins on it with a toothpick, and cut off the excess
- Make the body out of red plasticine in the shape of an oval, press it down a little on one side where the head will be
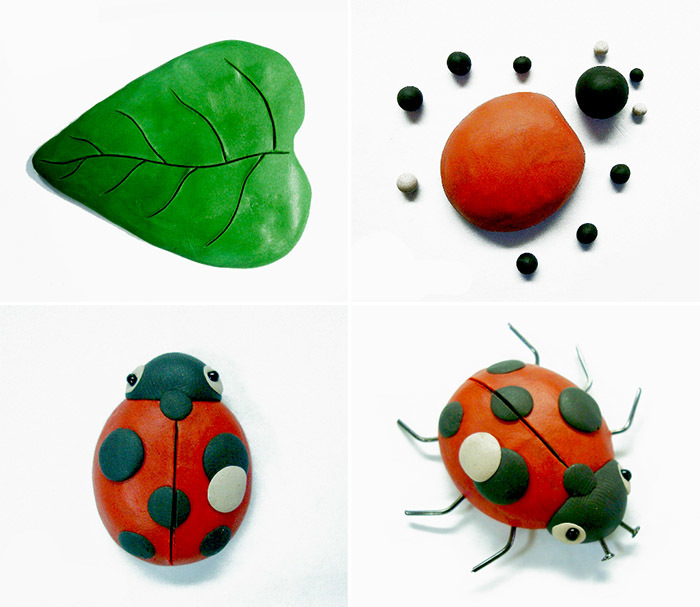
- For the head, roll a ball of black plasticine
- Add black spots from flattened balls
- Make eyes from white plasticine and beads
- Press the cut of the wings with a toothpick
- Make paws and antennae from pieces of wire
How to sculpt smeshariki from plasticine?
Let's make together the children's favorite cartoon characters from the cartoon "Smeshariki".
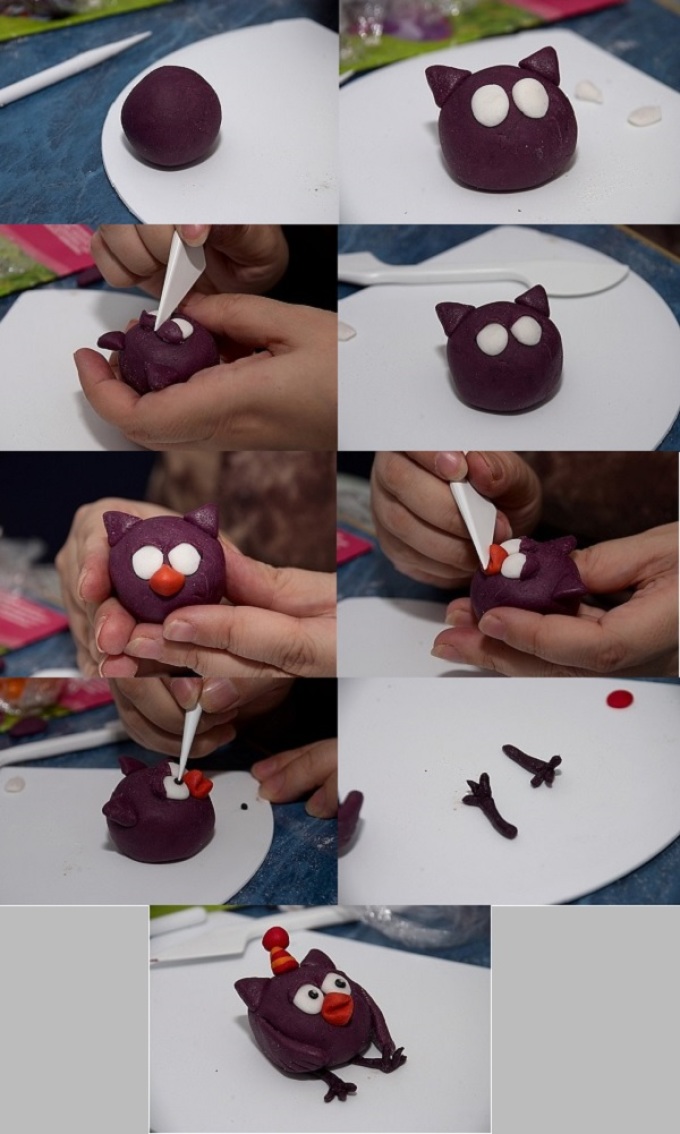
Sovunya made of plasticine
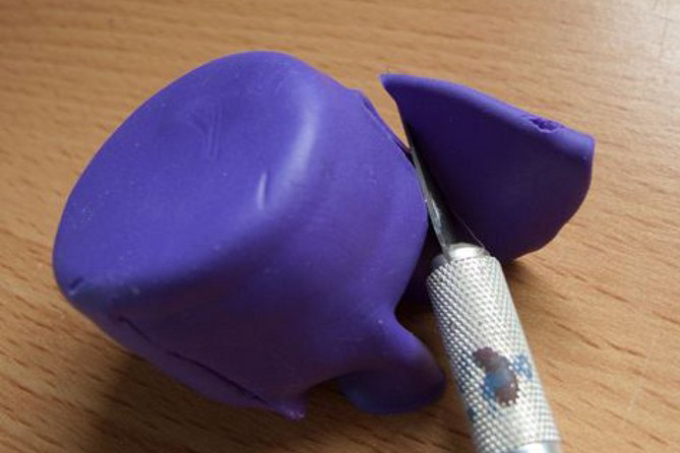
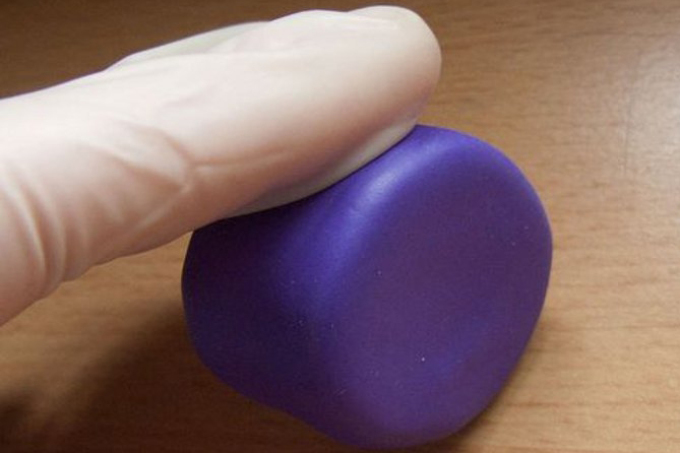
- Take purple plasticine, make a ball out of it - this will be the basis of our figure
- Make triangular ears and stick them to the ball
- Flatten two small white balls for the eyes and make a “visor” over the eyelids. Pupils can be made from small pieces of black plasticine, black beads or peppercorns
- Now take an orange or red piece of plasticine and mold it into a cone - this will be the beak. Press it down as shown in the picture so that the beak is slightly open and secure it under the eyes
- Make legs from black sausages and stick them to the figure
- Make wings for Sovunya, press stripes on them, imitating plumage
- Complete the look by making a bubo hat from crushed red and orange cakes.
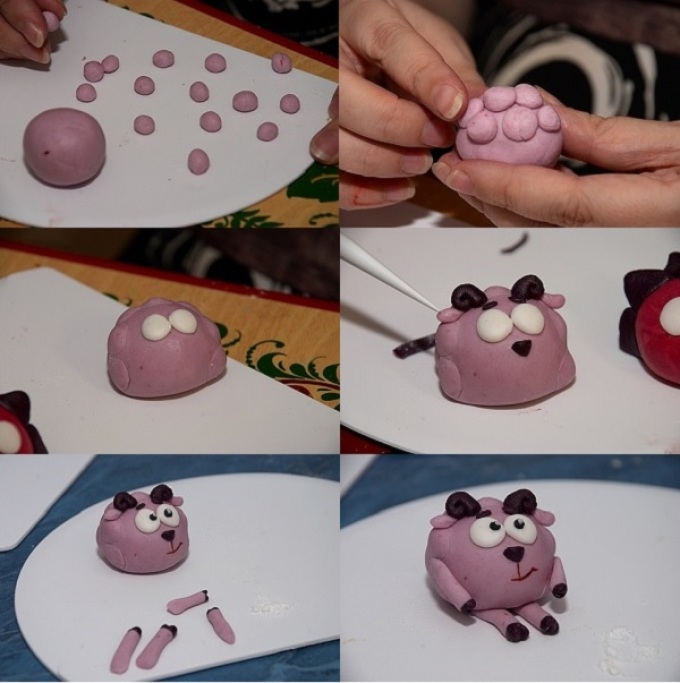
Plasticine lamb
- Take pink plasticine and roll it into a ball for the base of our figure.
- To imitate wool, make several pink small balls and stick them in the body
- Make ears, legs and arms for Barash from pink sausages
- Blind your eyes just like for Sovunya
- Use brown plasticine to make the horns, add it to the paws of our figure and don’t forget about the eyebrows
- Make a mouth out of thin red stripes
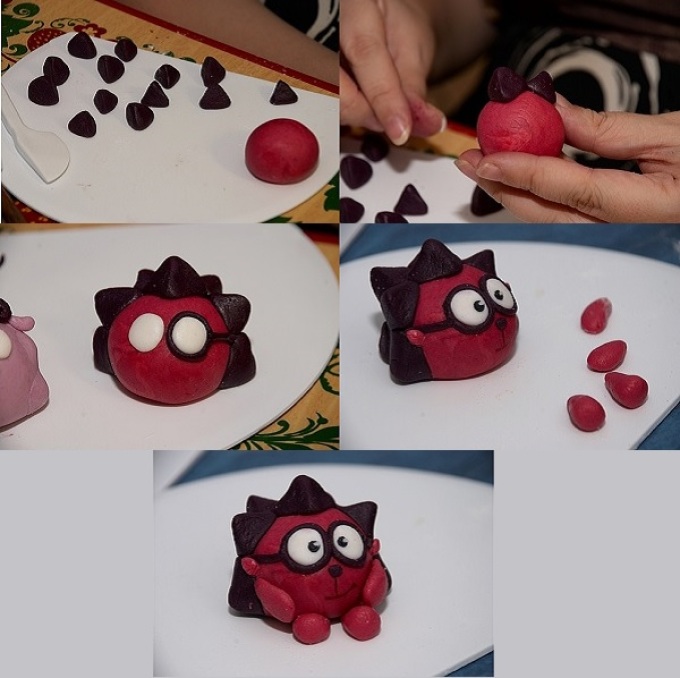
Hedgehog made of plasticine
- Roll out the base for the figure from red plasticine
- Cover half of the ball with black, slightly flattened plasticine cones, which will act as needles.
- Blind your eyes and add black glasses to them, attach them to the base
- Add paws and ears from red sausages of different sizes
- Don't forget about your nose and mouth
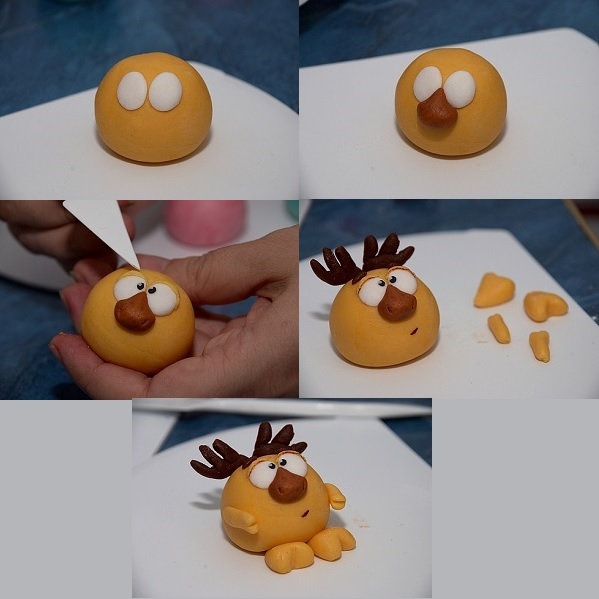
Plasticine elk
- Roll a yellow base ball
- Give him eyes and eyelids like Sovunya’s
- Make a large nose from a flattened cone and eyebrows from thin brown sausages
- Make the paws as shown in the picture
- All that remains is to add horns to him, which can be easily made from brown plasticine sausages
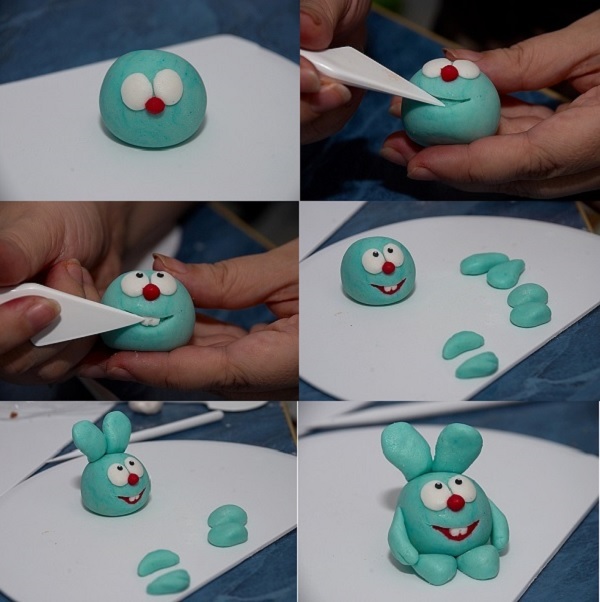
Plasticine crumbs
- The base will be a blue plasticine ball, if you find or mix turquoise plasticine yourself, it will be just wonderful
- Make his eyes like the other characters, and add a red balloon nose right below them
- Make large ears and paws for Krosha from plasticine of the main color
- Now we make a smile: with a plasticine stack or knife you need to make an incision in the place where his mouth will be, and push the plasticine apart, add a red sausage inside, and stick two white teeth on top of it
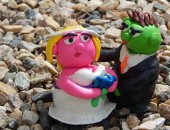
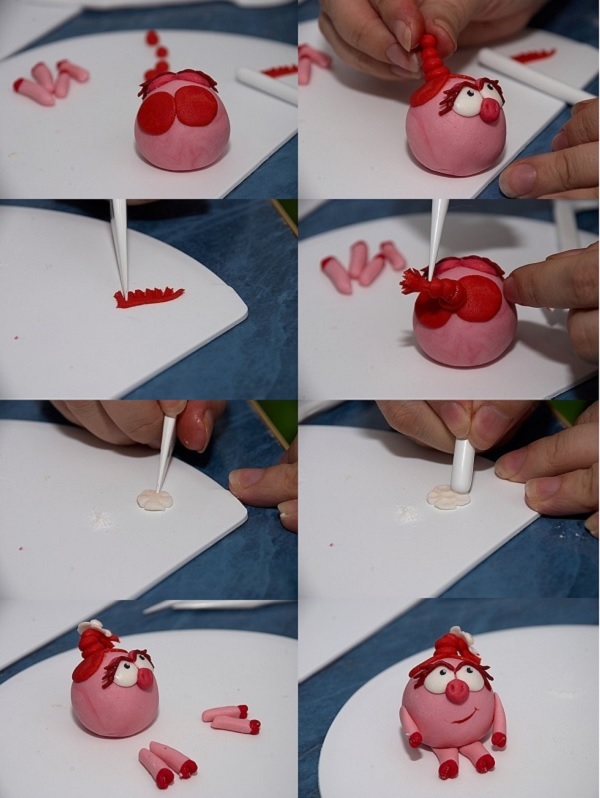
Nyusha made of plasticine
- Our Nyusha will be pink, make a pink ball for her.
- Make her eyes the usual way
- Make a nose out of a red flattened ball, press two holes on it
- Make eyebrows and eyelashes for Nyusha from thin red sausages as shown in the picture
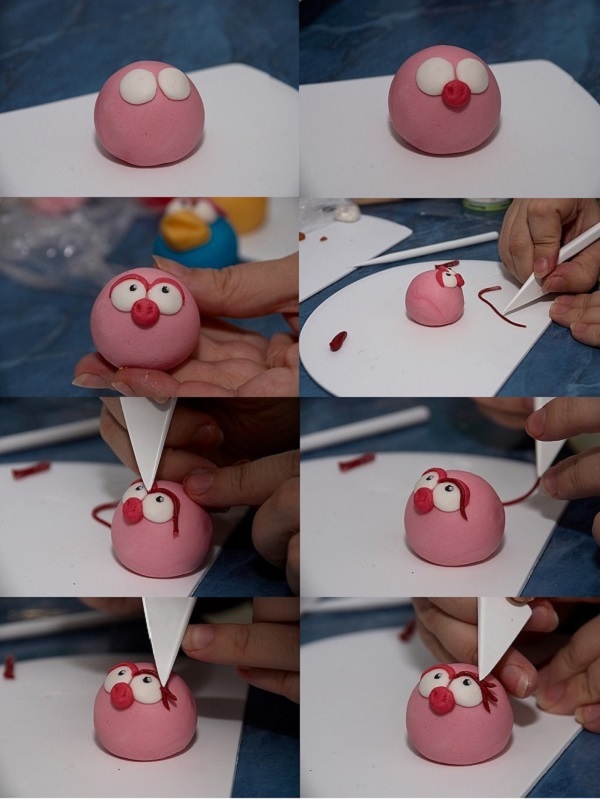
- Attach two red cakes to the back of the base; in the middle of them are four slightly flattened balls; this will be a pigtail. Make a ponytail for it as shown in the picture and attach it to the pigtail
- Decorate your ponytail with a white plasticine flower
- Make the paws from pink sausages and add red hooves to their tips.
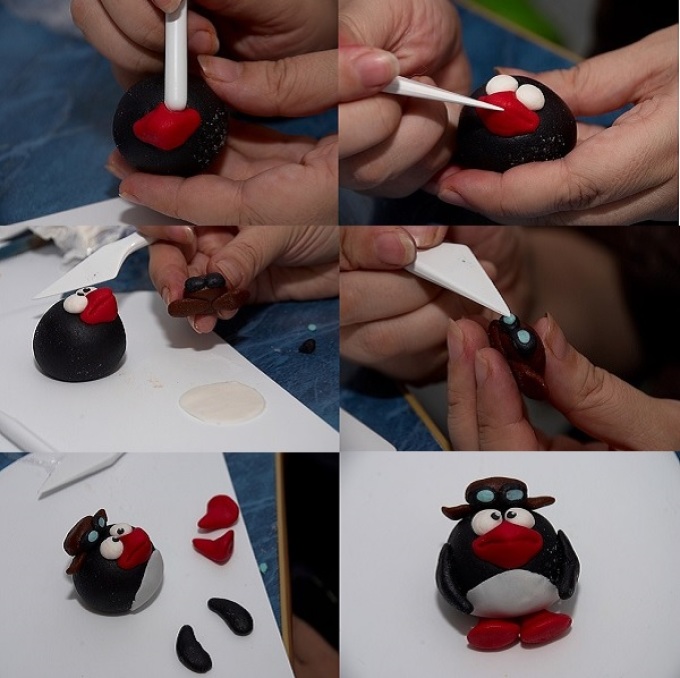
Plasticine pin
- The base of this figure will be made of black plasticine. Make a ball
- Make a tummy out of a piece of white plasticine
- Add eyes from white and black plasticine
- Immediately under the eyes, stick a beak, make it from a red cone, you need to flatten it slightly and push it with a knife, opening the beak
- Make a hat for Pin from a piece of brown plasticine, add blue balls to it, imitating glasses glasses
- Make red legs and black wings for our figurine
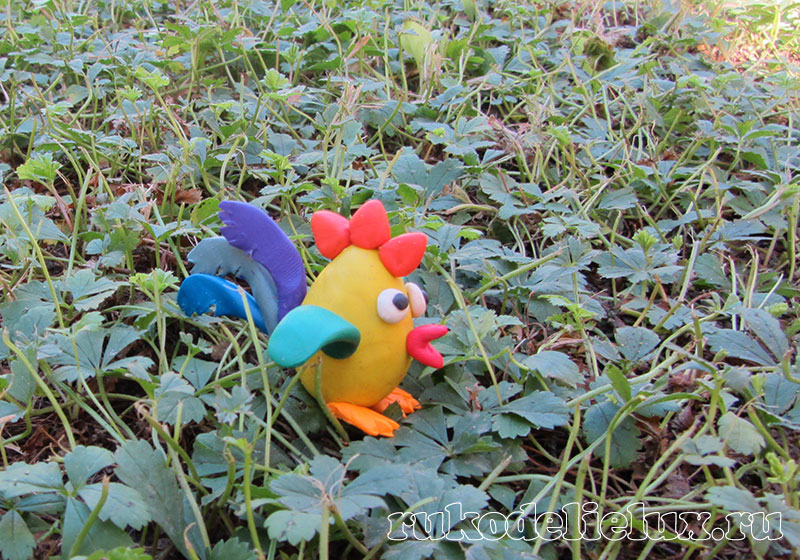
Modeling a bird from plasticine
Let's blind a parrot. Follow step by step instructions, given below, and you will get a beautiful and talkative bird.
- Take red, yellow, blue, white and black plasticine
- Make an oval body for a parrot from yellow plasticine
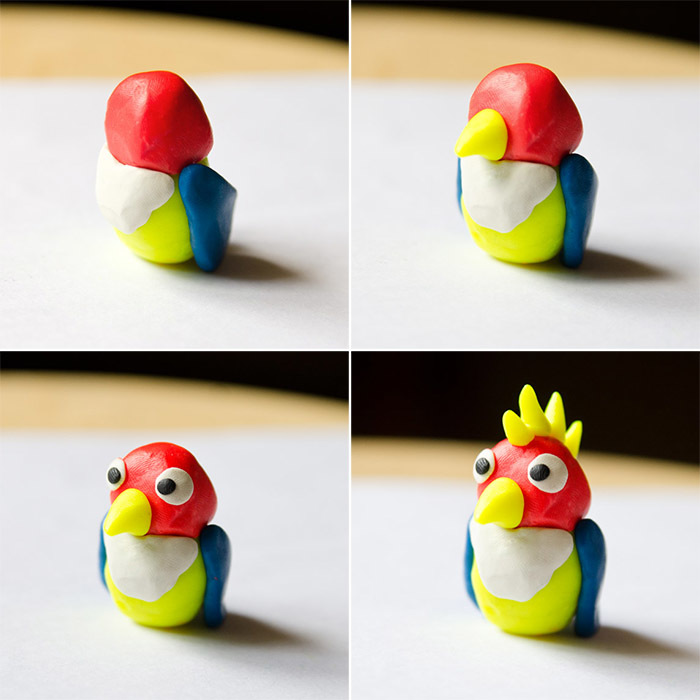
- Add a smaller red circle - this will be the head of our bird
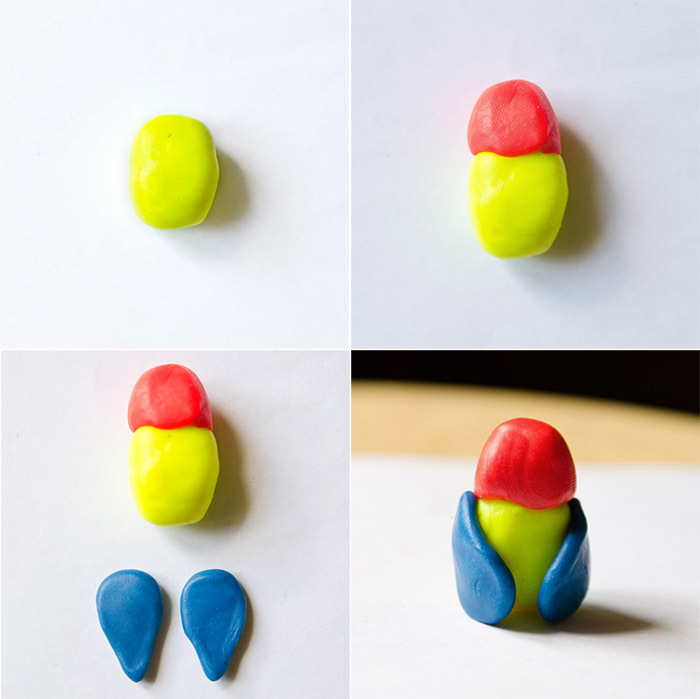
- The wings will be blue, to do this, stick two droplets on the sides of the body
- Add a white breast to your parrot
- Make a yellow beak, stick on the eyes and make a crest from the cones
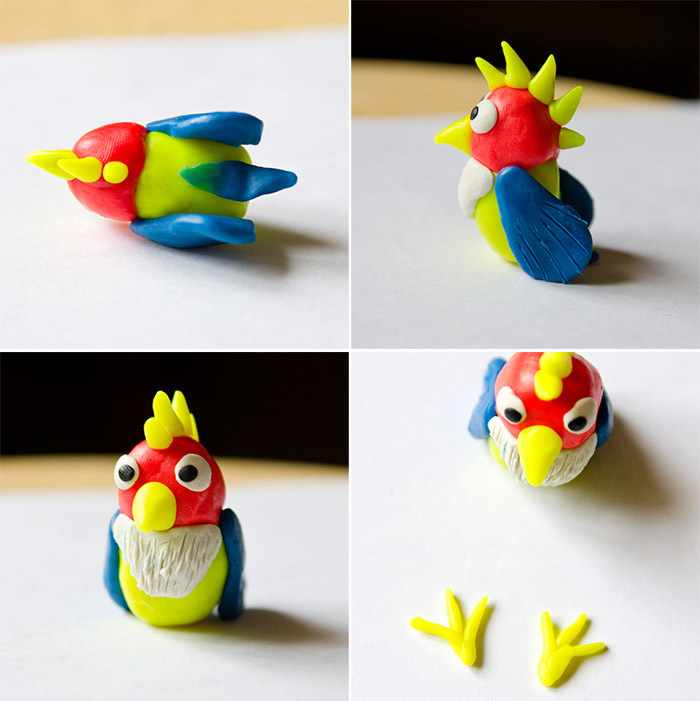
- Let's add another tail and use a stack to push through the grooves on the bird's chest and wings that resemble plumage
- All that remains is to attach the paws and the parrot is ready
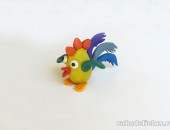
This kind of cockerel can be made from plasticine. 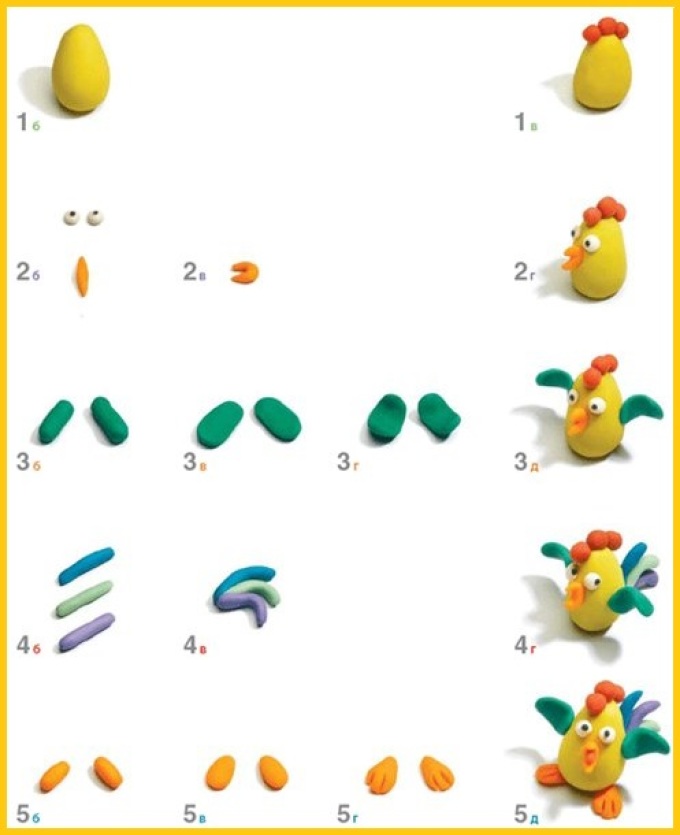
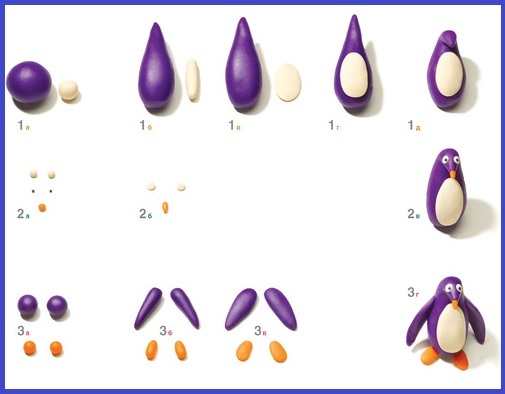
This is how a penguin is made from plasticine.
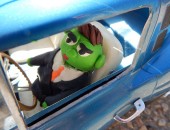
How to sculpt dinosaurs from plasticine?
- Take plasticine of any color, because you can make a dinosaur whatever you want
- Divide a piece of plasticine into three parts, one will go to the head, from the second we will sculpt the body, and the third will be divided into all other parts
- Divide one piece into three more parts, and one of them also into three
- From the two largest pieces we make the body and the head, to do this we roll them into sausages and stretch them out, connect them to each other and align the junction. What you should get is shown in diagram number 3
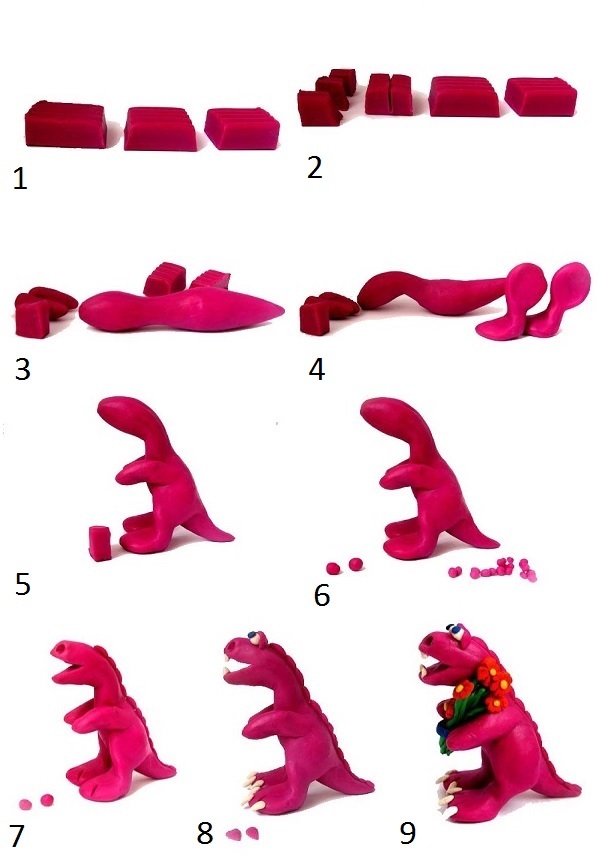
- Roll the two middle pieces into cylinders and stretch them out a little, flatten them from the bottom and top, leaving a thin “waist” - form the legs as shown in diagram 4
- Make sausages from small pieces - front legs
- Now assemble the figure from what is already ready and smooth out all the joints
- Roll a lot of small balls from the remaining piece of plasticine and stick them, pressing them on the sides, onto the dinosaur's crest.
- Make his eyes and don't forget about his eyelids
- Use a plasticine knife to cut the dinosaur's mouth and open it. Push down the nostrils with a toothpick, trim the paws a little
- Make teeth and claws for our figurine from white plasticine
You can also make such a dinosaur from a pine cone. 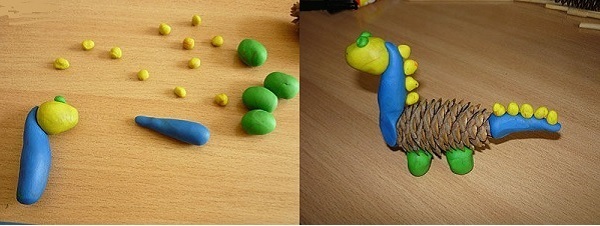
And here is another dinosaur - stegosaurus, one of the most popular among children. 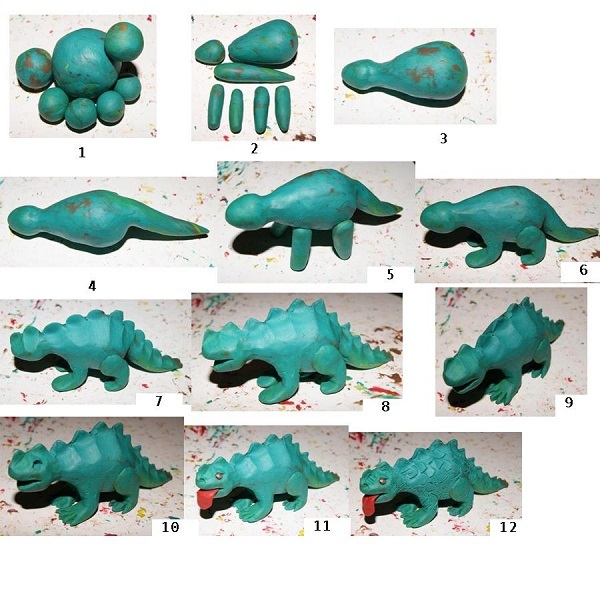
If a child wants to make a predator dinosaur, invite him to make a Dimetrodon.

How to sculpt a pony from plasticine?
After watching the My little pony cartoon, your daughter will probably want to make the same pony. Let us help her with this.
- Take plasticine of the desired color, pink, purple, red and blue shades are perfect
- Roll a sausage of the chosen color - this will be the body of the pony
- Pull one side of the sausage up into a cone - this will be the neck
- Roll the ball and stretch it out a little, forming the face of a small horse
- Make droplets out of two small pieces and stick them to the top of the muzzle - these will be the ears
- Use a toothpick to press down the pony's nostrils and mouth.
- Roll four cones from plasticine of the main color, cut off a little plasticine diagonally from the narrow side with a special knife, this is where the legs will be attached to the body
- Tap the wide part of the cones on the board to create horse hooves
- Assemble your figurine. Smooth out the joints
- To make the mane and tail, roll several thin multi-colored sausages, connect them together and cut them, stick them to our pony, bend them a little, imitating the curves
- Don’t forget about the eyes, make them not round, but elongated, in the shape of a leaf
Our pony is ready! 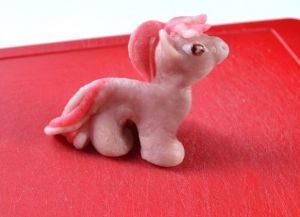 You can make several small horses of different colors and you will have many cartoon characters to play with.
You can make a pony in another way, see step by step photos below. 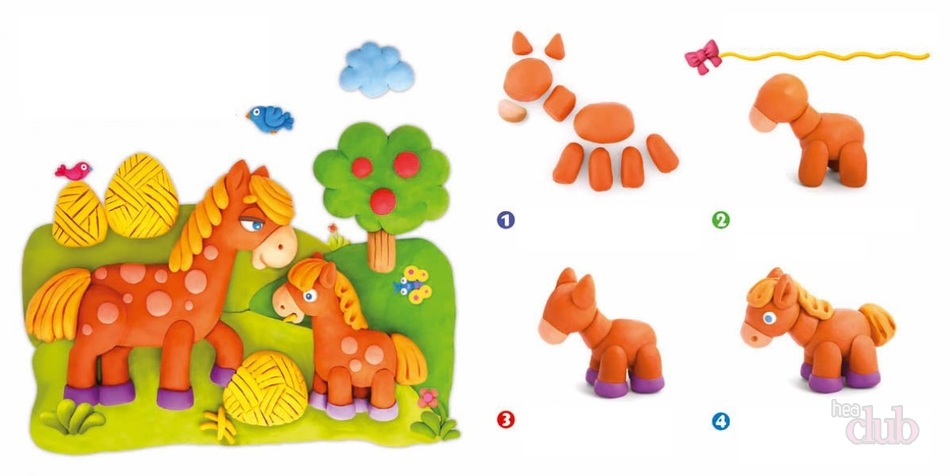
Crafts from plasticine
Show your imagination and combine them into one craft natural material and plasticine. It will be unusual and interesting for the child.
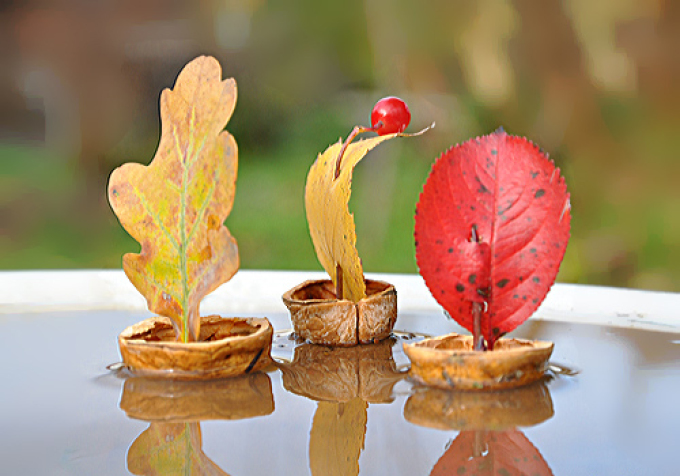
Making a boat from plasticine and nutshells
- Prepare nut shells, plasticine, leaves from trees, small sticks
- Stick a ball of plasticine into a cleaned shell and place a mast on it - a small stick
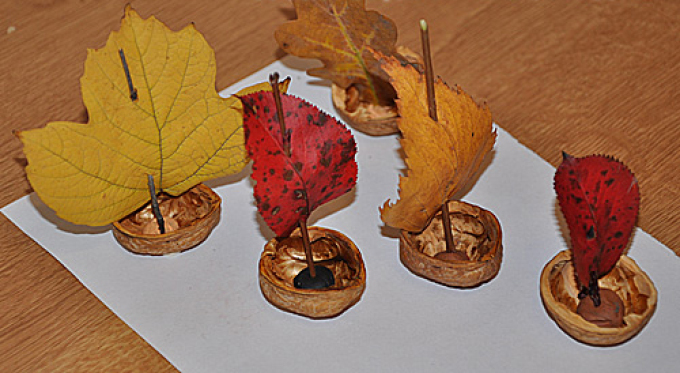
- Place leaf sails on the mast and attach another plasticine ball on top
- Launch your boats into the water
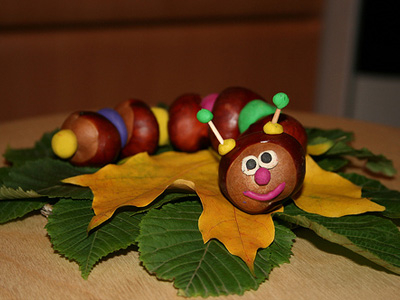
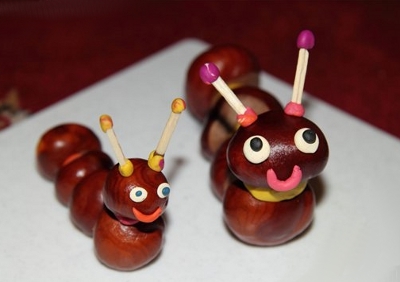
Making a caterpillar from plasticine and chestnuts
- Cook some chestnuts
- Roll several colorful plasticine balls
- Connect the chestnuts, alternating them with plasticine, press them down so that they stick firmly
- Make eyes from white and black plasticine
- Add a red balloon nose and a sausage mouth
- Don’t forget about the horns, they can be made from pieces of a match, combined with plasticine with chestnuts
 You can also make a hedgehog like this from chestnut peel and plasticine.
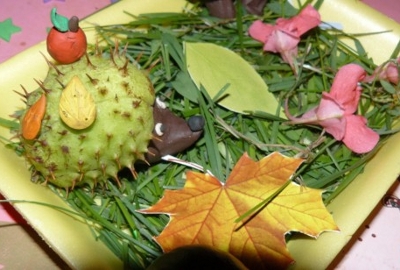
These are such cheerful multi-colored snails made of plasticine and chestnuts. 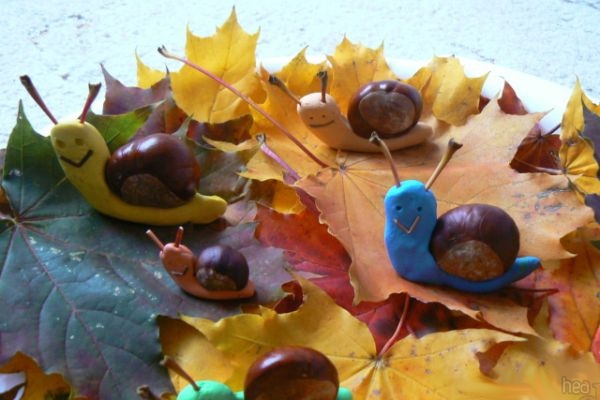
Plasticine appeared about a hundred years ago, and it is still relevant today. How many figures, animals and people have been made since then. Not many people know, but most sculptors often use plasticine, making sketches of their creations from it, which are then cast in metal. How difficult it can sometimes be to tear yourself away from sculpting, because everyone knows how malleable, soft it can be, and can take on absolutely any shape.
Surely, many have noticed that without using plasticine even for a year, when you accidentally discover it, you notice that it is just as soft.
Frankly speaking, having acquired such wonderful material, it is probably difficult to throw it away, since they always want to create and experiment. Even if you sculpt something unusual out of it every day for a year, you will still have a lot of fresh ideas.
You can come up with and make different ones from plasticine, both simple and complex. With the help of your rich imagination, you can sculpt a bunch of different figures that you want, because here you are given freedom for creativity!
Each craft made by your hands will bring you and the people around you only joy, and a great desire to create something new. If you have never sculpted before and are afraid to start, thinking that you will do poorly, then all doubts should disappear!
Sculpting from plasticine is quite easy; you only need to remember a small technique that will help you perform the basic elements. You are ready? Then let's get started!
TIP: The material you are going to work with must always be clean and should not be stored in a dirty or dusty place. Using pure plasticine, you can use it many times, even if it is mixed with another color and takes on a new shade.
Everyone who appreciates plasticine knows that the greatest advantage of plasticine is that it never hardens!
A little about plasticine
It goes on sale packaged, the box comes in different sizes and different colors. You can buy it in stationery and children's stores, as well as in art salons.
It is best to sculpt on a flat, hard surface; for example, a kitchen table can be perfect for sculpting. If you don't want to work on a table, you can purchase a small piece of hard cardboard, preferably polished.
You can move this piece of cardboard from one place to another, which is its huge advantage. In the artist store you can purchase a special board for modeling.
If you notice that the plasticine sticks to the board, then you just need to moisten it with water, and also wet your hands.
Everyone has long known that it comes in absolutely any color. If you mix several colors together, you can get a new color. This is good because if you are missing some color, you can make it yourself.
For example, you can take a piece of yellow and of blue color and knead them together until you get a green color. In the same way, you can combine other colors and get new colors.
But this does not mean that you can only mix two colors; there can be many more. A new door to creativity opens before you.
It is also worth noting that it is best to mix the plasticine not entirely, but using small pieces.
After some time, you will notice that your piece of plasticine contains several colors and it looks so beautiful, like marble! If you want one color, then you should connect all the pieces together and start kneading them until it becomes one color.
You already know that plasticine does not harden, but it can get dirty. Fuzz, animal hair, and various fibers often stick to it, and because of them, not only does the appearance of the material deteriorate, but it becomes simply inconvenient to work with it.
It is for this reason that you should store used play dough in its own box, or in an empty container, such as a yogurt container. Thanks to your care, it will remain in good condition and will always be ready for use.
If you have small pieces left after work, do not rush to throw them away immediately, as they can be useful to you for other crafts.
Plastic knife - stack
As mentioned above, plasticine is quite soft, and that is why it can be easily cut with a plastic knife. If you don't have such a knife, you can use a ruler or a nail file.
Most often, a knife is used to cut out a figure or remove excess plasticine from the surface.
Round pencil
Thanks to the sharp tip of the pencil, you can easily make unusual patterns on the surface of your craft; in other words, you can design the craft as your soul desires.
Since your pencil is round, you can use it as a rolling pin and thereby create flat elements. You can also crumple, puncture, and trim the clay using items such as a paper clip, wire, and toothpick.
Other sculpting tools
If you have soft plasticine, then you can easily make relief patterns on it using imprinting. For example, buttons, burlap, etc. are well printed.
A ballpoint pen cap can also serve as an idea for your creativity. For example, you can use it to make a smile on a little person; you just need to tilt the cap towards the head and imprint a smile.
 You can also draw a smile using a plastic knife.
 The plasticine sticks well to the other piece. But, if you want to connect a man’s head to his body, then you can use a match or a toothpick, then nothing will fall off of your craft.
To decorate your craft in an unusual way, you can use foil, beads, plastic bottles, twigs and more. Don’t know how else you can make an unusual figurine? Use a comb, garlic squeezer and toothbrush to make new patterns.
The most useful tool in working with plasticine is the hands of the person who sculpts. After all, it is your hands that can make whatever you want - a wide variety of figures and patterns!
Basic elements of modeling
When starting to sculpt, you should take a small piece, because if you take a large piece, it will be difficult for you to knead it. First of all, you should warm it up with your own hands and knead it for a couple of minutes. After which you will notice that it has become soft, and it will become easier for you to work with it.
You should gradually add new pieces to the finished piece and also crush them until you are sure that this piece is enough for you. Now you and your plasticine are ready to sculpt!
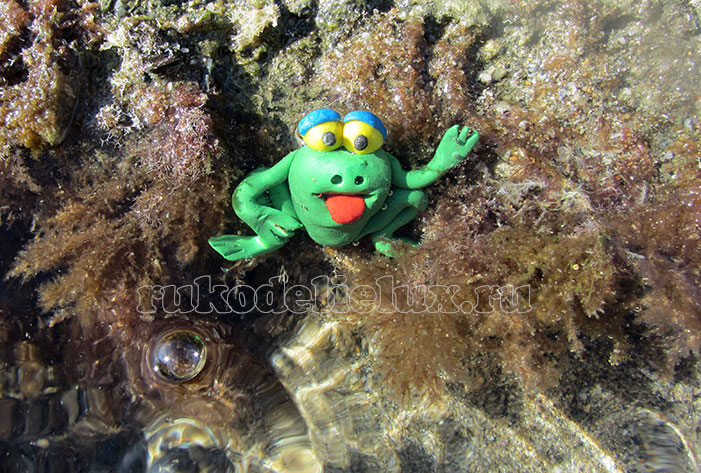 Photo crafts from plasticine frog
 To get a general idea of what you can do with plasticine, first of all you must learn how to sculpt basic shapes. If something didn’t work out for you the first time, then under no circumstances should you be upset, since you can crumple it at any moment and start sculpting again.
Ball
Perhaps this is the easiest figure, and you should start with it. Take a small piece of material in your hands and make it round. To make your ball even and smooth, you need to roll it in a circle between your palms.
Egg
First make a ball, then roll it between your palms, not in a circle, but back and forth. You will notice that it has taken an oval shape, and with your fingers you should round its ends and you will get the shape of an egg.
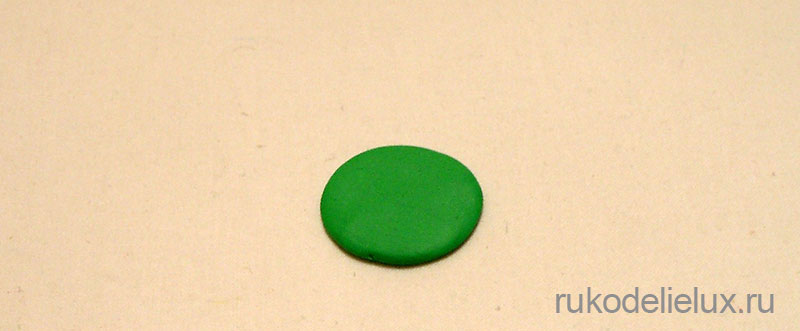
Pancake
Again, make a small ball, after which you should simply squeeze it with your index finger and thumb. The edge of the pancake may crack slightly, but don't worry as you can easily smooth out these tears. The size of the pancake and its thickness depends entirely on you.
droplet
If you want to make a drop, then you need to make a ball, then take one tip of the ball and pull it up.
Cone
You can easily turn the same drop into a cone. To do this, you just need to press the figure against the board with the blunt end of the drop and your cone is ready!
Snake
An element such as a snake is used quite often in modeling, and it is done quite simply. Take a piece of plasticine and roll it on the board until it takes a long and thin shape.
If your snake turns out to be too thin and even breaks in the middle, then don’t be upset, as you can easily connect the pieces together.
Sausage
Sausage is easy to make. The principle of this craft is exactly the same as that of a snake. Roll out a piece of oblong plasticine on the board, but do not squeeze it too hard, as the sausage should be thick.
Now, using all these elements, you can easily sculpt a wide variety of shapes, for example, animals. It is better to start with the simplest animals and slowly make more complex animal figures. And even if everything won’t be perfect for you at first, over time you will see wonderful results!
TIP: If you need to connect two parts of figures together, for example, these figures can be a leg and a torso, then you must first press them tightly together, then smooth out the joint with your fingers.
In addition to the fact that modeling from plasticine is a fun activity for adults and children, it is also useful! A child who is engaged in modeling develops imagination, thinking, creativity well, he also develops his fingers and gets acquainted with the delights of the world around him.
How wonderful it is to see small pieces of plasticine come to life in the hands of a child and turn into amazing animals, birds, and various fairy-tale characters. Thanks to our lessons, your child will be able to achieve great success in a new business.
How to make video tutorials from plasticine with your own hands
How to sculpt a cat master class.
How to make a dinosaur from plasticine video lesson.