Summary of a modeling lesson in the middle group. Summary of a modeling lesson in the middle group on the topic: “Bowls for three bears
Lyubov Parshukova
Summary of a modeling lesson for the middle group “Bear”
Lesson notes in artistic creativity (modeling) For middle group« Bear» . (4-5 years).
Educational field - art
Target: Form aesthetic tastes, develop creativity and thinking.
Tasks: Learn to sculpt an object consisting of several parts, passing character traits (ears, muzzle). Reinforce familiar techniques sculpting: rolling, unrolling, connecting parts using the technique of smearing. Develop independence, cultivate interest in sculpting.
Integration of educational regions: cognition, physical education, reading fiction, artistic creativity, music.
Material: plasticine; boards for sculpting; Images bear; toy « Bear» .
Preliminary work:
reading fiction "Teremok", "Three bear» ; "Mashenka and bear» , talking about wintering bear, its food products, its living conditions, looking at illustrations depicting bear, guessing riddles, watching a presentation "Wild animals".
Progress of the lesson:
Educator: Guys, a guest will come to us today, but before he appears, we must guess who it is. I'll tell you a riddle, and you tell me the correct answer.
Clubfoot and big,
He sleeps in a den in winter.
Loves pine cones, loves honey,
Well, who will name it?
Children: Bear.
Educator: Right! Listen, a short excerpt that talks about bear"Which of us doesn't know bear? Big, clumsy, club-footed. This is exactly the opinion we hold about this beast. But actually the bear is not like that. He is very mobile and maneuverable. Bear- a formidable forest dweller who will not let anyone down if he is not in the mood. Belongs to the family bearish. Bear– a predatory mammal, swims well and climbs trees. One blow and the bear can kill another animal. Legs thick bears, massive head with small ears and eyes, coat color is changeable. Although bear- this is a typical predator, he loves to eat plants and dessert: berries, fruits, grains, grass, plant roots,” but don’t be afraid, our guest is very kind, he came to us from a fairyland.
(there is a knock on the door. The teacher brings in a toy). Guys, we forgot to say hello to our guests, how can we greet beautifully?
Children: Hello, we are very glad to see you!
Educator: Mishka told me that he is bored alone in the den in winter, how can we help him?
Children: Let's blind the little ones cubs.
Educator: But first, let's play a game with you. The game is called "Teddy Bear", you must perform movements in accordance with the text. So, let's go to our clearing and stand in a circle.
A clubfooted bear is walking through the forest,
He collects the cones and puts them in his pocket,
Suddenly a cone fell, right on the bear’s forehead,
The bear got angry and stomped his foot.
“I won’t collect pine cones anymore,
I’ll get in the car and go to bed!”
Educator: It’s too early for Mishka to go to bed, we’d better go to the table and see how our guys will sculpt cubs.
Children: go to the tables and sit down in their places.
Educator: Guys, what parts does the bear consist of?
Children: body, head, paws and tail.
Educator: How are we going to sculpt the body, what does it look like?
Children: body oval.
Educator: And the head?
Children: Round.
Educator: Please note that the bear's muzzle is elongated, and there are ears on the head! How many ears does bear? Let's count?
Children: 1 – 2. 2 ears
Educator: I made a bear yesterday, would you like me to show it to you?
Children: Yes.
Educator: I stretched out the muzzle with my fingers, and made the ears by pinching plasticine. Which part of the body do you think we'll start working on? Explain why you think so?
Children: From the body, because we will attach all parts of the body to it.
Educator: What are we going to sculpt after the body is done?
Children: Let's sculpt the head.
Educator: Here we will have a torso and a head, do we need them?
Children: Connect.
Educator: And in order for our head to hold firmly, we must use the technique of smearing. What remains for us to make so that the bear is ready?
Children: Paws and tail.
Educator: How many paws does he have? bear, let's do the math.
Children: 1, 2, 3, 4 -4 paws.
Educator: We will make them from balloons, but we will need 5 balloons, what is the fifth one for?
Children: For the ponytail.
Educator: Guys, when you start working, I will play some music for you, it will help you unleash your creativity. There is plasticine on our tables, we need to divide it into 3 parts, one part should be a little larger, the other two parts should be the same. From the larger part we mold the body, from the other part - the head, and we need to divide the last part into 5 more equal parts, these will be the paws and tail. Let's get to work. (music is turned on, preferably sounds of nature)
During work, the teacher gives children advice and, if necessary, provides assistance.
Analysis:
Look guys how cute they are you got the teddy bears.
(Ask the children whose work they liked and why, tactfully draw attention to the shortcomings in some works, offer to try to avoid them next time).
Guys, let's invite our guest to choose new friends. ( Teddy Bear happily selects all the children's works and thanks the children for the gifts). The children invite him to come visit again.
Teddy Bear treats the children with cookies and says goodbye.
Target:
1. Develop children's interest in working with plasticine
2. Continue to strengthen the skills of rolling, pinching and squeezing.
3. Mastery of the action of detailing.
4. Promote the development of the use of plasticine in conjunction with natural materials.
Preparation for the lesson:
Homework on the eve of the modeling class - watching the cartoon “How the Hedgehog and the Little Bear Met” at home with my parents New Year", 1975
Materials for the lesson:
Plasticine, modeling board, stacks, sunflower seeds, paper napkins. Riddles about a hedgehog.
Progress of the lesson:
Educator: Hello guys! I have a question for you - has everyone watched the cartoon at home “How the Hedgehog and the Little Bear Celebrated the New Year”?
Children: Yes.
Educator: Who was the main character of this cartoon?
Children: Hedgehog!
Educator: And what was the hedgehog doing there?
Children: He was a Christmas tree for the bear cub!
Educator: Do you remember what the bear cub decorated the hedgehog with?
Children: Yes, the bear cub decorated the hedgehog with mushrooms and apples!
Educator: That's right, well done! How many of you have seen a real hedgehog?
Children: Various answers from children.
Educator: What do you think the hedgehog eats? And in order to find out exactly what the hedgehog eats, I suggest you solve a few riddles:
He walks in the forest without a bag
Finds apples and mushrooms
There are needles on the back.
Who's that at the Christmas tree?
Children: Hedgehog!
Educator: Correct! What's on his back?
Children: Apples and mushrooms!
Educator: Correct! Here's another riddle:
On an autumn day, on a beautiful day
Looks like a spiky ball
Walked along a forest path,
I found an apple in the clearing.
And apples - I'll tell you -
I like it very much...
Children: Hedgehog!
Educator: Okay, you answered correctly! And you probably guessed that today we will sculpt a hedgehog.
Educator: (demonstration) to begin with, we take a piece of black plasticine and roll it out into a thick sausage, then we sharpen it on one side and now we practically have the face of our hedgehog. Next, take three small pieces of brown plasticine and roll small balls. These will be the eyes and nose of our hedgehog. Guys, what do you think we have sunflower seeds for? We will make him unusual needles from plasticine and from sunflower seeds! Take one seed at a time and carefully insert it into the back of the hedgehog. Remember when we solved riddles about what a hedgehog eats?
Children: Children's answers.
Educator: That's right, the hedgehog loves to eat apples. We will also make apples for your hedgehog. Let's take small pieces of napkins, crumple them in our hands and roll them into a ball, which we will put on the back of our hedgehog!
Independent activity of children. Perform a task according to a sample or from memory. If necessary, turn to the teacher for help.
Educator: Guys, you are so great! Everyone turned out to have very beautiful hedgehogs with delicious apples!
Nomination: Kindergarten, Lesson notes, GCD, modeling, applique
Title: Summary of a lesson on modeling in middle group"Forest hedgehog"
Position: teacher
Place of work: MBDOU No. 22
Location: Krasnoyarsk
Ekaterina Dmitrievna Sergeychuk
Summary of a modeling lesson (in the middle group)
Topic: "Snowdrops".
Program content:
Educational objectives:
Arouse interest in the awakening spring nature, introduce spring changes, give an idea of primroses;
Consolidate knowledge about spring natural phenomena;
Improve your sculpting technique;
Continue learning to sculpt objects consisting of several parts;
Strengthen the ability to connect parts, stick them tightly to each other;
Learn to convey in modeling the characteristic shape and color of a snowdrop (stem, leaves, flower, place it on a plane);
Developmental tasks:
Support children's desire to see beauty and harmony in the world around them;
Develop imagination, form an aesthetic attitude towards the world;
Develop fine motor skills and eye, attention and memory, creativity.
Educational tasks:
Foster a caring attitude towards nature;
Continue to cultivate accuracy, perseverance, independence, and hard work.
Preliminary work:
Reading an excerpt from H. H. Andersen’s fairy tale “Snowdrop”;
Memorizing the poem “Snowdrops” by G. Ladonshchikov;
Riddles about primroses;
Clarification of ideas about primroses;
Examination of images in sets of pictures;
drawing snowdrops from memory and based on illustrations;
Materials and equipment: plasticine, stacks, wet wipes, color illustration of a snowdrop.
Progress of the lesson:
(Children stand in a circle.)
ORGANIZING TIME.
Educator: Guys, show me what mood you are in today (the children smile happily at each other)
I want your good mood to remain not only during our communication, but also throughout the day.
Now let's tell you and me:
We are intelligent,
We are friendly
We are attentive
We are diligent
We are great at sculpting,
We will succeed!
Educator: Guys, guess the riddle:
I'm budding
In green leaves.
I water the trees
Full of movement
My name is.
Children: Spring.
Educator: Well done, it’s immediately obvious that you are observant. What other signs of spring do you know?
Children: The snow is melting, streams are running, grass is emerging from under the snow in some places.
Educator: That's right. Do you think flowers can bloom at this time?
(children's answers)
Educator: Do you want to know which ones? Then listen to another riddle:
On a thawed patch in the forest
I was the first to welcome spring.
I'm not afraid of frost
I'll be the first to break out of the ground. (snowdrop)
Children: This is a snowdrop.
Educator: That's right, it's a snowdrop. These are the very first spring flowers. They are breaking through from under the snow.
(show a slide with a picture of snowdrops)
Educator: Guys, do any of you know why it is called that?
Children: A snowdrop appears from under the snow; it blooms when there is still a lot of snow; snowdrop appears in the forest on thawed patches; because he is white as snow.
Educator: That's right, guys. Snowdrop blossoms in early spring, is not afraid of cold weather, frosts, or strong winds. He's so seasoned! He is also called the harbinger of spring. Whoever sees blue or white snowdrop flowers understands that spring has come! The snowdrop is a rare flower, but we can please ourselves and our loved ones by sculpting delicate snowdrops so that there are even more of these flowers.
Let's take a little rest before we get to work. I turn you into flowers:
Dynamic pause “Charging flowers”

The flower says to the flower: “Pick up your leaf. (children raise and lower their hands.)
Go out onto the path and stamp your foot (children walk in place, raising their knees high,
Shake your head and greet the sun in the morning. (head rotation)
Tilt the stem slightly - this is a charge for the flower. (tilts).
Now wash yourself with dew, shake it off and calm down. (shaking hands). Finally ready to greet the day in all its glory.
(children sit at tables)
Educator: Today we will sculpt a snowdrop on cardboard.
What color of plasticine do we need?
Children: green and white
Teacher: First, take green plasticine and roll a “sausage” between your palms - this will be the stem (it can be straight or tilted).

Educator: To make leaves, roll up a green “sausage” and divide it into three equal parts, flatten each one, sharpen it with your fingers on both sides, then attach it at the bottom of the stem.
For the flower, first roll up a green ball and secure it, slightly flattening it, at the end of the stem, you will get the middle of the flower, that is, the part of the plant called the sepal, which connects the flower and the stem.


(children perform)
Educator: Next, we proceed to making snowdrop petals: you need to roll a white “sausage”, divide it into three equal parts in a stack, sharpen each part at the ends, like leaves. Arrange a flower from the finished petals as follows: connect two petals with the tips at the sepals, and the third between them and lightly press them to the base, without flattening them too much.
(children perform)
Now the snowdrop is ready!


Educator: Now snowdrops will delight us all year long. And you can give your molded flowers to mothers and grandmothers.
Summary of the lesson.
The lesson ends with analysis and admiration of children's works, during which originality and creativity are emphasized.
Publications on the topic:
Topic: “Cups for dolls.” Program content: Teach children to sculpt tea utensils. Practice sculpting techniques. Arouse interest in the collective.
A comprehensive lesson on familiarization with the outside world and modeling in the middle group “Spring. Signs of spring. Snowdrop" Subject. Spring. Signs of spring. Snowdrop. Software tasks. Expand children's understanding of the seasons. Strengthen children's knowledge about spring.
Summary of an open lesson on modeling “Hut for Baba Yaga” in the middle group Tasks. Educational. Practice modeling techniques - rolling sausages between your palms. Enrich your vocabulary. Introduce children to the elements.
Summary of an open lesson on modeling “Cactus in a pot” Goal: Creation of a social situation of development in the process of productive activity. Objectives: 1. Create conditions for the formation of the ability to sculpt.
Compiled by D. A. Kravtsova, teacher of MBDOU No. 205 Krasnodar. Program content: Introduce children to the types of aircraft in our country.
Summary of the "Chickens" modeling lesson in the middle group Goal: To create interest in modeling from plasticine. Development of creativity, imagination of children. Objectives: -Develop the ability to pinch small ones.
Summary of a modeling lesson in the middle group “Hare” Summary of a modeling lesson in the middle group “Hare” Program content. Teach children to sculpt a hare using a toy as a model;
Purpose: To arouse interest in the awakening spring nature, introduce spring changes, give an idea of primroses. Continue.
Summary of a modeling lesson in the middle group “Mushrooms” Summary of a modeling lesson in the middle group on the topic: “Mushrooms” Program content: to consolidate children’s ability to sculpt familiar objects.
Summary of an open lesson on modeling in the middle group “Sparrows on a puddle” Lesson in the middle group artistic creativity(modeling) Topic: “Sparrows in puddles” Tasks: 1. Teach children to sculpt birds from plasticine.
Image library:

Summary of GCD for modeling in the middle group “Kitten”
Prepared by the teacher
middle group
Konatyeva Elena Viktorovna
GCD purpose:
Teach children to sculpt a four-legged animal - a cat.
Program content:
Reinforce sculpting techniques: rolling plasticine between palms; practice using pinching and pulling techniques; consolidate the ability to connect parts, pressing them tightly against each other, and smoothing seams; continue to introduce children to the properties of plasticine (soft, pliable, able to take any shape). Continue learning how to work with a plasticine stack.
Develop independence.
Cultivate accuracy when working with plasticine. Cause a positive emotional response to the overall result.
Vocabulary work: stack, plasticine soft, pliable, multi-colored.
Preliminary work: conversations with children about pets, looking at illustrations, reading fiction and educational literature, riddles, didactic games: “Who lives where?”, “Where is whose cub?”, “Find out by description.”
Materials:plasticine on boards (for each child) and separately on plates, stacks, oilcloths, boards, a supporting diagram of modeling with an image (a kitten, a magnetic board, a layout with multi-colored balls, a disk with background music for the practical part.
GCD move:
Organizing time.
Minute of entry per day:
"Morning in kindergarten"
Let's stand side by side, in a circle,
Let's say "Hello!" each other.
We are too lazy to say hello:
Hi all!" and "Good afternoon!";
If everyone smiles -
Good morning will begin.
Q: Guys, look, guests have come to us. Let's say hello to them. D: Good morning!
Q: Guys, come to me, please. Look what we have on the table?
Q: What kind of pet do you think likes to play with balls?
Q: Look how many glomeruli there are, are they the same? What color and shape are they?
D: red, yellow, etc. multi-colored, round.
Q: Guys, there are balls, but there is no one to play with them. What can we do?
Q: Let's make kittens so they can play with them.
Q: And in order for your ears to listen to me carefully, and your eyes to see what I’m going to show, let’s play with you.
Dynamic pause.
"Let's turn into kittens"
Fluffy lumps
Wash your cheeks with your paw (act in accordance with the text)
Wash your nose with your paw
Wash your eyes with your paw
Right eye left eye
Wash your ears with your paw
Right ear left ear
And kittens have ears
How the houses stand.
Q: After being kittens, we turn into guys and sit down in our seats. We sit down straight, backs straight, eyes on me.
Explanation:
Q: And now I’ll show you how to make a kitten.
Here I have a large piece of plasticine. I tear off a smaller piece - this will be the head of our kitten. Now I tear off an even smaller piece from a larger piece - this will be the tail of our kitten. And from this remaining piece of plasticine I will sculpt the body of our kitten. I will roll this piece of plasticine into a sausage. Then I take the stack and make longitudinal cuts on both sides of this sausage. These will be our kitten's paws. Now we take a piece from which I will roll a ball - this will be the head of our kitten. The ball can be rolled between straight palms or between the palm and the table. Like this.
We flatten the plasticine on both sides of the ball with two fingers (thumb and index) and we will get ears. Let's take buckwheat grains and make eyes, take a very small piece of black plasticine, roll a small ball between our fingers - this will be the kitten's nose. Then we take pieces of wire and attach whiskers to our kitten on both sides. Now we press the head to the body. There is a small piece of plasticine left, from which we will roll out a small sausage - this will be the kitten’s tail. We attach it to the body. Look what a wonderful kitten I got.
Finger gymnastics: “Kittens”
(We fold our palms, press our fingers together)
Our cat has ten kittens,
(We shake our hands without separating them)
Now all the kittens are in pairs:
Two fat, two nimble,
Two long, two tricky,
Two little ones
And the most beautiful ones.
(Tap the corresponding fingers against each other from the big to the little finger)
Independent activities of children:
Practical work for children. Individual assistance. Calm music sounds. Children make their own pet.
Final part. Reflection
At the end of the modeling, the children make up a collective composition, placing their works on a stand.
Look, guys, how beautiful the kittens turned out.
Tell me, Vova, which kitten did you like best? Why?
(The teacher notes interesting and expressive works).
It's time to say goodbye to our guests.
Well done everyone! Thanks to all!
Children in the middle group of kindergarten must be taught in a playful way. The teacher comes up with unusual stories, invites fabulous guests, shows interesting pictures, captivating children into the world of knowledge, discovery and fantasy. Children do not just complete a learning task, they create small masterpieces, helping toys or fairy tale characters, preparing treats for dolls and animals. Kids explore the world and develop fine motor skills, imagination, and broaden their horizons. Modeling classes are a great way to develop a harmonious and creative personality.
Tips for teachers on organizing modeling classes in the middle group
While teaching modeling to children of middle preschool age, the teacher continues to actively work on the development of artistic skills, the foundations of which were laid in the younger groups.
Children 4–5 years old learn not only to create, but also to decorate their works with various patterns made in a stack with an awareness of an elementary rhythmic composition (for example, first children apply them to the edge of the product, and then to the middle).
Children's molded items, decorated with simple ornaments, acquire expressiveness, and preschoolers show greater independence and imagination than before. As children continue their education, they begin to approach decorative issues creatively. They can independently, based on the illustrations and slides they have viewed, choose a pattern for dishes, clothes, baskets for mushrooms and berries, culinary products, and they are not only interested in reproducing the form.
Step by step, children awaken to the desire to bring artistic touches to the fruits of their labor. Focusing on the works of real masters and craftsmen, preschoolers strive to turn their work into a work of art that would be aesthetically pleasing and attractive.
Raising sculptors
Each modeling session is a fascinating journey into the world of form and plasticity. The teacher’s task is to inspire children to create their own sculptural forms from materials, which, thanks to their efforts and imagination, turn into animals, mushrooms, berries, jewelry, dishes, and so on. When a child sculpts or draws, he liberates himself, expresses himself, and makes an amazing journey into the world of color and composition. The creation of work should be preceded by positive and joyful emotions that contribute to a holistic perception of the artistic image. In addition, modeling develops the eye, fine motor skills of the hands, and tactile sensations.
While sculpting, the child is absorbed in creativity
Materials for modeling
In the middle age group, plasticine, clay or salt dough can be used as a material, which has a number of advantages for comfortable work. The dough does not stick to your hands, is easy to mold, and has an elastic structure. You can add gouache or natural dyes (fruit or vegetable juices) to it. - it will become multi-colored, which will cause an even greater emotional response in children and increase interest in visual arts.
Types and methods of sculpting
Modeling on the theme “Treat for a doll” involves combining two varieties: modeling on a plane and three-dimensional (details for decoration).
To make cakes and pastries, it is advisable to use a combination of the sculptural method (the main parts of the depicted object) and the addition of separately sculpted components. The sculptural method involves sculpting objects from a whole piece of material (clay, plasticine, salt dough) using various techniques. Techniques of pressing and rolling will be relevant in this topic.

Little craftsmen will be happy to prepare treats for their favorite dolls
Options for treats for the doll can include pastries, pies, cookies, gingerbreads, and also an interesting idea would be to play bakers and make buns, bagels, pretzels, and braids. The teacher has the opportunity to introduce children to the varieties of bakery and confectionery products, consider their shapes, and characteristic decorative elements. The teacher can also use different materials for modeling in one lesson: for example, salt dough and plasticine, organizing classes in the form of a game “Baker and Confectioner”.
We make dishes for the doll corner and invite friends to visit
A lesson on “Dishes for a doll” (modeling a mug) is held in the second junior group. Children make a mug from a round blank, pressing the plasticine inward to form a depression where tea is poured, and a handle is made by pinching the material with their fingers. Decorate the cup with a stack or stick, applying a pattern of strokes or dots.
In the middle group, making dishes becomes more complicated, as does making sweets, but it is better to conduct this activity after the topic “Treats”. The "Dishes for Dolls" theme includes modeling a cup and saucer. Children use already familiar modeling methods, and also come up with their own methods both in the process of creating the basic form and in the process of decorating it. Children have the skill of conveying the correct object relationship and know how to smooth the surface of an object.
The theme “Treats for Friends” involves inviting bunnies and hedgehogs to visit and treating them to carrots, apples, that is, modeling objects of a simpler shape.
Compositional solutions for modeling on the topic “Treats for dolls” in the middle group
Teaching children how to compose compositions is an important component in art classes, as it develops artistic taste, a sense of aesthetics, imagination, and expands their understanding of the world around them.
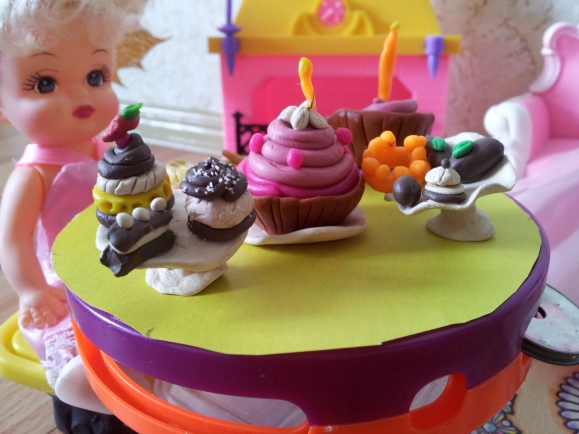
There are many options for individual and collective compositions on the theme “Treat”. It all depends on the plot of the lesson: a birthday, the arrival of guests, a game of bakers, a candy store and much more.
The pedagogical ingenuity and level of preparation of the children will tell the teacher how best to organize the presentation of the compositional solution. If a collective composition is intended, then you can prepare a large tray or dish on which the children will place their treats. You can set the table in a doll corner, seat the guests, the birthday girl, and put several cakes or other treats that the children made on a plate or saucer for each guest.
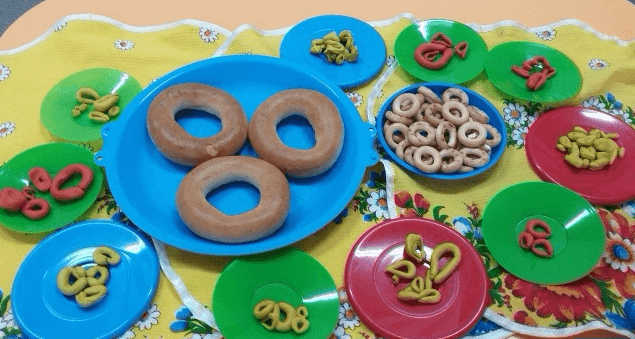
Each child's work can be placed on a separate plate.
If the composition is individual, then the teacher can cut out beautiful napkins or saucers from paper or cardboard, on which each child will place his treat. You can make napkins or saucers together with children during a joint activity or during an appliqué lesson, thus maintaining the continuity of lesson topics. Napkins or saucers can be decorated according to children’s ideas: polka dots, flowers, stripes. At the same time, cultural and hygienic food eating skills and table setting rules are taught.
Game motivation
At the beginning of the lesson, the teacher spends a few minutes activating the cognitive activity of children, using various gaming techniques. By combining the rich world of play with the educational process, the teacher makes completing any task interesting. Thus, children should have play motivation.

The toy used for motivation should be bright and attractive
As a motivating start, you can use scenes when your favorite toys (the Masha doll and her guests) come to visit, including solving riddles or reading poems about sweets. Next, you should talk with the children about confectionery and bakery products (if the children will sculpt them). Discuss their shape, colors, decoration options. You can talk about what sweets, cookies, bagels, etc. are made from. Then the teacher shows pictures or slides depicting different sweets.

Children need to know where bread comes from
O. N. Mishchuk. Author's summary of the lesson on the topic “Celebrating the birthday of the doll Vasilisa”
When drawing up lesson notes, you need to pay attention to the sequence and types of work that are planned to be involved and correctly allocate time for each educational stage:
- Preliminary work (2–3 minutes).
- Main part (10–13 minutes).
- Physical education minute (1–2 minutes).
- Final part, summing up (2 minutes).
Table: GCD summary for sculpting treats for dolls
| Author and theme of GCD | Progress of the lesson | |
| O. N. Mishchuk, “Celebrating the birthday of the doll Vasilisa” |
Goals and objectives | Goal: teach children to make treats for dolls from salt dough and plasticine. Objectives: Reinforce techniques for working with salt dough and plasticine. Improve skills in working with a stack. Learn to make pretzels and braids. Develop imagination. Preliminary work: consider the appearance of confectionery and bakery products, decoration options. Talk with children about what bread, pastries and sweets are made from. |
| Conversation with children | The teacher says that today the doll Vasilisa came to visit them (brings in the doll) and tomorrow is her birthday. Vasilisa loves fairy tales and reads a lot. He loves fairy-tale characters very much. – Do you guys like fairy tales? What fairy tales do you like? (Children's answers). And then a miracle happened. Vasilisa received a letter today. (Shows the children the envelope). Many fairy tale heroes found out about our Vasilisa’s birthday and decided that they would come to visit her. – Do you want to know who will come to Vasilisa’s birthday? I think these are your favorite heroes too. Masha from the fairy tale “Masha and the Bear”, Malvina from the fairy tale “The Adventures of Pinocchio”, Snow White from the fairy tale “Snow White and the Seven Dwarfs”, Thumbelina, Alyonushka from the fairy tale “Sister Alyonushka and Brother Ivanushka”. On birthdays, it is customary to treat guests. Vasilisa was glad that all her favorite fairy-tale characters would come to her, but she was afraid that she would not have time to prepare for their arrival. She asks you guys to help her. – Are you ready to help Vasilisa prepare food for the guests? - What should we cook? What do you guys think? (Children's answers). - Let's prepare some different treats! Pastries and cakes, cookies, bagels, braids, pretzels. We will arrange a real feast for fabulous guests. Everyone will be happy if we have a lot of beautiful and tasty treats. - Guys, how can you call all the sweets in one word - cakes, pastries, candies? (Confectionery). What about cookies, pretzels, bagels, braids? (Bread products). Shows pictures depicting bakery and confectionery products. Children name them, discuss shapes, colors, and options for decorating sweets. The teacher briefly talks about what bread and sweets are made from. |
|
| Riddles for children | - Guys, Vasilisa wants to tell you a few riddles about treats. On holiday I will come to everyone, I'm big and sweet. I have nuts, cream, Cream, chocolates. (Cake) He lives in his foil It quickly melts in your hand. Very tasty, very sweet, Smears the kids' faces. (Chocolate) I'm in a glass, a cone, Tasty and tender. Made with milk More often - snow-white. I live in freezers And in the sun I immediately melt. (Ice cream) We're rustling in the candy store Bright candy wrappers. And for the holiday we want To come to you with gifts. (Candies) We are in a package of one hundred zeros We notice with poppy seeds. Grandma, pour some tea, We'll devour them over tea. (Barankas, drying) Maybe it's sandy And sometimes with cream. Sometimes it happens with juicy Delicious jam. And the meringue can be tiny, And in a glazed peel Maybe it's a potato Just not puree at all. (Cake) Very fragrant, Sweet and minty. From above we are in glazed gloss, As if in a joyful blush. (Gingerbread) |
|
| Reading a poem | - Let's read a poem to Vasilisa and get to work in order to be in time for the holiday. A child reads Tatyana Petukhova’s poem “Cake”: Dad was proud today! He baked a huge cake. The cake is beautiful and flaky. But he was so salty Surprisingly tasteless. Dad walks around sad and sad. He explained to everyone later, How he confused salt with sand. He said he was stupid. I feel sorry for dad! Apparently new The Japanese recipe was like this - Sprinkle salt on each layer! Oh, how my mother was surprised. She was surprised and smiled. And then she said: - The beginning is always the hardest! Let's forget the failure. We won’t bake in Japanese. Let's bake a big one now Delicious cake for the whole family! |
|
| Sculpting Instructions | Explanation of the procedure for performing the work. | |
| Making crafts | Children make treats. | |
| Physical education minute |
|
|
| Final part (summarizing) | Let's put all your treats on trays, put them on the table in the doll's corner, where the table for Vasilisa's holiday has already been set. What beautiful and appetizing treats they turned out to be. Vasilisa's fabulous guests will be pleased. – Are you happy with the holiday you arranged for Vasilisa? Exhibition of children's works. |