Stove for a Winter Tent. Heating at Fishing. Homemade tent for winter fishing Tent stove: Stoker for Winter Fishing
A tent makes fishing easier and more comfortable. It protects from cold, snow and wind, and you can light a gas stove in it for maximum comfort when fishing. You can also use a tent to hide from prying eyes if you wish. A fisherman who is actively catching fish is usually surrounded by his colleagues. If you want to avoid this, an awning will come in handy. A do-it-yourself winter fishing tent can be made without much difficulty. It will reliably protect both from the gaze of others and from frost.
The simplest can be made from polyethylene, oilcloth or thick fabric. To do this, you need to cut the workpiece in the form of an isosceles right triangle, and then sew a zipper to its long side.
An ice screw can serve as a support for such a tent. It must be extended as much as possible and placed in the ice at an angle. Another option is to simply throw the tent over yourself.
It must be borne in mind that if the ice auger freezes into the ice, it will be difficult to remove it. In such a situation, you will either have to drill a hole somehow, or freeze the tool with hot water. Also, sometimes the ice cover on reservoirs cracks and shifts. If this happens while the ice auger is being driven into the ice, the auger auger may become jammed and bent. After this, the tool will become unusable.
The advantage of polyethylene is its transparency; light enters through it, and the fisherman inside sees everything that is happening around. But this material is very fragile, and such tents usually do not last long. In addition, it is quite difficult to sew a zipper to polyethylene. A tent made of oilcloth or fabric will last much longer, but you will need a lamp or lantern to fish in it.
The main advantage of the cape is that it does not take up much space and is easy to transport. It is also suitable for walking fishing. The disadvantage of this tent is that the movements of the fisherman who is inside it are very constrained. Because of this, it may not be entirely convenient to catch fish by waving your arms, or by jerking the fishing rod with a large amplitude.
Making a dome tent
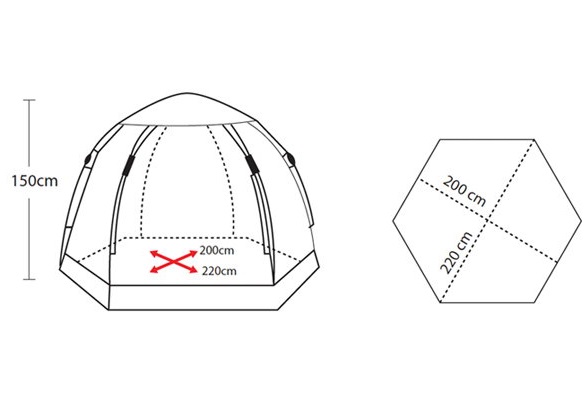 You can make a more complex pattern and make a dome tent. A do-it-yourself ice fishing tent in the shape of a dome will require more time to manufacture. It is not as compact for transportation as a cape, but it will also be much more convenient to fish in it.
Not suitable as a support for a dome. You need to prepare a special spacer with a pointed end that will stick into the ice. To make the tent easy to transport, the spreader must be collapsible. Its individual sections can be connected using metal tubes - this type of fastening was used in old bamboo fishing rods.
There should be holes along the edges of the dome for attaching the tent to the ice using spacers. Another option is to sew on loops.
DIY frame tent for winter fishing
 A more complex option is making a frame tent. The frame can be made from metal or plastic pipes, connecting them using small tubes, corner and three-way hinges. With the right approach, you will get a reliable design that can be quickly assembled and disassembled. Thus, a do-it-yourself winter fishing tent can be made of any size and shape.
A frame tent can be placed on a sleigh. In this case, it will be easy to move on the ice. To make a sled, you need to use the same metal tubes and any suitable wooden or plastic skis.
How to sew a tent awning
An awning for an ice fishing tent can be sewn in one evening, and you don’t have to be a craftsman to do it.
- You need to start by preparing a drawing. There are special computer programs that simplify this task for everyone who knows how to use them. But a paper drawing will be enough. The main thing at this stage is to correctly calculate all dimensions. You can also copy them from a factory-made tent you like.
- Then the drawing must be transferred to the material from which the awning will be made. To do this, it is very convenient to use a wooden meter (cutting ruler). You can apply markings to the material using chalk or a piece of dry soap.
- Then you need to cut the workpieces, leaving seam allowances of at least 2 cm at the edges.
Before sewing the tent, individual patterns must be fastened with pins, which are positioned perpendicular to the seam; the more of them, the better.
How to make pins
 To attach the tent to the ice, it is best to use screws, which you can also make yourself. The simplest option is to weld pieces of metal rod to long screws. You can put rubber or silicone tubes on both sides of the rod, in this case it will not cool your hands, and it will be more convenient to hold it. Such a screw can be easily screwed into the ice and then removed back.
You can also use construction screws to secure the tent. Their advantage is that they are hollow, so they are easier to screw into the ice. At the end of each self-tapping screw, use a needle file to sharpen 3-4 sharp teeth. It is also advisable to drill a through hole that will go into the ring. To make the screws screw in easily, you can use a piece of metal rod that will act as a handle.
DIY winter fishing tent - making a floor
 It is not necessary to make a tent floor, but it will make fishing as comfortable as possible.
Isolon (polyethylene foam), one of the types of sheet insulation, is perfect for its manufacture.
It is better to take a variety of this material with the smallest bubbles - it is very dense and conducts heat minimally.
To make a floor from isolon, you need:
- cut a piece of material of the desired size and shape;
- make one or more round holes in it for holes;
- If you cut a piece of polyethylene foam from different sides to 2/3 of the thickness, you will get a folding mat that is convenient to transport.
This flooring helps retain heat. When using it, the ice under the tent does not melt even when using powerful heating devices. In addition, all fishing accessories can be laid out on an isolon mat without having to be placed in the snow.
DIY winter fishing tent. How to make a tent with your own hands! A comfortable and spacious tent is one of the most important attributes for winter fishing. You simply cannot do without it. Often, fishermen have to spend hours in severe frost and wind waiting for a bite. It’s good if there is a tent nearby in which you can periodically warm up. But what about those who cannot purchase it? After all, this pleasure is not cheap. Today we will tell you how to make a tent with your own hands. This process does not require special skills or knowledge. Types of winter fishing tents First, you must decide on a suitable design. Let's list the main types of tents: Umbrella. For the manufacture of the frame, duralumin rods or tubes are used. The finished structure has rigidity and increased strength. Any synthetic fabric is suitable as an awning. They are often used in combination with tarpaulins. Automatic tent. This option is not as common as the previous one. A distinctive feature of the design is that the tent is sewn to an elastic frame and then folded into a circle. Frame on arches. This model consists of 2-3 arcs made of fiberglass or duralumin. The structure quickly unfolds in place. An awning is pulled over it. What shape can a tent for winter fishing have? Cube, triangle, trapezoid and so on. The choice is yours. What requirements should a homemade tent for winter fishing meet? First things first. The main function of a tent is to protect a person from adverse weather conditions (wet snow, strong wind). It also increases the comfort of fishing. While under the tent, you can prepare food and tea, as well as warm up using special heating devices. Of course, there are a variety of winter fishing tents on sale. The photos attached to this article prove to us that homemade designs turn out no worse than store-bought ones. So, let's get down to business. What should you pay special attention to when sewing such an important attribute? A do-it-yourself winter fishing tent must meet the following requirements: 1. Have a lightweight, compact and mobile design. This is understandable. Some fishermen would prefer to freeze for a few hours rather than carry an extra load. 2. Quick to unfold and easy to install. 3. It is advisable that a do-it-yourself winter fishing tent be made of thick tarpaulin or waterproof fabric. 4. A truly durable frame is made from aluminum and composite materials. But it is not recommended to use plastic. 5. The inside of the tent should remain warm. It would be nice to achieve this without heating devices (portable, gas and others). But this is a utopia... What materials and tools will you need? A DIY winter fishing tent is an excellent solution that will allow you to save a lot of money. We propose to assemble a fairly simple design. We are talking about a tent based on a standard box, which can be purchased at a fishing store. We will also need: one pair each of children's (very small) and school skis (up to 160 cm long); several duralumin tubes (you can remove them from ski poles); old cot; waterproof fabric (will be used as an awning). Do-it-yourself winter fishing tent: instructions All necessary materials and tools are prepared. Now you can move on to the practical part: 1. Take aluminum ski poles. From these we will make vertical frame tubes. As for the horizontal tubes, they should be a little thinner. The upper connections of the ribs of the future tent are made in the form of tees that end in cylinders (length 5 cm). It is very important that the diameter of the cylinders is the same as that of the tubes being connected. 2. We begin to secure the lower ends of the vertical tubes to the skis. The main role here is played by the shaped lock. At the lower end of the tube we find a T-shaped tongue, and then carefully insert it into the metal plate attached to the ski. All that remains is to rotate the tube 90 degrees. 3. To connect the tent frame with the box, we use 2 duralumin tubes from an old folding bed bent at the ends. The end of the connecting product must be secured to the end of the bent tube. At its other end we install a latch, which, during docking, with its tongue will fall exactly into the hole on the second bent tube. 4. The box will be connected to the above mentioned tubes using round lugs located on the ski racks. They can be made from copper or steel strip and then attached to the posts. 5. Now you need to pull the awning. We install metal plates with slots on the lower edge of the material. It is through these slots that the U-shaped brackets driven into the side ends of the skis will pass. We fix the connections using shoe laces. In order for the tent to hold well on ice, you need to equip it with anchors (2 pieces). Each such anchor is a penknife with two blades at the ends. Assembling the tent on site Making a winter tent is only half the battle. It must be assembled and installed correctly. The algorithm of actions is as follows: 1. We connect the halves of the bent tubes with the skis. The tongues should fit into the slots of the plates. The tubes are located along the axis of the skis and then rotated 90 degrees. 2. We thread the ends of each pair of tubes through the eyes on the ski racks. 3. Connect all 4 skis. The locking tab of the bent tubes should snap into place. 4. Let's start installing the box. 5. We install 4 vertical posts at the ends of the skis. 6. Now you need to install tees on the ends of the tubes, and then connect them to the roof tubes. 7. Align the holes of the tubes and tees. The installation wires will pass through them. 8. We stretch the awning onto the frame. We thread carabiners and plates through the brackets and tongues on the skis. We fix the connections with laces. 9. At the end of the process, we attach anchors and install them in pre-prepared holes. Conclusion Now you know how to make a tent with your own hands, what materials and tools are required for this. By following the recommendations and instructions described above, you can create a stable and reliable structure.
SHOWCOLLAPSE
Many anglers who are interested in winter fishing are interested in the question of how to make a good tent with their own hands. In this article we will talk about why this accessory is needed, consider possible designs and alternative options.
Purpose
The main purpose of the tent is to protect the fisherman from the adverse effects of the environment. In our case it is snow, wind and cold.
Thick snow clogs the hole, makes it difficult to register a bite and covers everything around. And if you add wind and cold to this, then fishing turns from pleasure into torture. Another function is protection from onlookers. As strange as it may sound, if you fish in a body of water with great fishing pressure, then the presence of such a protective tent will be very important even in mild weather. In addition to annoying interlocutors, you will also get rid of unwanted neighbors. During the absence of a bite, many fishermen actively monitor the reservoir for the presence of fish from their colleagues. During such periods, small fishing towns may gather around more successful anglers. A tent can not only protect you from the elements, but also from other anglers if that's what you want.
Constructions
There are many design options. Which one is better to use depends on how often you change your fishing location. If you intend to sit in one place all the time, then camping tents with tension lines are quite suitable for you. For running fishing, you need structures that are quickly assembled and light in weight.
Stationary

To make such a shelter with your own hands, you need to install a frame and pull an awning over it. As a frame, you can use a collapsible structure of various layouts. The awning is fixed both on the posts themselves and with pegs driven into the ice. You can sew it with your own hands from a tarpaulin or other dense material that is not blown or wet. The awning needs to be made a little larger than required. The lower edge of the awning should lie on the ice (about 15-25 centimeters). This area is covered with snow, which prevents the tent from blowing from below. This shelter is used primarily for night fishing, which involves fishing in one place.
Easy to install
Tents of this type are an awning into which spring steel rods are sewn. These rods hold the tent open. The arrangement of the rods can provide a hemispherical, cubic or triangular shape. The latter is the easiest to make, but it has the smallest internal volume, which can cause inconvenience when fishing.
It is better to sew an awning with your own hands from nylon or nylon. Tarpaulin is no longer suitable here, since it has a lot of weight. This tent is quick to set up and easy to transport.
Based on a sled

A sled is an indispensable item for winter fishing. They can also be used as a tent base. On the sled, you can mount a rectangular frame made of aluminum or plastic pipes, on which the awning will be placed. For convenience, the frame can be made collapsible. This shelter can be transported assembled.

A more complex option is a fan-type folding design. This mechanism is also used in strollers for a lowered canopy. In this case, the awning is attached to a set of U-shaped pipes. A folding frame based on a sled is an excellent option for fishermen who actively move around a pond in search of prey. Installing such a tent with your own hands will take no more than 20 seconds.
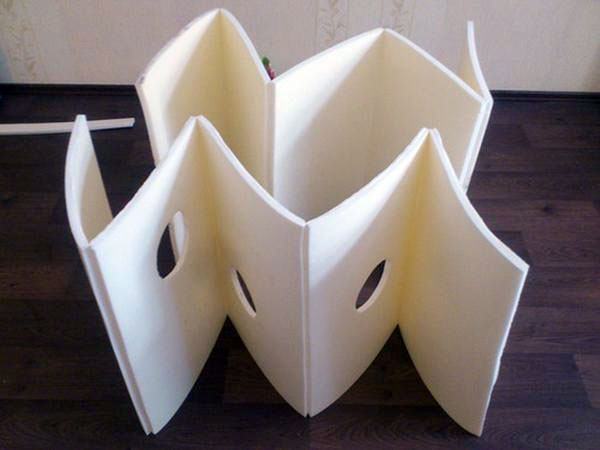
Panel house
If you are a car owner and love comfort when fishing, you can make your own shelter from sheets of plywood or chipboard. But it will be more like a fishing house. You will need 6 sheets of pre-cut holes for the windows, doors and holes. You can make sandwich panels, which consist of two sheets of plywood and an insulator. Such panels have good thermal insulation properties, and their use in your house will provide comfort to its inhabitants.
Alternatives
Oilcloth
 If you don’t have a tent, then you can use the most ordinary oilcloth. In this case, the fisherman himself serves as the frame. It should be said that this this option is not suitable for those who like very active hooking, because with such movements the oilcloth will fly off. As a stand, you can use an ice ax or an ice pick stuck into the ice. The lower edge of the oilcloth must be folded inward and secured with available items.
You can also sew a large bag from oilcloth with your own hands, which is put on the fisherman.
Such a shelter greatly restricts the angler’s movements and is not suitable for fishing with a balance beam.
The advantages include minimal cost and very fast installation. This is an excellent option for winter fishing enthusiasts who do not sit still and do not want to spend money on purchasing or making a more expensive shelter.
Tourist
If you have a camping tent, it can also be used for winter fishing. It would be very good if it had a bottom. To use such a shelter for winter fishing, it is necessary to modernize it - make a U-shaped cutout at the bottom, through which access to the holes will open. We also recommend sewing a zipper there. Tourist tents are less expensive than specialized fishing tents, and they can also be used for outdoor recreation.

If you plan to fish at night, then feel free to install a stationary shelter, but before that, inspect the ice for the presence of gullies, which may reach your site by morning. For lovers of fishing with a balance beam, a fan-type design, made with your own hands on the basis of a sled, is perfect. If you don’t want to spend extra money, an oilcloth bag is just for you.
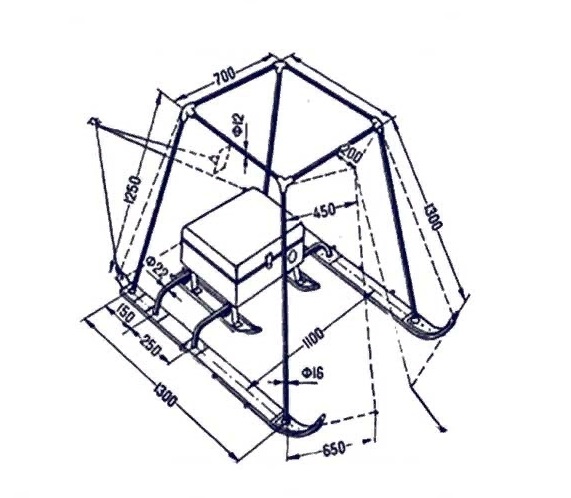
The frame of a homemade winter tent is made with your own hands from old aluminum ski poles with a diameter of 16 millimeters, which are cut into 10 pieces 500 millimeters long. In addition, four tubes with an outer diameter of 13 millimeters and two plastic rods or beech sticks (you can use poles from children's skis) with an outer diameter of 10 millimeters were needed. For connection, corner and three-way hinges, rivets and hooks from an old folding bed are used.
Fig. 1 Frame of a homemade winter tent:
1 - beech stand; 2 - ball stoppers; 3 - beech rod; 4 - grooves for the locking ball;
5 - cap strips (red arrows indicate the directions of hinges and telescopic connections).
The rivets are shortened, the hinges are reduced in size, and new holes are drilled into them, taking into account the diameter of the tubes.
Places are marked for drilling holes with a diameter of 5.5 millimeters in such a way as to obtain the desired angle of divergence of the poles when installing the tent (at point-blank range). This is the main condition for all hinge joints.
The side racks must be secured with cap bars in the working position so that the deflection angle is slightly greater than 90°.
A fairly simple method of locking telescopic connections is used: in the place where the extendable tubes are locked, we drill a hole with a diameter of 5-5.5 millimeters with a chamfer for a socket, into which we insert a ball with a diameter of 6 millimeters. We install the ball into the socket and slide a piece of rubber hose with an internal diameter of 13-14 millimeters. The ball is first coated with lubricant.
Circular recesses are made in the beech rod on both sides - grooves for the locking ball.
 f2
f2
Fig.3 Fastening parts for a homemade tent:
1 - adjustment of hinges; 2 - ball stopper; 3 - fastening the vertical rear pillar
Making a homemade tent frame begins with a vertical rear post. The lower side tubes (opening angle 90°) are attached to the three-way hinge, then the side posts, and lastly the lower support tubes are assembled.
Ball stoppers (10 pieces) are assembled during the manufacture of the frame. The length of all racks is determined at the end of assembly, but the lower tubes should not extend beyond 500 millimeters. The front post is assembled in exactly the same way, only the hole for the hook axis is made before attaching the side tubes. The opening angle of the side beams of the front pillar is determined after manufacturing the rear pillar.

Fig.4 Frame of a homemade winter tent, made with your own hands, with an awning:
1 - tension cords; 2 - zipper locks; 3 - part of the sewn bottom of the tent; 4 - loops and ribbons for attaching the awning to the frame; 5 - apron; 6 - pocket.
When the frame of the homemade tent is ready, we begin to make the tent awning, for which we use old raincoats made of Bologna fabric, which does not harden or rot in the cold.
We sew part of the bottom (250-300 millimeters) to the tent, as well as loops and straps for attaching the frame. Cuts are made on the sides and zippers of at least 500 millimeters in length are sewn in. An apron 200-300 millimeters wide is sewn along the bottom of the tent to the bottom, and pockets are sewn onto the inner side wall.
You can make a small cut with a zipper (200-250 millimeters) for the window. Caps made of thick fabric are sewn into the corners of the tent canvas, into which the frame posts are inserted. The cords are stretched from the side posts to the front, we pass them through the loops and put them on the front post over the cap, the upper part of which is not sewn in this place.
The weight of the tent is 1.8 kilograms, the assembled dimensions are 200 x 500 millimeters.
Setting up the tent takes no more than one minute. Standing against the wind, facing the rear pole, we unfold the tent and put it on ourselves, straighten the hinges, pull out the telescopic connections, and secure the side poles with cap strips. We close the zippers and put on the tension cords. To leave the tent, open the locks on the sides, lower the front pole (the tension cords will fall on their own and hang in the loops), tilt it towards you and tilt the front edge of the tent over your head.

Fig.5 Parts and assembled tent:
1 - assembled front pillar; 2 - assembled rear pillar; 3 - assembled tent
If you sew two “zippers” 1000-1200 millimeters long - one parallel to the bottom, the other perpendicular to it, you can leave the tent without lowering the front post - just open these two locks. A tent for winter fishing for two should be equipped with two rear frames, the lower connections will be longer.
The light weight and dimensions allow you to put the tent in a backpack.
Tent for winter fishing can buy. They are different: large, small, medium; quite cheap and quite expensive. In any case, you can choose according to your budget and needs, buy it and not bother - that’s my opinion. But, there are people with obvious “creative incontinence” and too even hands, growing from exactly that place. Here, this article is for them - how to make your own tent for winter fishing.
So, why is it needed? For protection from wind and snowfall. Let's consider several options for making your own tent for fishing in winter. As usual, there is a simple way and a more complex, thorough one, and also a very thorough and very labor-intensive one. I will briefly describe all three.
 . Well, this is the most conventional and easiest to make shelter from the snow and, to some extent, from the wind.
It's not even a tent, but rather a cape. Our task is to make a dome from thick polyethylene film. The support of the tent will be an ice screw. To do this, extend the drill to the maximum and screw it into the ice at an angle, as can be seen from the figure. Polyethylene can be cut in the form of an isosceles right triangle, so that when folded in half, you naturally get a rectangular isosceles triangle. If you forgot geometry or didn’t understand anything, here is the diagram.

 Accordingly, we sew on a zipper that can be used to close it. We make holes in the grommets along the perimeter of the bell. Through these holes we will attach the cape to the ice using steel pins or nails.
A tent dome made of polyethylene is not the best solution in terms of strength. It is quite difficult to sew a zipper well without tearing the film. But, on the other hand, the film is transparent and everything around is visible. So, you can make a dome from fabric (light, translucent or denser). You can make a dome using a more advanced pattern. This is already a transition to a more complex winter tent design. Here, an ice screw won’t work as a support. At a minimum, you need a central support, higher. It can be made foldable by holding the sections together with tubes, like the old bamboo fishing rods. One end is sharp to pierce the ice. We pull the canopy onto such a central support and tighten the edges by driving pins into the ice through the holes (or using guy ropes sewn to the tent canopy).
Even more complex structures, as in the figure, require more than one support. In addition to the central one, 4 or more auxiliary supports are required on the sides. This way you can make a fairly large tent. Of course, the larger the tent, the more folding poles, the heavier and bulkier the tent will be when folded...

And, the most outdated, time-consuming and complex option make a tent for winter fishing– make a collapsible rigid frame from aluminum tubes. And a dome made of thin fabric is pulled over the assembled frame. There are many design options! I think if you have reached the point in life where you want to make this kind of tent yourself, then you will design it, construct it yourself to make it even more interesting
I repeat. Personally, I think that with the current abundance of winter tents on sale, and their moderate cost, doing it yourself is a dubious idea. But perhaps there are fans of various homemade products and they will decide make a tent for winter fishing with your own hands. I hope these brave people will find some useful ideas in the proposed material.