Home waterfalls. Decorative waterfalls and fountains in the interior. Decorative garden fountains and waterfalls
These miniature indoor waterfalls are made from natural materials can be used to decorate terrariums, indoor plants, green corners in the garden or as an independent miniature.
How to make such a waterfall? Prepare materials and tools: shells, a heat gun, transparent glue sticks, pebbles or large transparent beads, pearls, artificial greenery and flowers, blue paint and glitter, a brush, glass (drywall, a piece of plywood) as a stand.
Fill the shells with hot glue. Glue them together to create a smooth cascade. Secure the reverse side with pebbles or beads using hot glue. Glue the composition onto the stand. Using glue, make waterfalls from one shell to another. Add blue paint and glitter. Secure the green plants and pearl.
TheTinyShinyCottage, etsy
Add small shells, pearls and blue transparent beads to the next waterfall, cover the stand with glue and sprinkle with decorative sand or glitter. Make a mermaid from polymer clay or cold porcelain.
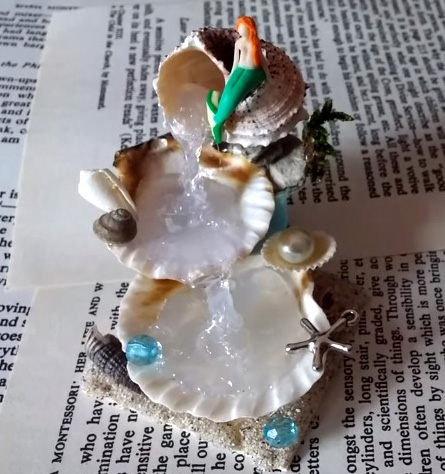
tenshicrafts.storenvy
It is better to place a stone waterfall on a glass stand. Here, too, all elements are glued together with hot-melt adhesive. To get falling water, stick clear tape from the top stone to the lake and cover it with glue, foam the lake with a gun to get splashes. Make the fish yourself or use ready-made ones.

youtube.com/watch?v=BjGjCTcYdDM
Remember that we are talking about miniature waterfalls here. If you use large shells and heavy stones, hot melt glue will not be able to hold such a structure. Average and large waterfalls it is necessary to strengthen it with reinforcement (wire) or use other materials.
Standard ( a budget option) provided: acrylic glass from 8mm thick. Filling system (pump, pouring watering can). Stainless steel tank, flexible stone finish, pebble tray. Top decorative cover (stainless steel, flexible stone finish) with built-in spotlight. Additional equipment: Replacement of acrylic glass with tempered silicate glass from 8mm, applying a pattern using a sandblaster. Applying acrylic pattern, logo, etc. on acrylic glass with directional lighting. Turn on/off the remote control. Replacing the tray for pebbles with a deeper one for planting plants. A large number of designs are possible: interior, wall-mounted, wall-mounted, free-standing.
2. Waterfall on stone (wall, interior). The only difference from a glass waterfall is the replacement of the waterfall with a slab made of natural stone. The main component of pricing is the choice of stone.
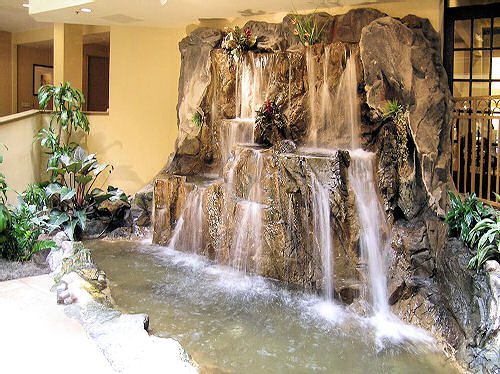
3. Cascade waterfall. Ideal for corners, niches, etc. which are very difficult to occupy. Often such corners, upon completion of the construction of the waterfall, turn into the main element of the design of the entire room; in 95% of them they are decorated with large potted plants, plus places for planting climbing plants are equipped throughout the entire area. Standard equipment: Water slide (molded concrete using our revolutionary technique, exact imitation of almost any rocks). Water supply and bottling system. Additional equipment: Installation of underwater lighting, equipment with a fogger. It is possible to complement the waterfall with a decorative panel and provide a thematic transition.
 More and more people, when planning renovations in their apartment, pay attention to design. And often they are faced with the fact that some zest, the main element of the entire design, is missing.
For those who like one of the most beautiful elements of the earth - water, our company can offer to buy a waterfall for an apartment. This kind of waterfall can serve as the main design element and be decorated with living plants; in fact, it is possible to create a living corner of nature with gently rippling water. It is worth noting that the waterfall is not only beautiful but also useful. This is air humidification, which will have a beneficial effect on living plants, wooden furniture and parquet floors.
As standard, this design does not require water supply; a closed water cycle is used. You just need to add water as it evaporates and, when using tap water, remove limescale from the surface of the drain.
The surface of the waterfall can be made of either tempered glass or natural stone. Glass is absolutely safe and very durable; if broken, it breaks into small pieces, which eliminates the chance of serious injury. If you are planning a waterfall using stone, you should look through all the options for natural stones, such as onyx, travertine, slate, granite, marble and choose the one you need. They all differ in color, texture, and patterns.
The backlight is LED or halogen. The halogen lamp is located in the upper, decorative tank and illuminates 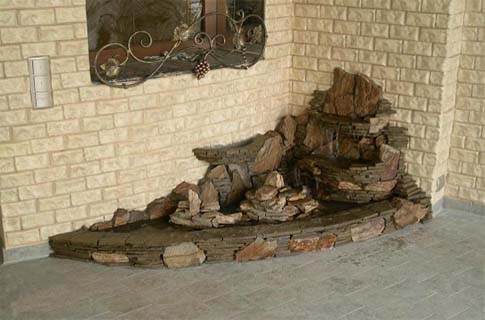 the surface of the waterfall from top to bottom. LED lighting can be installed around the entire perimeter of the waterfall.
It is also possible to combine a wall-mounted waterfall with a cascade one; replace the lower stainless steel expansion tank with a mini tank made of stone or tiled. If desired, you can even make an aquarium at the foot of the waterfall from acrylic glass and line the edges with stone or other materials. It is also possible to install a fogger.
Our company guarantees you the quality and unique design of a waterfall according to the dimensions you specify. All you have to do is buy a waterfall for your apartment and enjoy quiet evenings or in the company of friends, the gentle murmur of water, framed by living plants.
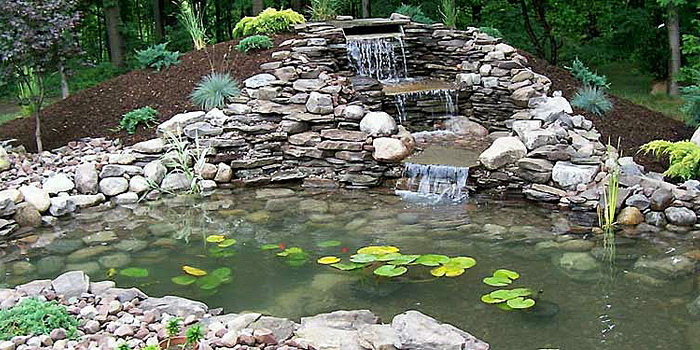
Waterfalls and fountains are an excellent decoration for any suburban area. Decorative fountains and waterfalls can become a place for solitude and contemplative relaxation. We offer photos of waterfalls and fountains after this article in the photo gallery, as well as information on their standard arrangement in the garden and dacha. You can make garden fountains and waterfalls using available materials. The most pressing issue always remains the debugging of the process of natural circulation of water flows.
The steeper the slope and the greater the flow of water, the stronger the waterfall. In a small garden it is hardly worth making it several meters high. For a small waterfall, a height difference of 50-100 cm is sufficient. The pressure of the water, the height and nature of its fall (it can ooze drops, flow in a stream or pour in a flat stream) affect the sound of falling water. Calmer sounds have a calming effect.
Installation of fountains, ponds and waterfalls in the garden
The design of fountains and ponds has a similar standard structure. In most cases, the construction of a waterfall on a site is based on the use of simple laws of physics, in particular communicating vessels. You can make a waterfall in the garden using modern electrical equipment.
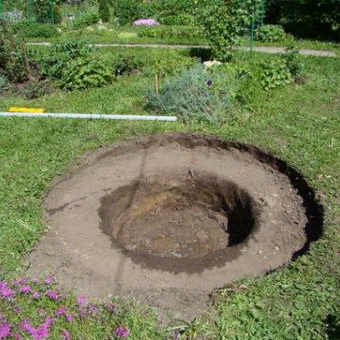
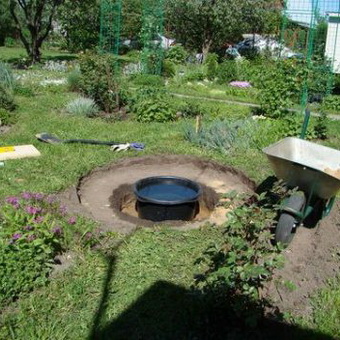
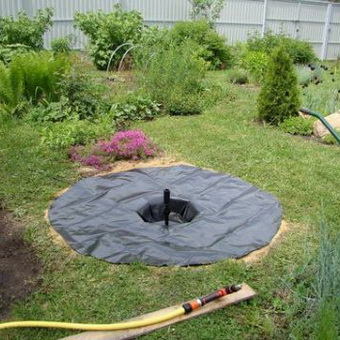
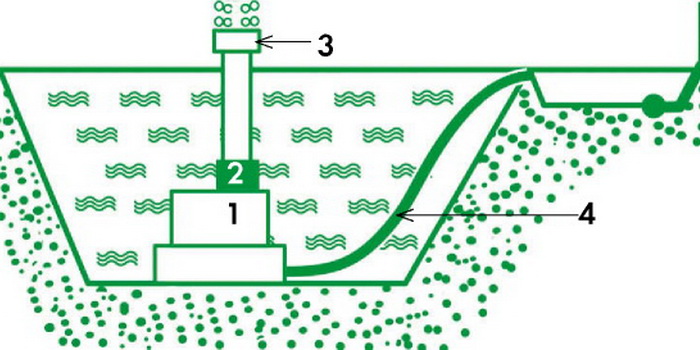
Any waterfall is installed on the shore of a catchment pond into which water will fall, and a submersible pump is installed at the bottom of the same pond. It is better to start building a waterfall from this pond, making a coastal zone at a level of 15-30 cm from the water level, in which large stones will be laid. They should lie very stable; if this does not work without mortar, you can cement them. To increase the strength of the entire structure, you can first lay a layer of mortar between the underlying material and the earthen wall, and then lay BC rubber, then again the mortar and the foundation stones of the waterfall on it.
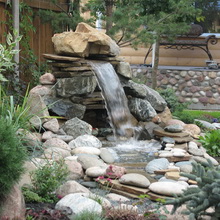
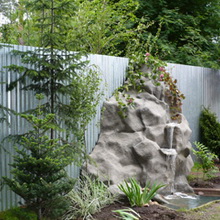
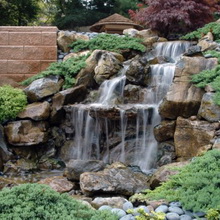
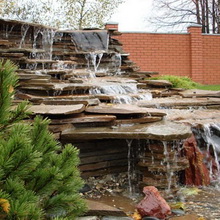
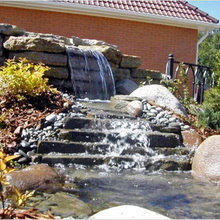
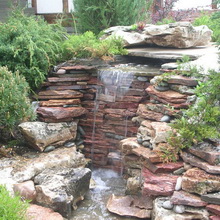
How to make a waterfall from stones: photo and description
The stone waterfalls in the photo amaze even the most discerning connoisseur of exquisite landscape interiors:
 |
 |
 |
 |
 |
 |
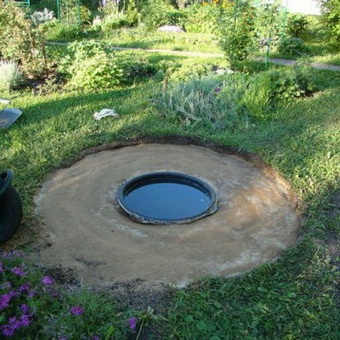
Before you make a waterfall out of stones on your site, you need to prepare the site in the same way as described above.
Then you need to partially unwind the underlying material again and lay a flat stone on top of the foundation stones, from which water will fall, so that its edge protrudes above them, and the water drains into the lower reservoir. This stone needs to be cemented and checked with a watering can whether everything is done correctly.
The waterfall surround can now be constructed by laying stones around the weir stone, if necessary (to increase stability) attaching them to the lining material with mortar. To prevent water from seeping under the stones, you should lay a fold of lining material at the height of the spillway stone and secure it. The banks of the catchment pond are decorated with stones.
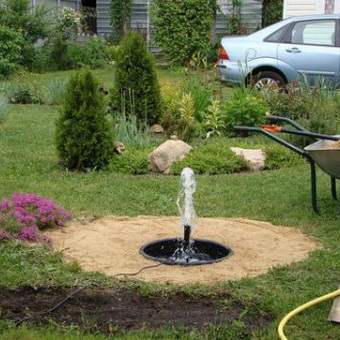
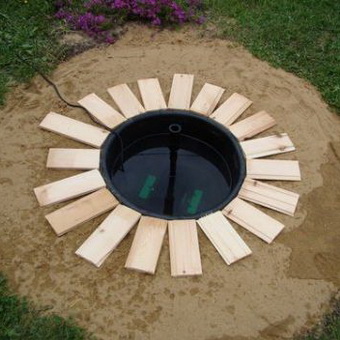
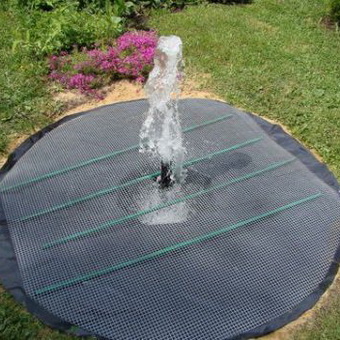
After constructing the waterfall, you need to install a submersible pump, bury the flexible hose coming from the pump to a shallow depth, install a tap in the hose if you plan to regulate the water pressure, and decorate it. After this, you need to turn on the pump and test the waterfall; if everything is satisfactory, you can cut off the excess underlying material and disguise its edges with low coastal plants or stones and pebbles.
You can build a “crying” waterfall on a retaining wall made of flagstone, built without the use of mortar, by laying a hose behind it; at the end of the hose, the stream from it is divided into as many parts as there are streams of the waterfall. At the bottom of the retaining wall, a water tank is made from film or a small ready-made mold is installed. By turning on the pump, we close the system, and the waterfall starts working.
To construct a waterfall, you can use ready-made fiberglass molds, the appearance of which is close to natural stone. It is especially important to disguise their edges and fit them into the garden environment.
Installation of decorative fountains at the dacha
The installation of fountains in the country can be carried out according to a pre-planned plan. In a regular garden, a fountain is an indispensable element; its size must correspond to the size of the garden; in order to be attractive, it does not have to be many meters high. A fountain can decorate not only reservoirs in a regular style, and a fountain in the form of a springing spring is quite appropriate in a landscape garden. The smaller the fountain, the closer to the house or vacation spot it should be. It is better to admire the large fountain from a distance. The style of the fountain should match the style of the garden.
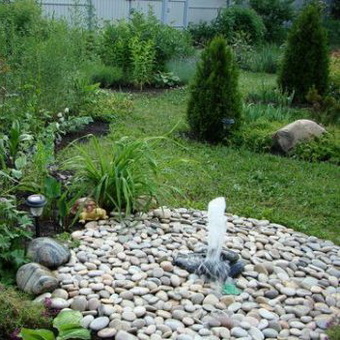
The installation of decorative fountains in the country is quite simple. It consists of a pump and a sprinkler through which water is released under pressure. The simplest sprinkler looks like a watering can attachment. Other attachments can create jets of water, foam, a spherical dome, etc. You can connect a submersible pump to statues, for example, to a metal heron with a hole in its beak or another type of jug or huge boulder (natural or natural) with a drilled hole, an old mill one will also do millstone. Water under pressure will splash out or flow quietly from them into the reservoir. A small container for water, dug into the ground and decorated, and a pump that “drives” the water in a closed cycle are enough.
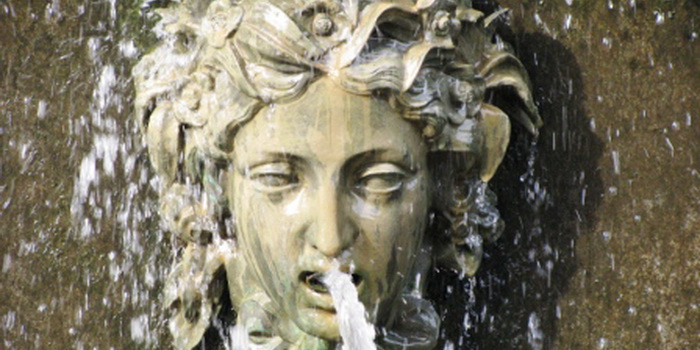
A mascaron looks interesting in the garden; it is a mask, a decorative relief in the form of a human face or an animal’s head with a hole for releasing a stream of water. A stream of water from the mascaron falls into a small reservoir and, with the help of a pump, flows back into the “open mouth”. Water features built into the wall make good use of space, are very attractive and produce a calming, sweet sound. They are organic not only for Italian gardens, but for gardens of any size in any country.
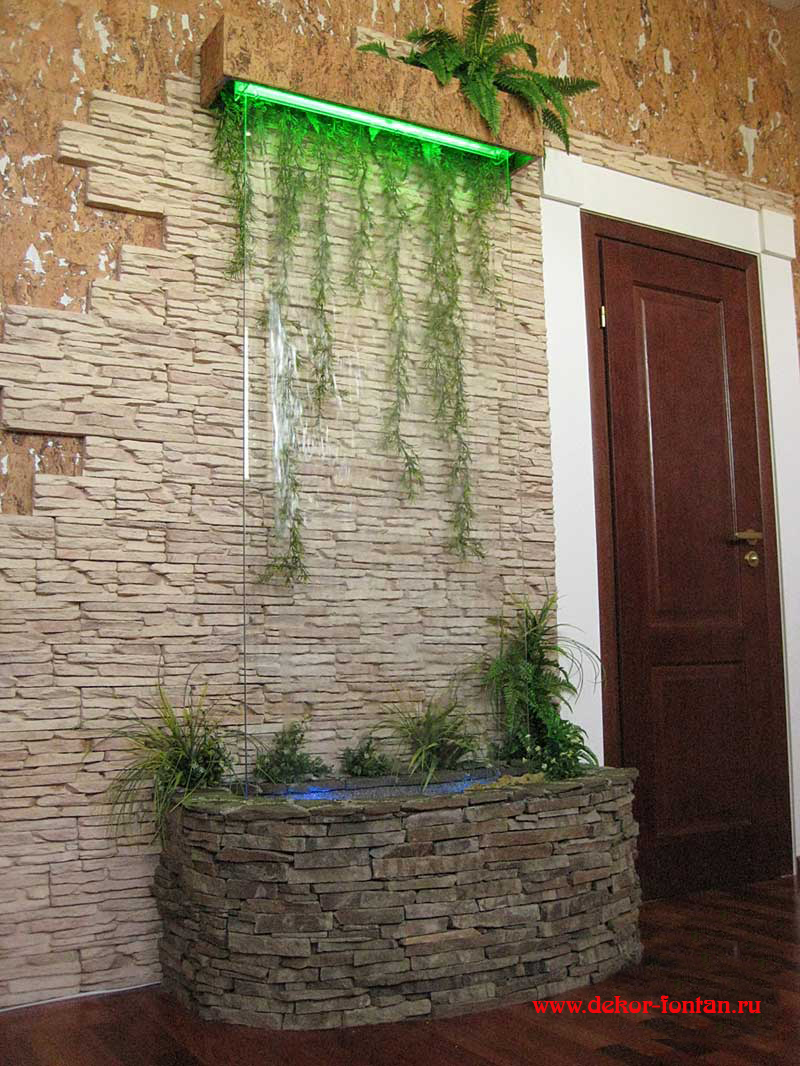
A decorative waterfall is an excellent way to complement the interior of a room; for this reason, in many design photographs and images of room interiors, their presence is a prerequisite. Without a decorative and indoor “waterfall”, the furnishings in the room will not look complete and complete. Today, everyone can have a waterfall. Moreover, it is not necessary to spend a lot of money to buy the model you like in the store.
A waterfall in the house is a real decoration that pleases the soul
If desired, you can make a small device yourself. Your own waterfall will always please the eye, especially if it goes well with the rest of the interior of the apartment. How to make a waterfall yourself? Getting to know this issue will help you easily make a beautiful and useful “water” device at home.
Getting to know the waterfalls
A mini waterfall, despite its small size, is capable of solving several problems at once. These include:
- Decoration of the room, addition to the stylistic solution of the room design. The waterfall will perfectly complement the interior in African, Japanese style or hi-tech style. Such water devices perfectly complement the “green areas” in the apartment, on the windowsill or loggia.
Indoor waterfalls have a simple operating principle:
- Water rises from the tank using a pump.
- Having risen to the top point along the hose, the liquid flows along a special slope into the container.
- This results in a water cycle. The system does not require connection to the water supply network. To operate the waterfall, you need access to the power grid, as well as periodic water renewal.
- It is important to use clean water free of sediment and foreign matter. Filling with dirty water can clog the pump, increasing the chances of premature failure.
An indoor waterfall requires an electrical outlet to operate.
The key element of any waterfall is the way the water flows. The nature of the movement of fluid in the structure depends on the power of the water supply, as well as on the characteristics of the slope. Water can fall in a free stream or flow in streams through special gutters. There are a lot of varieties, it all depends on what kind of waterfall you plan to use in the apartment.
Kinds
A home waterfall can come in different shapes and sizes. Before you start searching for or making a waterfall with your own hands, it is worth considering the existing types and types of devices.
The following types of devices are popular for installation in an apartment:
- Exotic. This type of device involves the use of natural stones, reeds, wood, mirrors, figurines and figurines in decoration. Often a mandatory element is living vegetation.
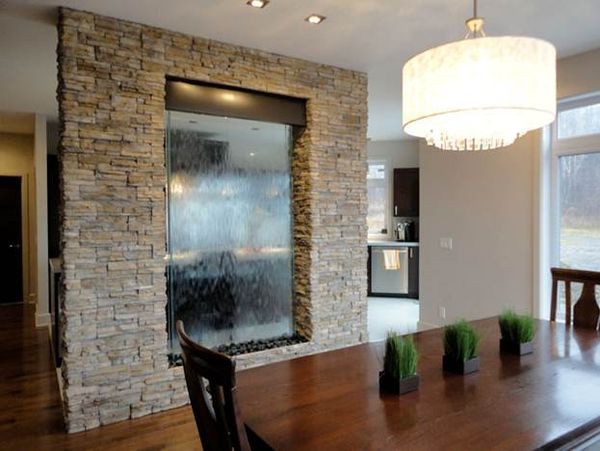
- Waterfalls on glass. Quite simple but effective look. Perfectly suits the interior of modern apartments, where the use of plastic, glass and other artificial materials abounds. Glass structures can be of two types: jet and drip-rain. Jet devices take the form of classic decorative waterfalls installed in a glass shell. In them, water, lifted by a pump into a container at the top, flows down along the glass surface, creating a kind of liquid circulation. Raindrop waterfalls have a more complex design; the glass in them has a special vascular-capillary structure. Water flowing down them creates the effect of rain.
- Combined. The most complex designs that combine a fountain and a waterfall. With the help of a pump, the liquid rises and is thrown out in a stream of a certain shape onto the surface. The water returns to the starting point through a system of waterfalls.
Based on the method of placement, designers divide decorative waterfalls for apartments into the following types:
- Floor-standing.
- Tabletop.
- On special deliveries or suspended, wall structures.
Based on the nature of the water jet, “water” devices are divided into:
- Jet.
- Cascade.
- Drip.
- Foggy.
- Combined.
According to technical “equipment”, waterfalls can be divided into several more conditional groups:
- With backlight.
- With music.
- With living vegetation.
The photo shows an example of a home waterfall with living plants
Homemade waterfalls
Having decided on the waterfall option, you can not only purchase the desired model in the store, but also make it yourself. With a competent and attentive approach, the result can be impressive. By doing the work independently, selecting the right materials and determining the optimal shapes, each person will receive a waterfall that meets the requirements and expectations. You should first prepare a drawing of the future device, calculate the required size and list of necessary materials.
It is good to use an aquarium as the basis of the device.
It will protect the device from dust and solve the issue of the tightness of the structure. The aquarium will increase the mobility of the waterfall - it’s easy enough to move it from place to place, it will fit compactly on the windowsill, on the floor, and on the table.
Let's consider the option of making a glass waterfall with your own hands. For manufacturing you will need the following materials:
- Cellular plexiglass.
- Pump.
- Check valve.
- Illumination from neon or LED bulbs.
- Base made of waterproof material. A plastic plate with high sides is perfect.
- Transparent water container.
Sequencing:
- The basis is laid on lighting equipment in the form of controllers and lamps.
- A sheet of plexiglass covers the backlight.
- At the base, a transparent container is installed on plexiglass where the water will be located.
- A pump (submersible) is installed in the container. If the pump is surface-mounted, it is placed in the base.
- A pedestal is formed from plexiglass, the basis of a waterfall along which water will flow.
- A hose is connected to the top of the pedestal. To hide it, various decorative elements are used.
- This DIY tabletop waterfall can be made not only using glass. The pedestal of the device can be made of wood, stone or concrete.
In order to make an indoor waterfall with your own hands using stone, you will need the following materials:
- A low-capacity submersible pump with the ability to regulate power.
- Hoses of the required length to deliver water to the top point of the structure.
- Base. A plastic tray is perfect for this purpose.
- Water container. This could be a basin or other similar object made of plastic, glass or other material. The best solution is a stone bowl.
- Stones of various sizes. It is optimal to use two types of stones. River pebbles are perfect.
River pebbles are perfect for creating a home waterfall with stones.
Step-by-step manufacturing steps:
- A container is installed on the base.
- A pump is placed in the container. To give a natural appearance to the structure, the pump is laid with pebbles.
- Medium stones are placed below, larger stones are placed on top.
- A stone structure consisting of several terraces is carefully constructed. It is placed closer to one of the edges of the container. A pump is laid from the pump, it is supplied along the back side of the stones to the top point. You can make holes in the stones for the cable.
- Water is poured into the container. The pump turns on, it will pump water up through the hose, from where it will flow down the terraces back into the container. The waterfall for your home is ready!
- For a beautiful appearance, it is worth considering the issue of hiding the hose and power supply wires for the pump. Artificial plants are suitable for this.
- Foam or waterproof clear sealant can be used for fastening and sealing.
- You can add neon or LED lighting to the design.
4403 0 0
What kind of stone “something”: pebbles for the bathroom and 3 ideas for its use
August 21, 2016
You can talk at length about canons in design, but every day the existing canons are becoming less and less stable. Aesthetics and harmony, balance, colors, materials brought together in order to obtain such a long-awaited result are the essence of your knowledge, practice and self-development. My motto is to learn, see, touch something new every day, and I am sure that this is the only way to stay on the right course in “high design.”
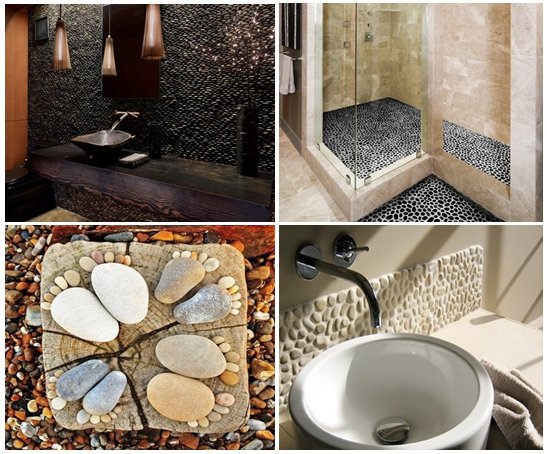
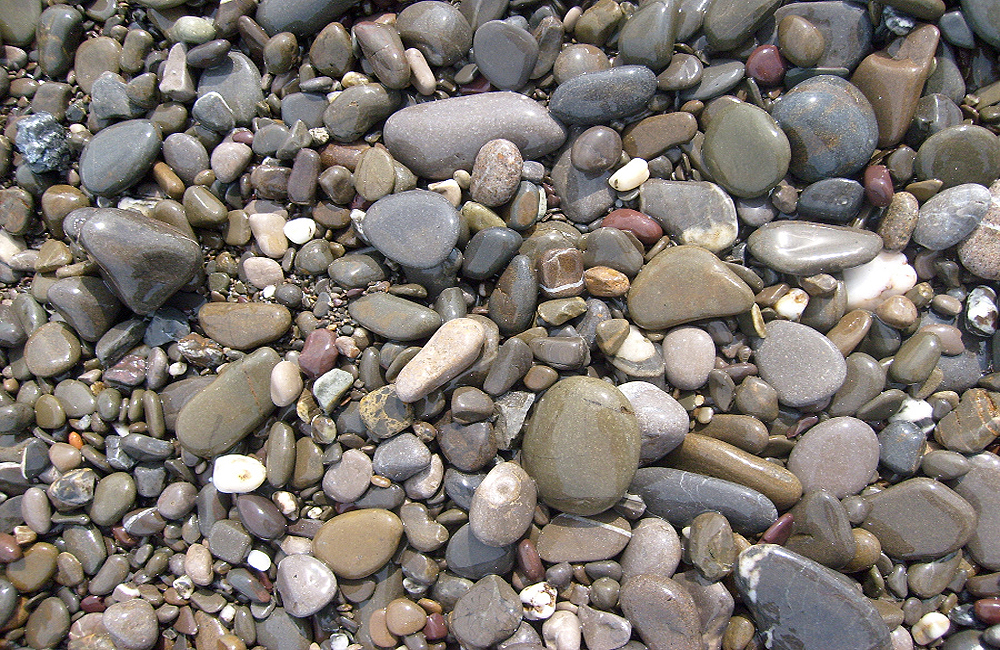
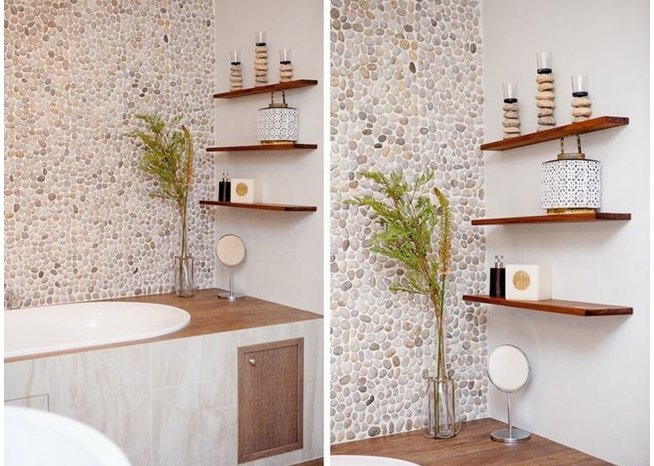
Pebbles are small stones that, when exposed to water, take on a smooth, rounded shape. This allows it to be actively used in surface finishing, as well as bathroom decor.
Among the advantages, it should be noted low porosity, moisture resistance, as well as a wide color palette from white to rich gray-black. Pebbles sit comfortably alongside tiles, mosaics and wood.
The trends of recent interior exhibitions show a clear design direction towards nature. This concerns not only the issue of environmental friendliness of materials, but also shapes and shades.
Pebbles are far from a new decorative element; not so long ago they were actively used in bio-fireplaces; today, simple pebbles have migrated to the bathroom and help create an interior in an oriental, maritime, and even country style.
Bathroom designs using pebbles
Jungle under the starry sky
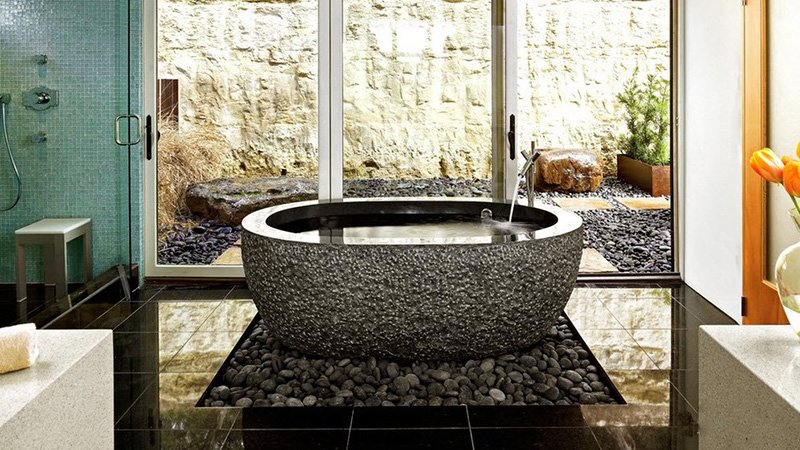
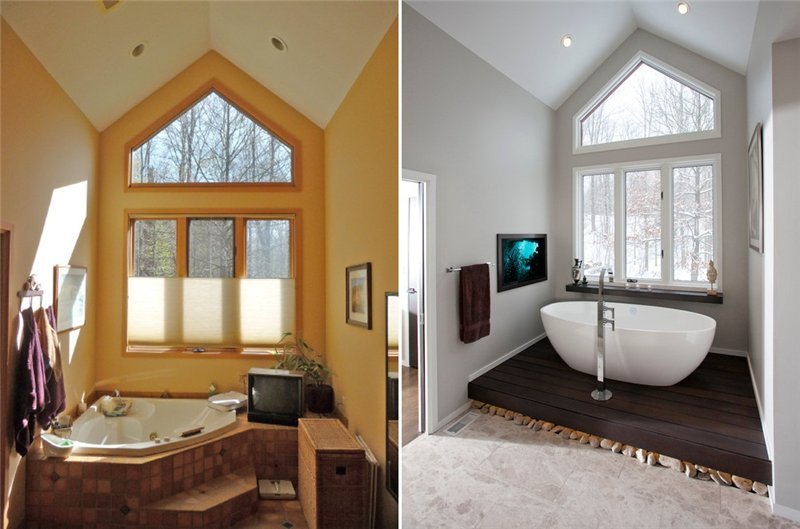
Do you dream of a bathroom with a real waterfall, a window into an exotic forest, a starry sky above your head and cool pebbles under your feet? Do you think that this is only possible in a SPA salon somewhere overseas? You are wrong, and I will prove it to you now.
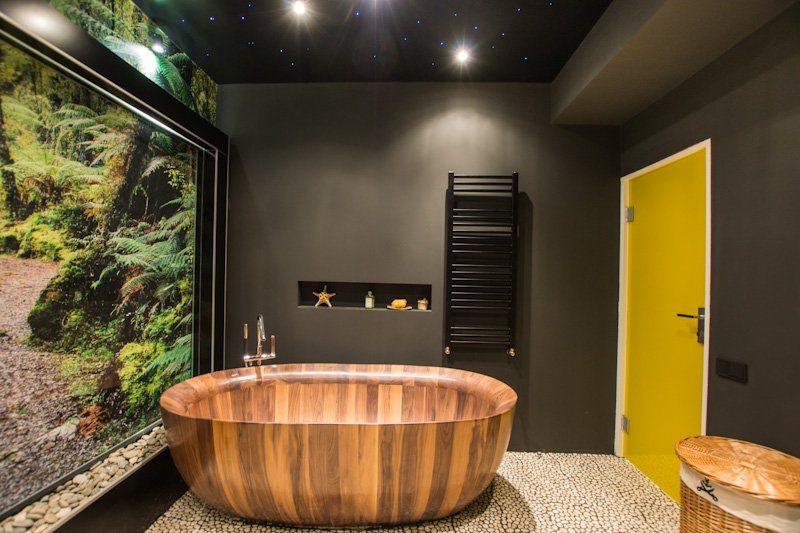
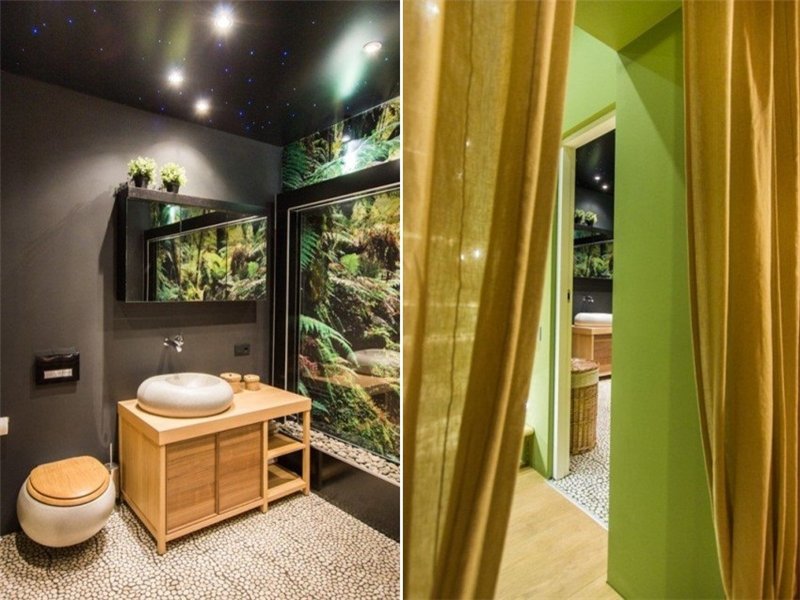
So, I came across a bathroom in a private house, initially divided into two parts: a tiny shower and a large sauna, which modestly served as a storage room. The entire area of the room was upholstered in classic lining. Where did the jungle come from?
The concept of the project was supposed to show a different view on such concepts as “naturalness” and “naturalness”. After all, not everything is limited to natural colors and natural materials. The main style, as you may have guessed, is eco-style.
An ideal solution for a private home would be glass partitions instead of walls, but in this case such a plan could not be realized. To make the walls as invisible as possible, I painted them with moisture-resistant paint of a complex graphite-chocolate shade.
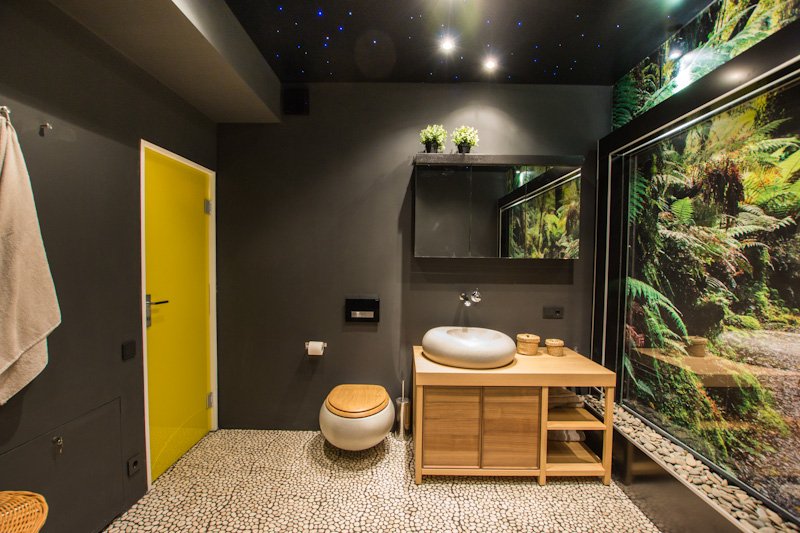
I abandoned classic tiles because the latter makes the walls too noticeable.
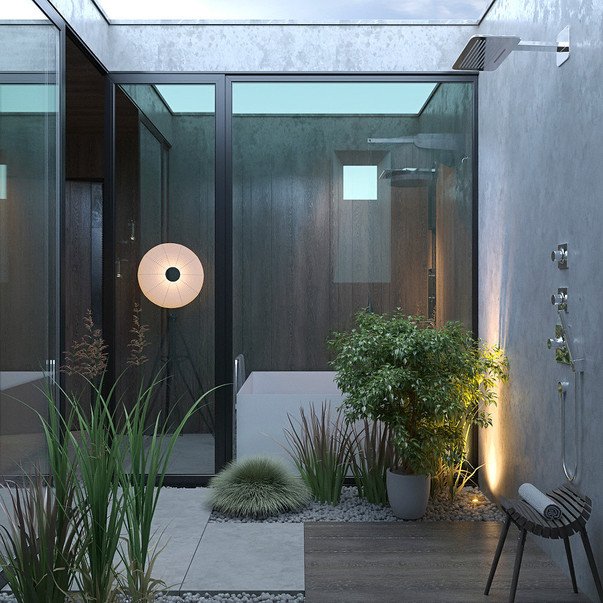
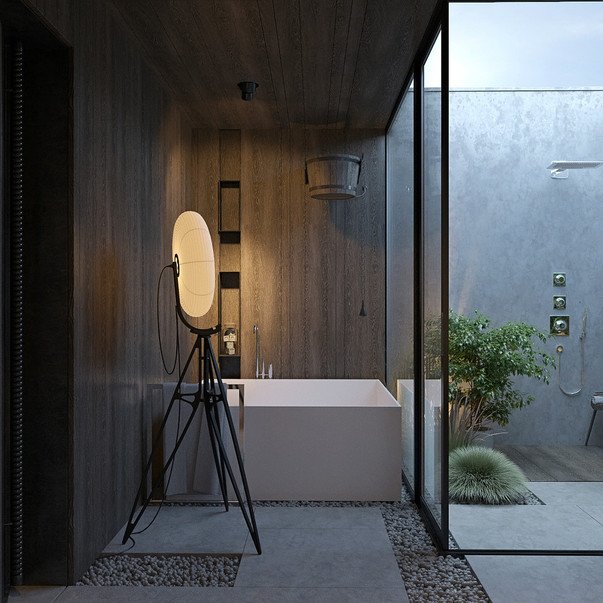
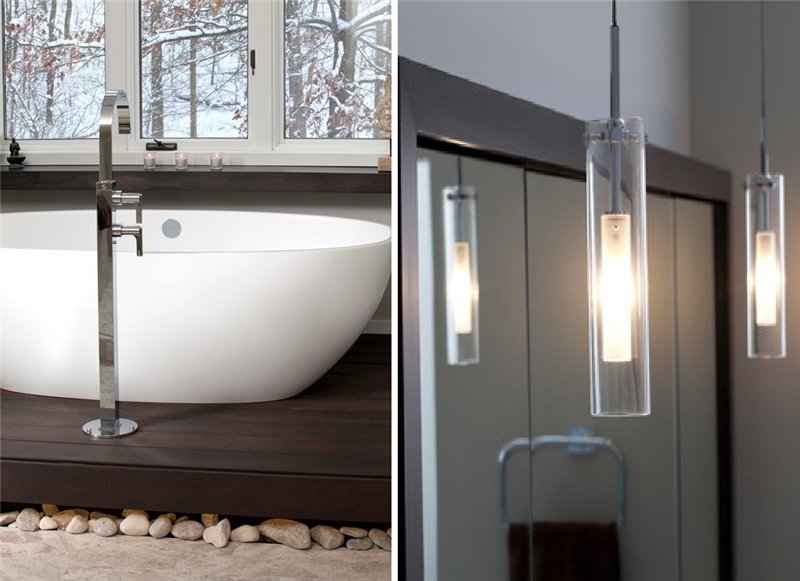
The center of the interior was the waterfall. Yes, yes, the real one, and not his image. Water flows down the glass, falls down, and returns to the stones.
To give the power of the waterfall, it was decided to use a photo printed finish. So, on the wall there appeared an image of a jungle with a path leading deeper into the forest.
To make it seem more “nature”, I used mirror surfaces near the wall with a photo print.
Natural sea pebbles were used to finish the floor, which goes well with the stones lying on the parapet and the stone path leading into the jungle.
It was possible to visually increase the area of the room through the use of images with perspective. In our case, this is the jungle, but you can choose the ocean or mountains, which, by the way, can be combined very well with a pebble floor.
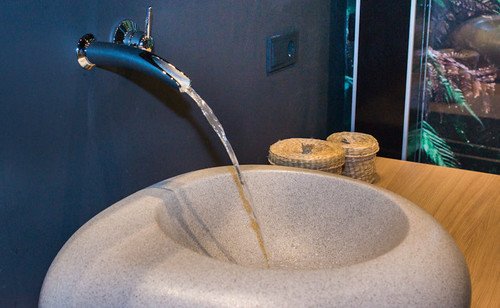
In order not to disturb the naturalness of the interior, all the plumbing fixtures are made in the shape of boulders, yes, including the toilet. There is no hole for the mixer in the “stone”; the water comes directly from the wall.
Most accessories are made from natural fibers such as jute and sisal.
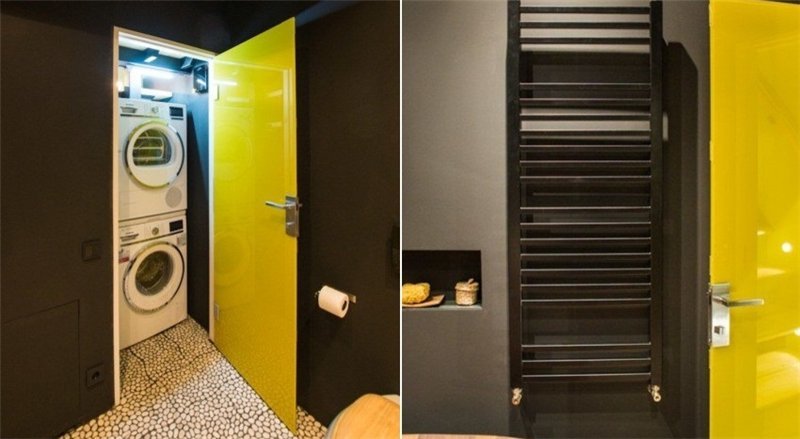
The next question is the location of household appliances. The washing machine went into the laundry room, which is adjacent to the bathroom and hidden behind a yellow door. The olive-canary color does not disturb the unity of the “jungle” and goes well with the walls.
The glossy canvas was not chosen by chance; it also works to reflect light and visually expand the space.
The classic design of the chrome radiator was replaced with a gray-brown battery, which was completely lost in the “jungle”.
“I could use a wooden bathtub,” I thought, but its price was so undemocratic that I had to look for an alternative. And yes, I found it. The handmade bathtub looks like a parquet surface, since it is assembled from individual planks and covered with a polymer composition that is not afraid of moisture.
Used in the interior:
- paint – Belinka;
- floor mixer – Jacob Delafon, Stillness;
- spot light – Lightstar;
- vanity unit – Villeroy & Boch;
- toilet – Pure Stone;
- the cabinet above the sink is from the Furniture Design Laboratory;
- washbasin – Villeroy & Boch;
- door – Casali, Pineapple C.
Gardens in the soul
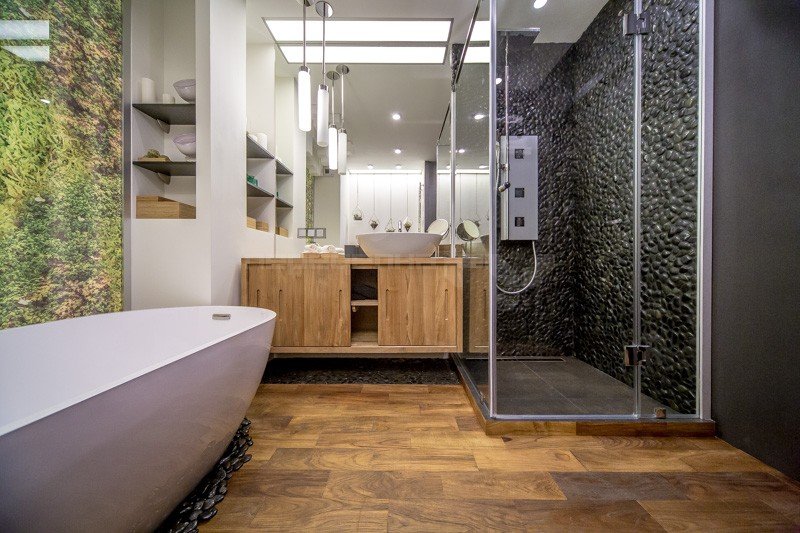
Another example of an eco-interior using pebbles, living plants and natural wood in wall decoration.

It would be fair to say that this bathroom was lucky with its space; as much as 20 square meters turned into an oasis of nature.
So let's start from the top. The lighting is arranged to create a feeling of natural light in the bathroom. Why is this necessary? The room has a large number of fresh flowers that require constant lighting.
A word of advice for those who want to place plants in the bathroom: choose greens that have smooth leaves, and be careful not to allow soap residue to settle on them.
The walls are decorated with wooden panels and Neo hedonism tiles from Petra Antiqua.
For decoration, “miraculous” elements were used, for example, a fancy piece of driftwood under the washbasin. The tub on the wall, which continues the bathhouse theme, deserves a special mention; it not only carries a decorative function, but is also used for dousing with cold water.
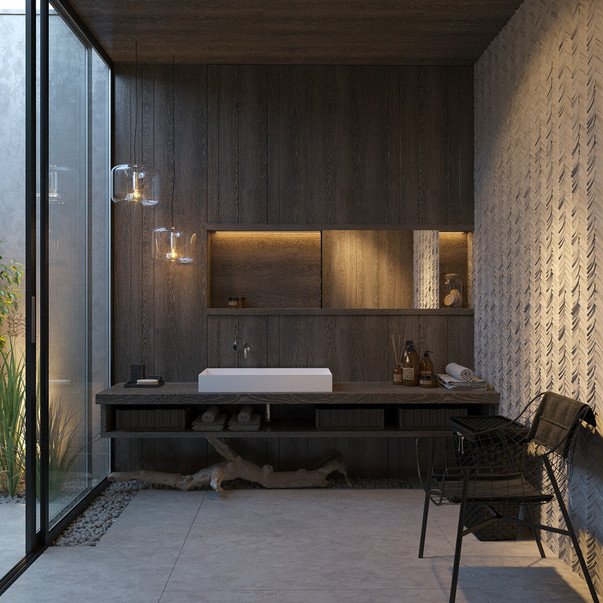
Bright, but fairly soft light is provided by the original lamp above the bath. Thanks to its bizarre shape, the floor lamp has become the “highlight” of the interior.
Plumbing fixtures include a rectangular sink and a wall-hung toilet with installation. Part of the bathroom is visually zoned with floor tiles.
An abundance of cabinets and shelves would be inappropriate in an ecological interior, so the choice was made in favor of wall niches equipped with lighting.
The no-frills bathroom looks cozy due to the use of materials with different textures, which were important to combine in shape and color.

The recreation area, if space allows, can be supplemented with sofas, benches or sun loungers. In this project, I decided to choose a stylish chair, which in shape and color found a “relative” in a wicker laundry basket.
In the spirit of Zen
The East is a delicate matter, this phrase from the legendary film also applies to interiors made in oriental style.
The owners of the house looked at the design from a minimalist point of view, which was not reflected at all by the classic interior. After the redevelopment and transformations, the bathroom acquired the features of minimalism with details of Zen aesthetics.
Let's start with finishing materials, in the selection of which the emphasis was placed on naturalness. Naturalness affected not only the type of material, but also the color; there are no rich complex colors here, everything is as simple as possible and close to the soul.
The room seems much larger due to the huge window and the gable roof, which forms a high ceiling. I did not clutter this feeling of freedom.
I decided to raise the bathtub onto the podium, this will allow the owners of the house to enjoy the view from the window. The main material is massaranduba wood, most often used in exterior decoration, as it can withstand temperature changes and humidity.
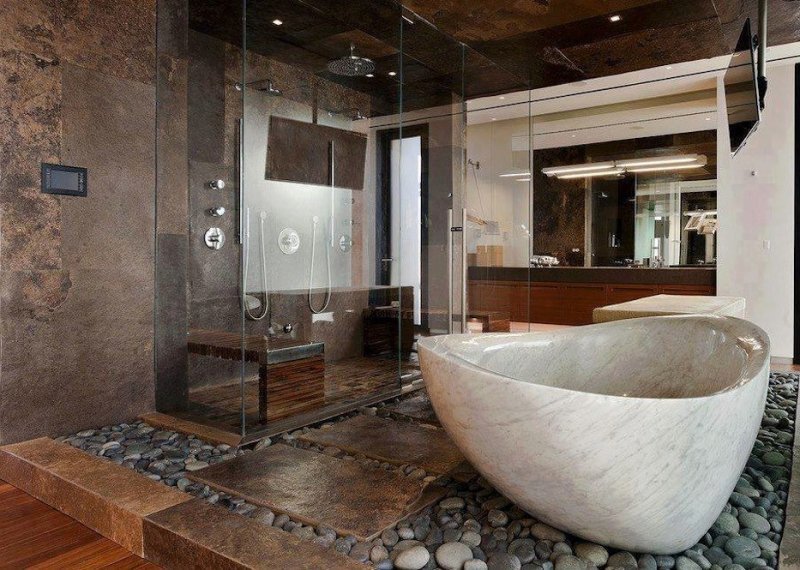
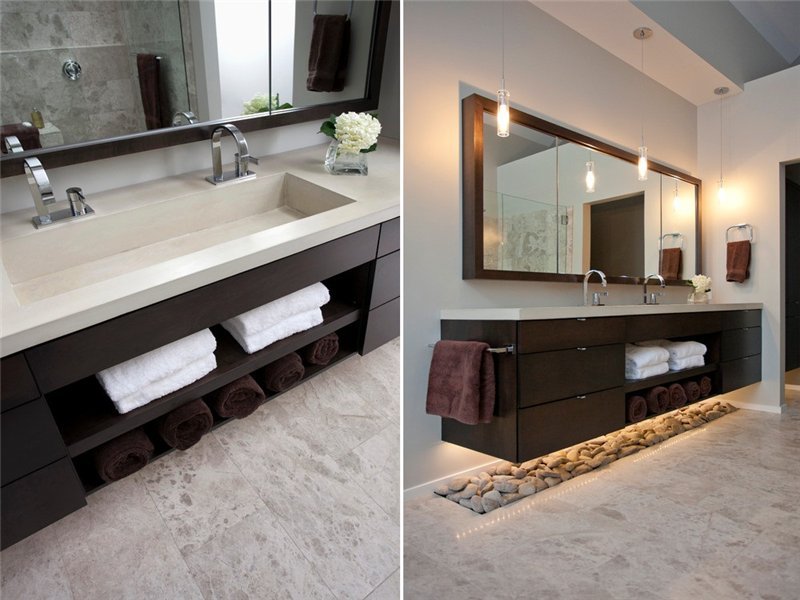
River pebbles were used to fill the gap between the podium and the floor. The “stone” theme started by the pebble strip was continued with natural limestone slabs laid on the floor.
You'll never guess what a wall-mounted washbasin is made of. Marble? Colored acrylic? No! This is maple, painted a rich black-brown color.
Storage space was created in the cabinet above the sink, closed with mirrored doors. The design of the washbasin looked too massive, so I placed it in a niche, now it does not take away volume from the room. The sink was once a piece of polished concrete, which was previously treated with a special impregnation.
The lighting issue required a well-thought-out solution. An LED strip was built under the washbasin and wooden podium so that it illuminated the laid river pebbles. Overhead lighting – pendant lamps in the shape of glass cylinders with a laconic design.
A convenient and functional solution was a built-in shower cabin designed for two. The area of the structure and the mounted overhead shower on one side and a hand shower on the other allow you to take a shower at the same time. Zoning of the space is provided by a built-in bench.
Used in the interior:
- mixer – R10 Series 3FRTL Rubinet;
- floor tiles – Arctic Gray limestone Daltile;
- bath – Barcelona Victoria and Albert;
- lighting fixtures – Top-si Coax Pendant LBL;
- mixer – R10 Series 1BRTL Rubinet.
Philosophy of stone - what to combine pebbles with in bathroom design
So, if you decide that there must be a place for simple stones in your bathroom, approach your choice responsibly
- Form. In the design of a bathroom that is focused on naturalness and naturalness, there should be no sharp corners. Even if the sink and bathtub are rectangular in shape, it should be as streamlined as possible.
By the way, such forms are the most popular among designers this year; to understand this, just look at the interior insert. Pay attention to the Tiberino Cielo and Gessi Equilibrium models. Looking at the last copy, the saying “water does not flow under a lying stone” is born, and indeed it will not flow until you move it.
There should be no excess in forms. Focus on Japanese minimalism, which promotes the rejection of excess. An example of this is the Saltodaqua Flaminia shell - a tribute to Japanese tradition and tea ritual.
- Color. Colored ceramics are in favor, but not bright, but natural: olive, light brown, wood shades. Depending on the pebble color chosen, the furniture can be light gray or almost black, for example the Catino Cipria Cielo washbasin model or the Bonola Flaminia toilet.
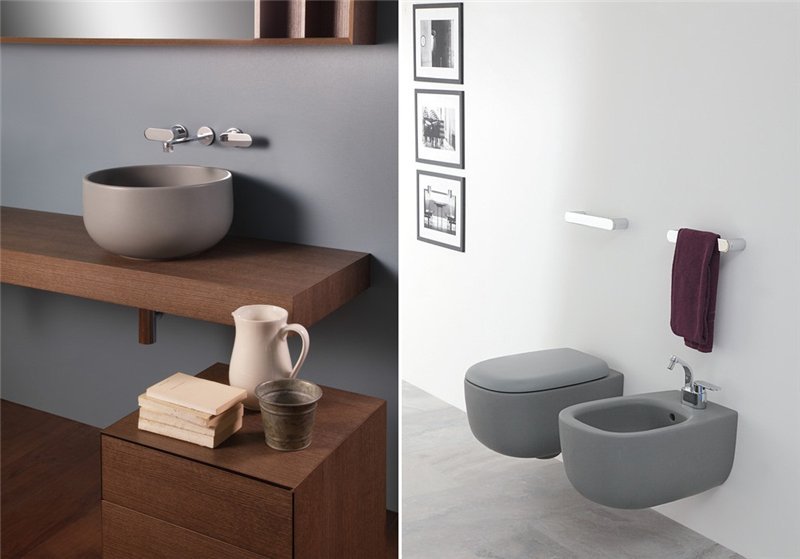
- Alternative – black. Avoid shiny chrome faucets and opt for black.
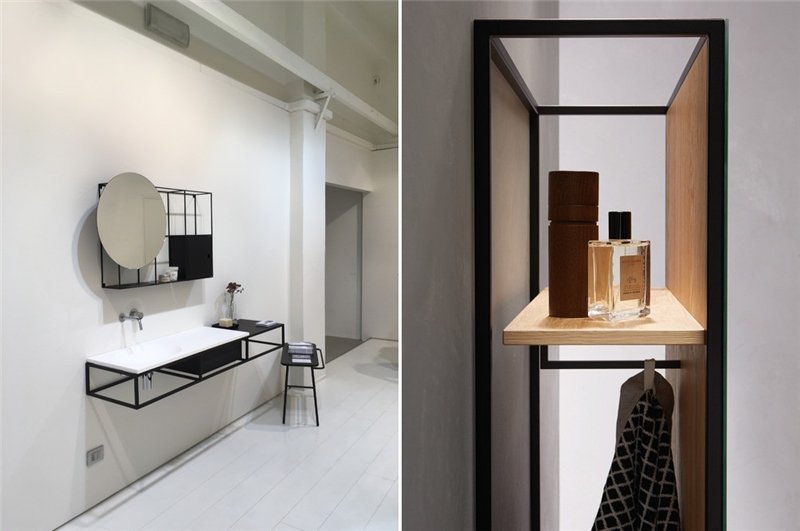
- Light furniture. So, let's move on to choosing furniture. Pebbles in the bathroom interior will not tolerate proximity to bulky cabinets and chests of drawers. The design should be as lightweight as possible, preferably frame. Feel free to choose minimalist hanging consoles with a metal open frame, such as the Norm Architects Ex.t Via Tortona 34 model.
- Neighbor - marble. White marble with a network of gray veins can coexist with pebbles. An excellent solution for finishing the floor!
Pebbles: how, where, why?
- Individual pebbles. Pebbles are selected according to size and color, secured with tile adhesive, and the seams are rubbed. The method is labor-intensive, so it is suitable exclusively for finishing small fragments of the wall; it is often combined with tiles or moisture-resistant plaster.
- Pebble mosaic tiles. In this version, individual pebbles are initially glued onto a fiberglass mesh. The color and size combinations have already been selected for you, all you have to do is secure the fragments with regular tile adhesive.
Black pebbles - bathroom tiles for finishing the floor and walls of the shower stall
- Pebble mat. The simplest option that you can easily implement with your own hands. The stones are attached to fabric or rubber and used anywhere in the bathroom.

- embankment. The method is more decorative than practical. Pebbles are poured into floor or wall niches and, if desired, fixed with glue.
So, having dealt with the possible options, let's move on to the practical part.
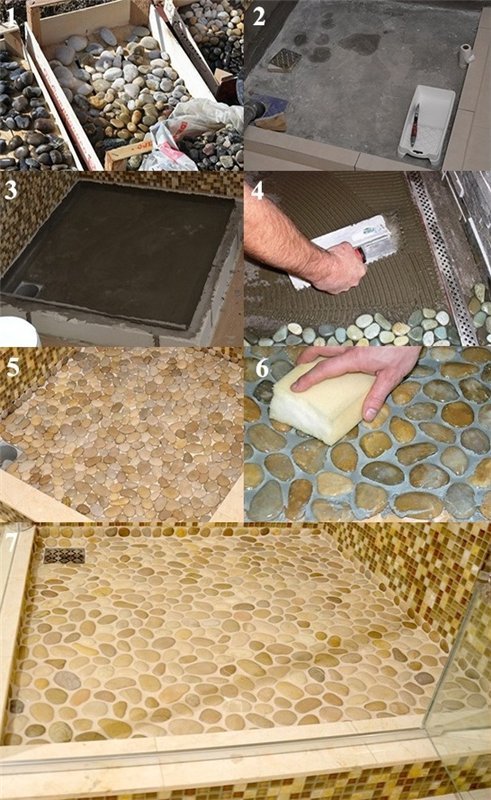
Option No. 1 – pebble tiles
Pebble floor tiles are sold in small squares measuring 30x30 cm, each square holds from 50 to 60 pebbles. Due to the transparent mesh base and wavy edge, the joints are almost invisible.
Tools and materials:
- tile;
- tile adhesive;
- primer;
- grout;
- water repellent;
- roller or wide brush;
- rubber spatula;
- notched spatula;
- sponge.
| Stage | Instructions for carrying out |
| Preparatory | The tiles are laid on a previously prepared, leveled surface. Levelness is assessed using a level; large cracks and potholes are covered with self-leveling mortar or cement screed. Small irregularities can be left; they will be leveled with tile adhesive. A primer is applied to the prepared base using a brush or short-haired roller to enhance the adhesion of the glue. Please note that deep-penetrating primer mixtures with a moisture-proof effect that do not contain solvents are used for the bathroom.
|
| Basic | Before fixing the tiles, lay them out to dry. At this stage, individual elements are trimmed with a knife for the most accurate joining. To lay tiles, adhesive for porcelain tiles or natural stone is used. The glue is mixed with water and thoroughly mixed until a creamy thick mass is formed. Laying begins from the far wall. The adhesive is applied using a notched trowel to an area of 2-3 tiles (up to 1 m). Make sure that the adhesive layer does not exceed 1-1.5 cm. A mesh with pebbles is placed on top, leveled and pressed with the palm of your hand, a metal trowel or a piece of plywood.
|
| Final | It will take about two days for the glue to dry completely, after which you can start grouting the joints. You can use a regular tile fugue or a tinted mixture, the color of the latter is determined by the shade of the stones and the overall design of the bathroom. The mixture is applied by rubbing movements using a rubber spatula. After the grout has set (20-30 minutes), excess mass is removed from the stones with a damp sponge. The next day, the tiles are treated with a water repellent - an impregnation that helps protect the stones from moisture.
|
Option No. 2 – floor made of individual stones
In this case, use separate pebbles, collected with your own hands on the beach or purchased in bulk.
Tools and materials:
- tile adhesive;
- pebbles;
- grout;
- brush;
- sponge;
- notched spatula.
Sequence of work:
- Surface preparation is carried out using the technology described above and includes leveling, priming and waterproofing work (if necessary).
- For the mosaic, stones that are as similar in size and shape as possible are selected. Color sorting is also performed in advance.
- Stones that were purchased in bulk or collected independently require preparation. Each pebble is treated with a metal brush and washed with soapy water.
- Glue is applied to a small area of the floor (thickness 1-1.5 cm). Each pebble is “set” on the glue and recessed by 1/3.
- After 2 days you can start grouting the joints.
Option No. 3 – pebble rug
Want to create a piece of pebble beach? A portable mat option is for you!
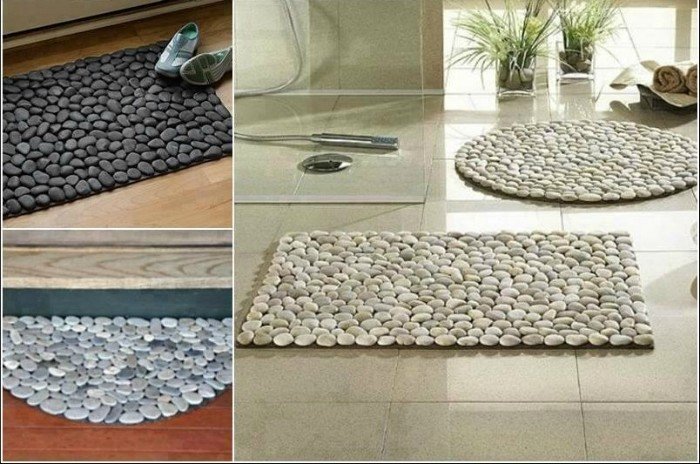
So, we need:
- flat thin pebbles;
- rubber mat of suitable size and shape;
- transparent waterproof glue.
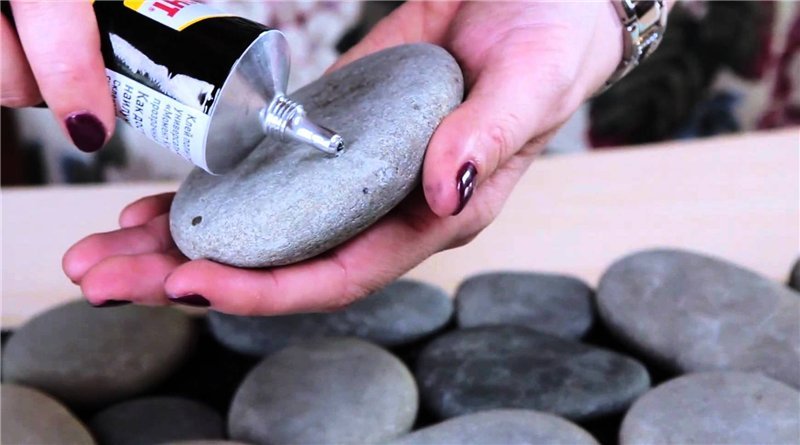
- The stones are sorted by size and color, washed and dried.
- The stones are tried on, laid out “dry”. You can lay out a plain surface, an ornament or an inscription.
- Each individual element is glued onto a rubber base and pressed.
- After drying, apply 1-2 layers of varnish.
If you don't plan to apply varnish, wax the pebbles. This will give the surface not only shine, but also water-repellent properties.
Summing up
Natural materials never go out of fashion; they exist outside of time. Inconspicuous at first glance, stones can set the tone for the entire interior. Don't believe me? Try it!
All I have to do is offer you a video in this article and an interesting conversation in the comments about how to use pebbles in decoration.
August 21, 2016If you want to express gratitude, add a clarification or objection, or ask the author something - add a comment or say thank you!